 |
am3zzw00016658
PCM REMOVAL/INSTALLATION [MZ-CD 1.6]
id0140e7802400
1. Remove the battery cover. (See BATTERY REMOVAL/INSTALLATION [MZ-CD 1.6].)
2. Disconnect the negative battery cable.
3. Remove the LH wheel and tire.
4. Remove the LH mudguard.
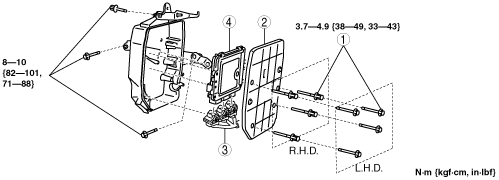
5. Remove in the order indicated in the table.
6. Install in the reverse order of removal.
am3zzw00016658
|
|
1
|
Set bolt (R.H.D.)
(See Set Bolt Removal Note.)
(See Set Bolt Installation Note.)
|
|
Bolt (L.H.D.)
|
|
|
2
|
PCM cover
|
|
3
|
PCM connector
(See PCM Connector Removal Note.)
|
|
4
|
PCM
|
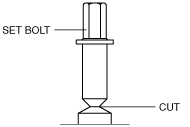
Set Bolt Removal Note
1. Using a chisel and a hammer, cut a groove on the head of the set nut/bolt so that a screwdriver can be inserted.
2. Loose the set nut/bolt using an impact screwdriver or pliers.
am3zzw00010389
|
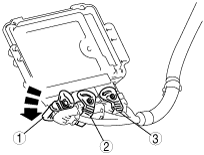
PCM Connector Removal Note
1. Detach the PCM electrical connectors in the sequence shown.
am3zzw00016659
|
PCM Removal/Installation Note
1. When replacing with a new PCM, perform the following procedure:
PCM Connector Connection Note
acxaaw00000768
|
1. Verify that the PCM connector lever is tilted towards the wiring harness side as shown in the figure.
acxaaw00000766
|
2. Insert the PCM connector straight until it contacts the PCM and verify that the lever reverts upward naturally.
3. Push the lever until a click is heard.
acxaaw00000767
|
Set Bolt Installation Note
1. Install a new set nut/bolt and tighten it until the neck of the nut/bolt is cut.
am3zzw00010391
|