 |
am3zzw00014121
REAR VEHICLE MONITORING BRACKET REMOVAL/INSTALLATION
id092200014900
1. Disconnect the negative battery cable. (See NEGATIVE BATTERY CABLE DISCONNECTION/CONNECTION [SKYACTIV-G 1.5, SKYACTIV-G 2.0, SKYACTIV-G 2.5].) (See NEGATIVE BATTERY CABLE DISCONNECTION/CONNECTION [SKYACTIV-D 2.2].) (See NEGATIVE BATTERY CABLE DISCONNECTION/CONNECTION [MZR 1.6].)(See NEGATIVE BATTERY CABLE DISCONNECTION/CONNECTION [SKYACTIV-D 1.5].)
2. Remove the following parts:
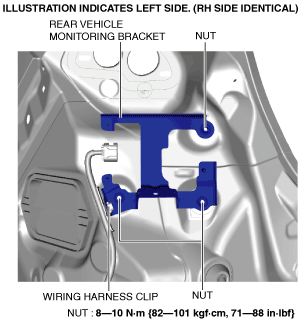
3. Pull out the wiring harness clip.
am3zzw00014121
|
4. Remove the nuts.
5. Remove the rear vehicle monitoring bracket.
6. Install in the reverse order of removal.
7. Perform the rear vehicle monitoring radar aiming procedure. (See REAR VEHICLE MONITORING RADAR AIMING.)