DIAGNOSTIC ASSIST FUNCTION
id0902f6361100
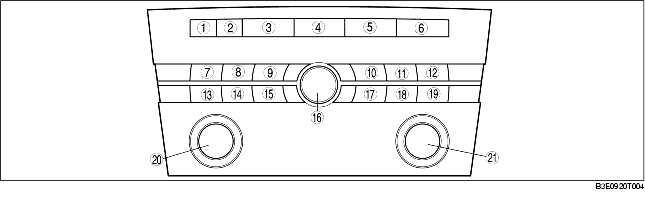
Structural View
Buttons
.
|
1
|
CLOCK button
|
|
2
|
INFO button (with drive information system)
|
|
SET button (without drive information system)
|
|
3
|
FM1/2 button
|
|
4
|
AM button
|
|
5
|
CD button
|
|
6
|
TAPE/MD button
|
|
7
|
SEEK UP button (with RDS)
|
|
Preset button "1" (without RDS)
|
|
8
|
TA button (with RDS)
|
|
Preset button "2" (without RDS)
|
|
9
|
PTY button (with RDS)
|
|
Preset button "3" (without RDS)
|
|
10
|
Preset button "1" (with RDS)
|
|
RPT button (with RDS)
|
|
11
|
Preset button "2" (with RDS)
|
|
SCAN button (without RDS)
|
|
12
|
Preset button "3" (with RDS)
|
|
SEEK UP button (without RDS)
|
|
13
|
SEEK DOWN button (with RDS)
|
|
Preset button "4" (without RDS)
|
|
14
|
PROG button (with RDS)
|
|
Preset button "5" (without RDS)
|
|
15
|
AF button (with RDS)
|
|
Preset button "6" (without RDS)
|
|
16
|
POWER/VOLUME button
|
|
17
|
Preset button "4" (with RDS)
|
|
RDM button (without RDS)
|
|
18
|
Preset button "5" (with RDS)
|
|
PROG button (without RDS)
|
|
19
|
Preset button "6" (with RDS)
|
|
SEEK DOWN button (without RDS)
|
|
20
|
TUNE/TEXT/AUTO-M button (with RDS)
|
|
AUDIO CONT button (without RDS)
|
|
21
|
AUDIO CONT button (with RDS)
|
|
TUNE/TEXT/AUTO-M button (without RDS)
|
LCD Inspection
1. With the audio power on, press the POWER button and simultaneously press the SEEK button (upper) for approx. 1 s.
2. Inspect according to the following table:
|
INSPECTION
|
DISPLAY
|
ACTION
|
|
Start the LCD inspection mode.
|

|
The characters displayed on the LCD are not truncated or faint.
|
The LCD is normal.
|
|
Except above
|
Replace the information display.
|
3. Turn the audio off or the ignition switch to the LOCK position to stop the diagnostic assist function.
Button Inspection
1. With the audio power on, press the POWER button and simultaneously press the CLOCK button for approx. 1 s.
2. Inspect according to the following table:
|
INSPECTION
|
DISPLAY
|
ACTION
|
|
• Start the button inspection mode.
• Press all buttons.
|
-
|
The buzzer sounds.
|
The button is normal.
|
|
The buzzer does not sound.
|
Replace the base unit.
|
3. Turn the audio off or the ignition switch to the LOCK position to stop the diagnostic assist function.
Speaker Inspection
1. With the audio power on, press the POWER button and simultaneously press the AUTO-M button for approx. 1 s.
2. Inspect according to the following table:
|
INSPECTION
|
DISPLAY
|
ACTION
|
|
• Start the speaker inspection mode.
• Does each speaker output sound in the following order?
-
1. Front passenger-side door speaker and tweeter
-
2. Front driver-side door speaker and tweeter
-
3. Driver-side rear door speaker
-
4. Passenger-side rear door speaker
|
-
|
Yes
|
Speakers, and wiring harness between the base unit and speakers are normal.
|
|
No
|
• Inspect the following parts.
-
- Malfunctioning speaker
-
- Wiring harness between base unit and malfunctioning speaker
|
3. Turn the audio off or the ignition switch to the LOCK position to stop the diagnostic assist function.
Radio Reception Condition Inspection
1. With the audio power on, press the POWER button and simultaneously press the PRESET 2 button for approx. 1 s.
2. Inspect according to the following table:
-
Caution
-
• Even if the system is normal, radio reception may be difficult depending on where the system is inspected (indoors/outdoors, or conditions at the location). Before inspecting the system, verify that radio reception is adequate.
-
• When inspecting, select a frequency band (radio station) with the best reception.
|
INSPECTION
|
DISPLAY
|
ACTION
|
|
Start the radio reception condition inspection mode.
|

|
Antenna, antenna feeder and base unit are normal
|
|
|
Change the frequency (radio station) and inspect again.
|
|
|
Inspect the antenna and antenna feeder.
-
• If either the antenna or the antenna feeder is not normal, replace the malfunctioning part.
-
• If the antenna and antenna feeder are normal, replace the base unit.
|
3. Turn the audio off or the ignition switch to the LOCK position to stop the diagnostic assist function.