PRIMARY SHAFT COMPONENTS INSPECTION
id051500803100
4th Gear, 3rd Gear Inspection
1. Inspect the synchronizer cones for wear.
-
• If there is any malfunction, replace parts if necessary.
2. Inspect the gear teeth for damage, wear, and cracks.
-
• If there is any malfunction, replace parts if necessary.
3. Inspect the synchronizer ring matching teeth for damage and wear.
-
• If there is any malfunction, replace the synchronizer ring.
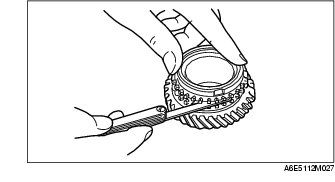
4th Synchronizer Ring, 3rd Synchronizer Ring Inspection
1. Inspect the synchronizer ring teeth for damage, wear, and cracks.
-
• If there is any malfunction, replace parts if necessary.
2. Inspect the tapered surface for wear and cracks.
-
• If there is any malfunction, replace parts if necessary.
3. Measure the clearance between the synchronizer ring and the flank surface of the gear.
-
• If it is less than the minimum specification, replace the synchronizer ring.
-
Note
-
• Set the synchronizer ring squarely in the gear and measure around the circumference.
3rd and 4th gear synchronizer ring clearance
-
Standard: 1.50 mm {0.059 in}
-
Minimum: 0.80 mm {0.031 in}
3rd/4th Clutch Hub Component Inspection
1. Inspect the clutch hub sleeve and hub operation.
-
• If there is any malfunction, replace parts if necessary.
2. Inspect the gear teeth for damage, wear, and cracks.
-
• If there is any malfunction, replace parts if necessary.
3. Inspect the synchronizer keys for damage, wear, and cracks.
-
• If there is any malfunction, replace parts if necessary.
4. Measure the clearance between the hub sleeve and shift forks.
-
• If it exceeds the maximum specification, replace the hub sleeve and shift fork as a set.
3rd/4th clutch hub sleeve and shift fork clearance
-
Standard: 0.10-0.40 mm {0.004-0.015 in}
-
Maximum: 0.90 mm {0.035 in}
Primary Shaft Gear Inspection
1. Inspect the gear contact surface for damage and wear.
-
• If there is any malfunction, replace the primary shaft.
2. Inspect the splines for damage and wear.
-
• If there is any malfunction, replace the primary shaft.
3. Inspect the gear teeth for damage, wear, and cracks.
-
• If there is any malfunction, replace the primary shaft.
4. Inspect the oil passage for clogging.
-
• If there is any malfunction, replace the primary shaft.
5. Measure the shaft gear runout.
-
• If it exceeds the maximum specification, replace the primary shaft.
Primary shaft gear maximum runout
-
0.050 mm {0.0020 in}
6. Measure the clearance between the shaft gears and the gears.
-
• If not within the specification, replace parts if necessary.
3rd and 4th gear oil clearance (mm {in})
|
Gear
|
Shaft (Outer dia.)
|
Gear (Inner dia.)
|
Clearance
|
|
3rd
|
35.945-35.970 {1.415-1.416}
|
36.000-36.025 {1.417-1.418}
|
0.030-0.080 {0.001-0.003}
|
|
4th
|
30.945-30.970 {1.218-1.219}
|
31.000-31.025 {1.220-1.221}
|
