REAR SASH MOLDING INSTALLATION
id091600807100
-
Note
-
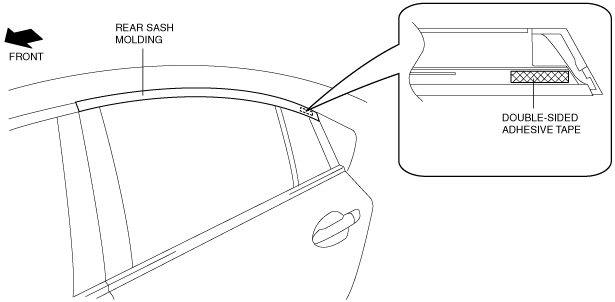
• Double-sided adhesive tape has already been attached to the new rear sash molding.
-
Warning
-
• Using a razor with bare hands can cause injury. Always wear gloves when using a razor.
1. When installing a new rear sash molding, follow the procedure below:
- (1) Remove the adhesive remaining on the body using razor.
- (2) Remove any grease or dirt from the adhesion surface of the body.
2. When reusing the rear sash molding, follow the procedure below:
- (1) Remove the adhesive remaining on the rear sash molding and the body using a razor.
- (2) Remove any grease or dirt from the adhesion surface of the rear sash molding and the body.
- (3) Apply primer to the bonding area of the rear sash molding.
- (4) Affix double-sided adhesive tape to the rear sash molding as shown in the figure.
-
-
Note
-
• As for the double-sided adhesive tape, use 3M GT7120 or equivalent.
3. Peel off the backing of the double-sided adhesive tape.
4. Hook tab B to the body in the position where tab A align with the sash holes.
5. Press the rear sash molding in the direction of the arrow and install tabs A to the body.
-
Caution
-
• Do not press the rear sash molding in any place other than the rubber areas.
6. Press the rear sash molding from the vehicle front in the direction of the arrow and install tab C.
-
Note
-
• After installing the rear sash molding, verify that tabs B and C are connected properly to the body.