CYLINDER HEAD ASSEMBLY (I)


id011000504300

Caution
•  The end of the glow plug protrudes from the cylinder head (tightened surface of cylinder block). When removing/installing the cylinder head and placing the cylinder head on a workbench, be careful not to allow the end of the glow plug to contact the cylinder block or workbench. Otherwise, the end of the glow plug could be damaged.

1.  Assemble in the order indicated in the table.

bes2ze00000154

1
Oil control plug
2
Lower valve spring seat
3
Valve seal
4
Valve
5
Valve spring
6
Upper valve spring seat
7
Valve keeper
8
OCV oil filter, plug
9
OCV
10
Seal cover bracket


Valve Seal Assembly Note

1.  Place the valve seal on the valve guide.

Valve seal identification color
IN: GREEN
EX: GRAY

2.  Set the SST to the valve seal in the direction shown in the figure.

bes2ze00000055

Caution
•  Do not insert the SST with the force of 450 N {45.9 kgf, 101 lbf} or more.

3.  Press in the SST by hand and install the valve seal to the valve guide.

4.  Measure the height of the valve seal.

•  If it exceeds the standard, press in the valve seal again.
bes2ze00000155
Valve seal height
IN: 16.80 mm {0.6614 in}
EX: 17.91 mm {0.7051 in}


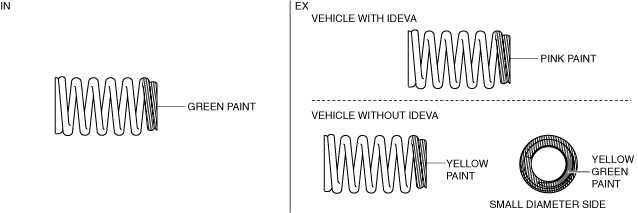
Valve Spring Assembly Note

Caution
•  The valve springs differ depending on IN and EX sides. Therefore, verify the identification paint beforehand and assemble the valve springs correctly.
bes2ze00000156

1.  Assemble the valve spring with the small diameter side of the valve spring facing upward.


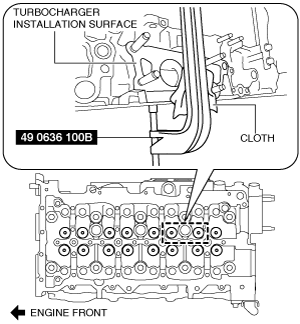
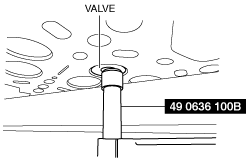
Valve Keeper Assembly Note


When using the SSTs (49 0636 100B, 49 B012 0A2A)

1.  Install the valve keeper using the SSTs.

bes2ze00000058

Caution
•  When removing/installing the valve keepers in the two locations shown in the figure out of the total 16 locations, the SST could contact the turbocharger installation surface of the cylinder head and damage the cylinder head. Insert a rag between the cylinder head and SST before performing the work. (Only vehicles with IDEVA)
bes2ze00000059
Note
•  When performing the work for the above two locations, the SST is slightly deviated from the center of the valve as shown in the figure. However, this does not indicate a malfunction.
bes2ze00000060


When using the SST (49 JE02 0A2) (Europe only)

1.  Install the valve keeper using the SST.

bes2ze00000061


OCV Assembly Note

Caution
•  If the OCV is dropped accidentally, replace with a new one. Otherwise, the OCV may not operate normally.
•  Do not allow foreign matter to get caught when installing. Otherwise, it could leak oil.
•  If the installation bolt is tightened with oil adhering, the bolt could be twisted and cut. Always degrease the bolt.