 |
am6zzw00010237
OIL COOLER REMOVAL/INSTALLATION [SKYACTIV-G 2.5 (WITH CYLINDER DEACTIVATION)]
id0111s9800800
1. Disconnect the negative battery terminal. (See NEGATIVE BATTERY TERMINAL DISCONNECTION/CONNECTION.)
2. Remove the front under cover No.2. (See FRONT UNDER COVER No.2 REMOVAL/INSTALLATION.)
3. Drain the engine coolant. (See ENGINE COOLANT REPLACEMENT [SKYACTIV-G 2.5 (WITH CYLINDER DEACTIVATION)].)
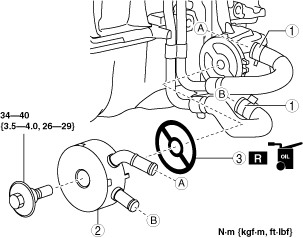
4. Remove in the order indicated in the table.
5. Use a clean rag to wipe off the mounting surface on the oil filter body and the oil cooler.
6. Install in the reverse order of the removal.
7. Refill the engine coolant. (See ENGINE COOLANT REPLACEMENT [SKYACTIV-G 2.5 (WITH CYLINDER DEACTIVATION)].)
8. Start the engine and confirm that there is no oil leakage.
9. Inspect the oil level. (See ENGINE OIL LEVEL INSPECTION [SKYACTIV-G 2.5 (WITH CYLINDER DEACTIVATION)].)
10. Inspect for engine coolant leakage. (See ENGINE COOLANT LEAKAGE INSPECTION [SKYACTIV-G 2.5 (WITH CYLINDER DEACTIVATION)].)
am6zzw00010237
|
|
1
|
Water hose
|
|
2
|
Oil cooler
(See Oil Cooler Installation Note.)
|
|
3
|
Gasket
(See Gasket Installation Note.)
|
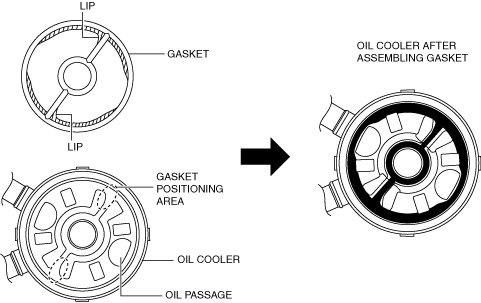
Gasket Installation Note
1. Apply engine oil to a new gasket.
2. Align the gasket lip to the gasket positioning areas of the oil cooler and assemble the gasket to the oil cooler.
am6zzw00010238
|
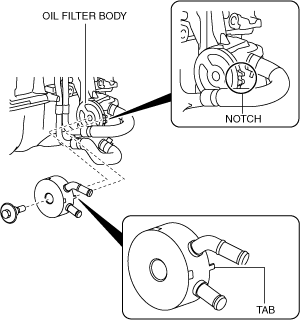
Oil Cooler Installation Note
1. Install the oil cooler with the tab aligned with the notch of the oil filter body.
am6zzw00010239
|