Note
• Shine light into the thermo valve from the direction shown in the figure and inspect.
ac8wzw00002573
|
THERMO VALVE INSPECTION [SKYACTIV-D 2.2]
id0112s6809800
ac8wzw00002573
|
1. Remove the thermo valve. (See THERMO VALVE REMOVAL/INSTALLATION [SKYACTIV-D 2.2].)
2. Inspect the thermo valve at normal temperature. (See Inspection at Normal Temperature.)
3. Inspect the thermo valve at high temperature. (See Inspection at High Temperature.)
4. Install the thermo valve. (See THERMO VALVE REMOVAL/INSTALLATION [SKYACTIV-D 2.2].)
Inspection at Normal Temperature
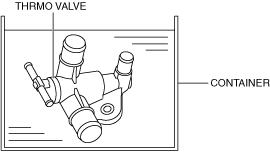
1. Place the thermo valve into a container filled with water.
ac8wzw00002574
|
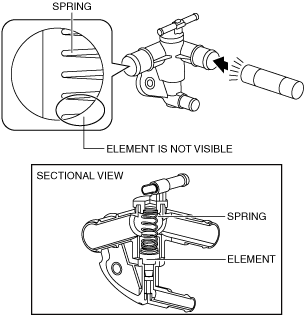
2. Remove the thermo valve from the container.
3. Shine light into the thermo valve from the direction shown in the figure and verify the element condition.
ac8wzw00002575
|
Inspection at High Temperature
1. Place the thermo valve into a container filled with water of 90 °C {194 °F} or more and wait for 5 min.
ac8wzw00002574
|
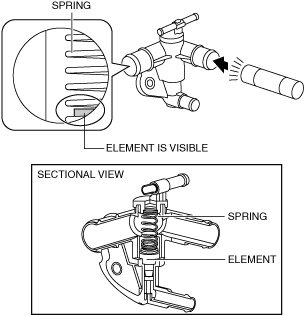
2. Remove the thermo valve from the container.
3. Shine light into the thermo valve from the direction shown in the figure and verify the element condition.
ac8wzw00002576
|