|
am6zzw00016168
PRESSURE SENSOR REMOVAL/INSTALLATION [TWO-STEP DEPLOYMENT CONTROL SYSTEM]
id0810b1810100
1. Switch the ignition off.
2. Disconnect the negative battery terminal and wait for 1 min or more. (See NEGATIVE BATTERY TERMINAL DISCONNECTION/CONNECTION.)
3. Remove the front door trim. (See FRONT DOOR TRIM REMOVAL/INSTALLATION.)
4. Remove the bolts.
am6zzw00016168
|
5. Disconnect the connector. (See Connector Disconnect Note.)
6. Remove the pressure sensor.
7. Install in the reverse order of removal. (See Connector Installation Note.)
8. Switch the ignition ON (engine off or on).
9. Verify that the air bag/seat belt pre-tensioner system warning light illuminates for approx. 6 s and turns off.
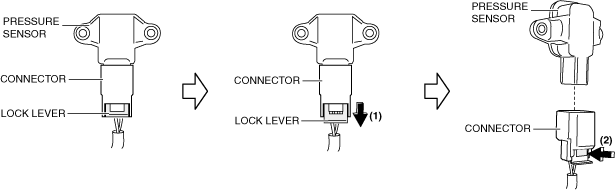
Connector Disconnect Note
1. Pull out the connector lock lever in the direction of arrow (1) shown in the figure.
am6zzw00016169
|
2. While pressing the area indicated by arrow (2) shown in the figure, disconnect the connector.
Connector Installation Note