|
am6xuw00011790
FRONT SCUFF PLATE REMOVAL/INSTALLATION
id091700801400
Front Scuff Plate (Inner)
1. Hold area A shown in the figure, open the front scuff plate (inner) in the direction of arrow (1), move it in the direction of arrow (2), and detach tab A of the front scuff plate (inner) from the inner panel.
am6xuw00011790
|
2. Hold the shaded area shown in the figure, move the front scuff plate (inner) in the direction of arrow (3), and detach tab B of the front scuff plate (inner) from the inner panel.
3. Hold area A shown in the figure, open the front scuff plate (inner) in the direction of arrow (1), move it in the direction of arrow (2), and detach tab A of the front scuff plate (inner) from the B-pillar lower trim.
am6xuw00011791
|
4. Hold the shaded area shown in the figure, move the front scuff plate (inner) in the direction of arrow (3), and detach tab B of the front scuff plate (inner) from the inner panel.
5. Hold the shaded area shown in the figure, move the front scuff plate (inner) in the direction of arrow (1), and detach the clips from the inner panel.
am6xuw00011792
|
6. Hold the shaded area shown in the figure, move the front scuff plate (inner) in the direction of arrow (2), and detach the clips from the inner panel.
7. Pull out the pins and remove the front scuff plate (inner).
8. Install in the reverse order of removal.
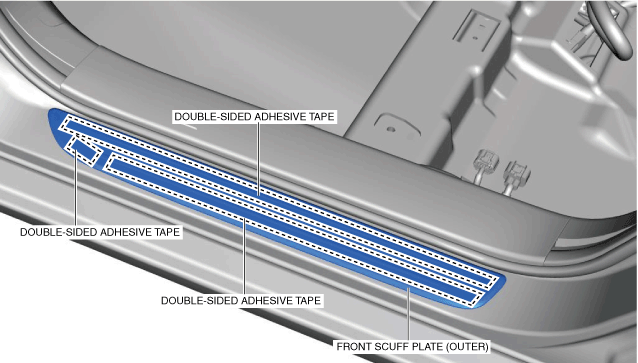
Front Scuff Plate (Outer)
Removal
1. Remove the front scuff plate (outer) while peeling off the double-sided adhesive tape in the positions shown in the figure.
am6xuw00011793
|
Installation
1. Degrease and clean the installation surface of the front scuff plate (outer).
2. Heat the installation surface of the front scuff plate (outer) to approx. 15°C {27°F} to 40° C {72°F} using a heat gun.
3. Install the front scuff plate (outer) to the position shown in the figure.
am6xuw00011794
|