 |
COURTESY LIGHT REMOVAL/INSTALLATION
id091800818100
Front
1. Disconnect the negative battery terminal. (See NEGATIVE BATTERY TERMINAL DISCONNECTION/CONNECTION.)
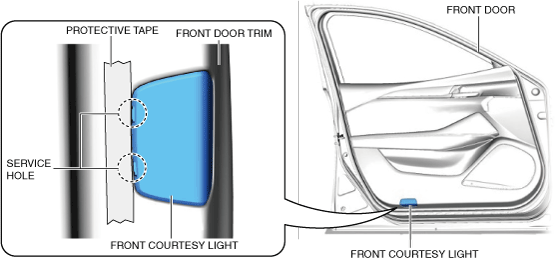
2. To prevent scratches or damage, affix protective tape to the position shown in the figure.
am6xuw00011363
|
3. Insert a tape-wrapped flathead screwdriver into the service hole in the position shown in the figure.
4. Move the flathead screwdriver in the direction of the arrow shown in the figure to detach the front courtesy light tabs from the front door trim.
am6xuw00011364
|
5. Move the front courtesy light in the direction of the arrow (1), (2) and remove the front courtesy light.
am6xuw00011365
|
6. Disconnect the connector.
am6xuw00011366
|
7. Install in the reverse order of removal.
Rear
1. Disconnect the negative battery terminal. (See NEGATIVE BATTERY TERMINAL DISCONNECTION/CONNECTION.)
2. To prevent scratches or damage, affix protective tape to the position shown in the figure.
am6xuw00011367
|
3. Insert a tape-wrapped flathead screwdriver into the service hole in the position shown in the figure.
4. Move the flathead screwdriver in the direction of the arrow shown in the figure to detach the rear courtesy light tabs from the rear door trim.
am6xuw00011368
|
5. Move the rear courtesy light in the direction of the arrow (1), (2) and remove the rear courtesy light.
am6xuw00011369
|
6. Disconnect the connector.
am6xuw00011370
|
7. Install in the reverse order of removal.