 |
am6zzw00007984
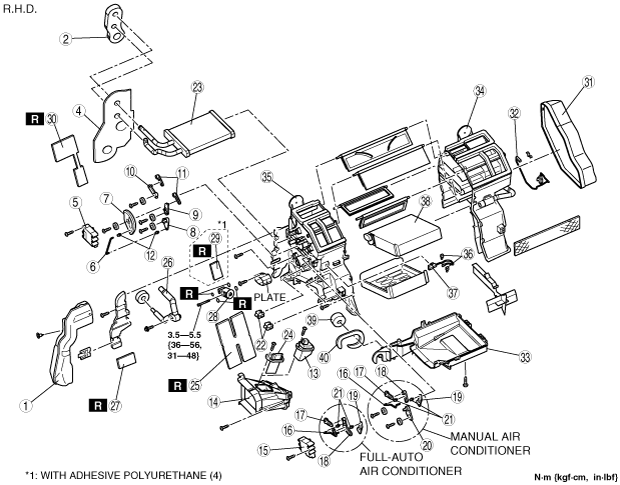
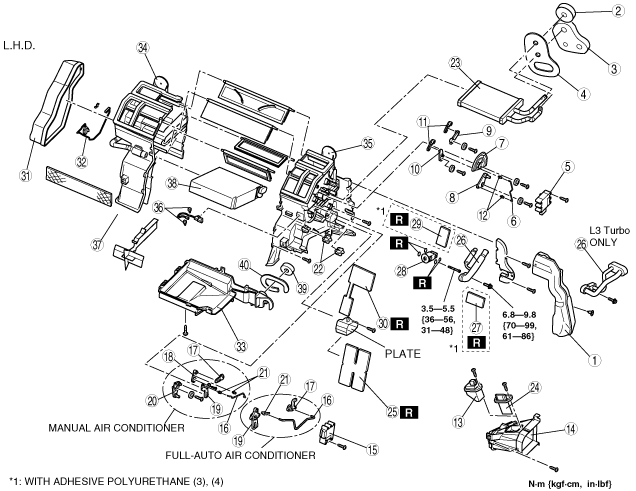
A/C UNIT DISASSEMBLY/ASSEMBLY
id071100800300
1. Disassemble in the order indicated in the table.
2. Assemble in the reverse order of disassembly.
am6zzw00007984
|
am6zzw00007985
|
|
1
|
Duct (1)
|
|
2
|
Polyurethane protector (1)
|
|
3
|
Polyurethane protector (2)
|
|
4
|
Polyurethane protector (3)
|
|
5
|
Airflow mode actuator (full-auto air conditioner)
|
|
6
|
Airflow mode rod (manual air conditioner)
|
|
7
|
Airflow mode main link
|
|
8
|
Airflow mode sub link (1) (manual air conditioner)
|
|
9
|
Airflow mode sub link (2)
|
|
10
|
Airflow mode sub link (3)
|
|
11
|
Airflow mode crank
|
|
12
|
Airflow mode rod holder (manual air conditioner)
|
|
13
|
Power MOS FET (full-auto air conditioner)
|
|
14
|
Duct (2)
|
|
15
|
Air mix actuator (full-auto air conditioner)
|
|
16
|
Air mix rod
|
|
17
|
Air mix crank (1)
|
|
18
|
Air mix link (1)
|
|
19
|
Air mix crank (2)
|
|
20
|
Air mix link (2) (manual air conditioner)
|
|
21
|
Air mix rod holder
|
|
22
|
Wire clamp (manual air conditioner)
|
|
23
|
Heater core
|
|
24
|
Resistor (manual air conditioner)
|
|
25
|
Adhesive polyurethane (1)
|
|
26
|
Outlet pipe
|
|
27
|
Adhesive polyurethane (3)
|
|
28
|
Expansion valve
|
|
29
|
Adhesive polyurethane (4)
|
|
30
|
Adhesive polyurethane (2)
|
|
31
|
Duct (3)
|
|
32
|
Water temperature sensor (full-auto air conditioner)
|
|
33
|
A/C case (3)
(See A/C Case Assembly Note.)
|
|
34
|
A/C case (1)
(See A/C Case Assembly Note.)
|
|
35
|
A/C case (2)
(See A/C Case Assembly Note.)
|
|
36
|
Sensor clamp
(See Sensor Clamp Assembly Note.)
|
|
37
|
Evaporator temperature sensor
|
|
38
|
Evaporator
|
|
39
|
Polyurethane protector (4)
|
|
40
|
Adhesive polyurethane (5)
|
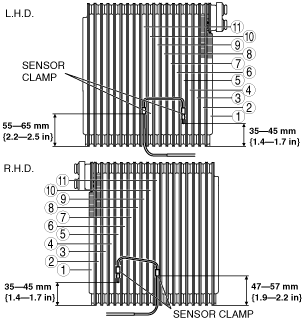
Evaporator Temperature Sensor Assembly Note
1. Assemble the evaporator temperature sensor as shown in the figure.
am6zzw00007986
|
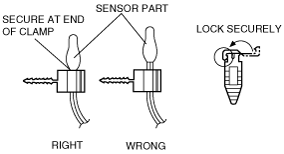
Sensor Clamp Assembly Note
1. Attach the sensor clamp as shown in the figure.
am6zzw00007987
|
A/C Case Assembly Note
am6zzw00007988
|
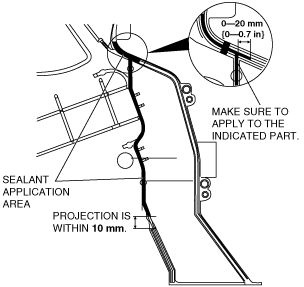
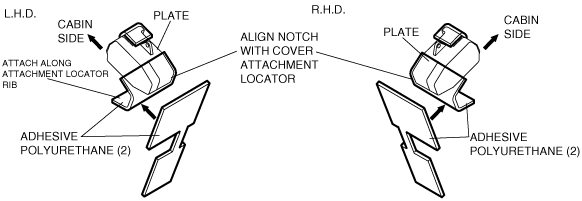
Adhesive polyurethane (2) Assembly Note
1. Attach the adhesive polyurethane (2) as shown in the figure.
am6zzw00007989
|
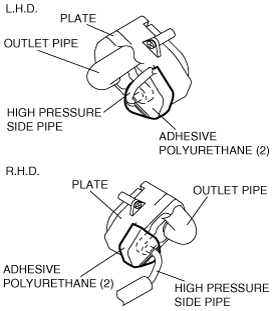
2. After assembling the outlet pipe as shown in the figure, attach the adhesive polyurethane (2) so that it adheres around the high-pressure side of the outlet pipe.
am6zzw00007990
|
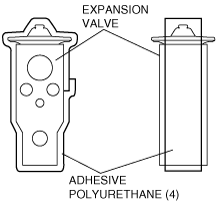
Adhesive polyurethane (4) Assembly Note
1. Attach the adhesive polyurethane (4) so that it adheres around the expansion valve.
am6zzw00007991
|
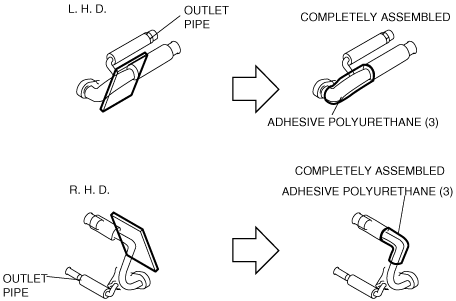
Adhesive polyurethane (3) Assembly Note
1. Attach the adhesive polyurethane (3) so that it adheres around the high-pressure side of the outlet pipe.
am6zzw00007992
|
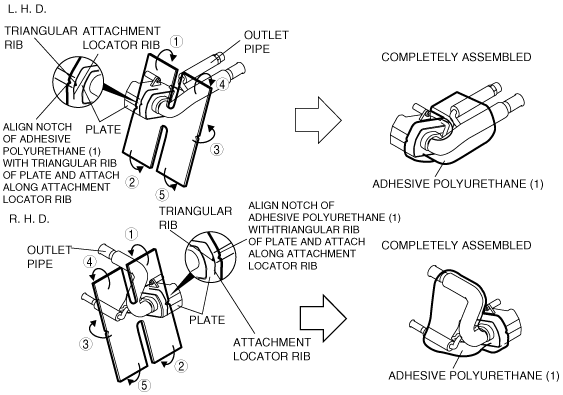
Adhesive polyurethane (1) Assembly Note
1. Attach the adhesive polyurethane (1) as shown in the figure.
am6zzw00007993
|