1. Disconnect the negative battery cable.
2. Remove the dashboard. (See DASHBOARD REMOVAL/INSTALLATION.)
3. Remove the blower motor. (See BLOWER MOTOR REMOVAL/INSTALLATION.)
4. Remove the resistor (Manual air conditioner) or power MOS FET (Full-auto air conditioner). (See RESISTOR REMOVAL/INSTALLATION.)
5. Remove the blower unit nuts.
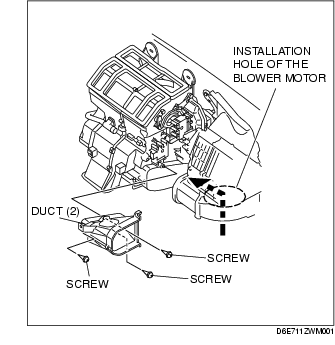
6. Remove the screw securing the duct (2) to the A/C unit, by inserting a phillips screwdriver into the hole made after removing the blower motor.
7. Remove the screw securing the duct (2) to the A/C unit.
8. Remove the duct (2).
9. Remove the blower unit.
10. Temporary install the blower unit.
11. Install in the duct (2).
12. Install the two outer screws, securing the duct (2) to the A/C unit.
13. Install the screw on the end of the phillips screwdriver with the packing tape.
14. Install the duct (2) to the A/C unit by inserting a phillips screwdriver, with the screw, into the hole made after removing the blower motor.
15. Pull out the phillips screwdriver together with the packing tape.
16. Install the blower unit nuts.
17. Install the resistor (Manual air conditioner) or power MOS FET (Full-auto air conditioner). (See RESISTOR REMOVAL/INSTALLATION.)
18. Install the blower motor. (See BLOWER MOTOR REMOVAL/INSTALLATION.)
19. Install the dashboard. (See DASHBOARD REMOVAL/INSTALLATION.)
20. Connect the negative battery cable.

