 |
am6zzw00012768
MAP LIGHT INSPECTION
id091800801300
Map Light (Bulb Type)
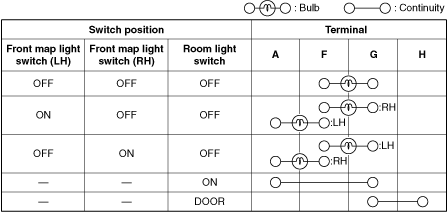
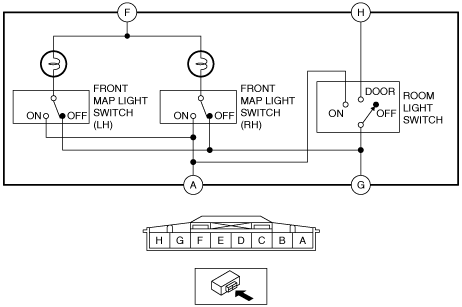
Front map light
1. Disconnect the negative battery cable. (See NEGATIVE BATTERY CABLE DISCONNECTION/CONNECTION [SKYACTIV-G 2.0, SKYACTIV-G 2.5 (WITHOUT i-stop)].) (See NEGATIVE BATTERY CABLE DISCONNECTION/CONNECTION [SKYACTIV-G 2.0, SKYACTIV-G 2.5].) (See NEGATIVE BATTERY CABLE DISCONNECTION/CONNECTION [SKYACTIV-D 2.2].)
2. Remove the front map light. (See MAP LIGHT REMOVAL/INSTALLATION.)
3. Verify that the continuity between the front map light terminals is as indicated in the table.
am6zzw00012768
|
am6zzw00014989
|
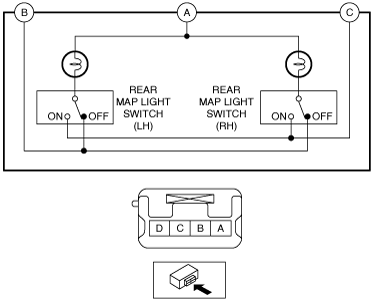
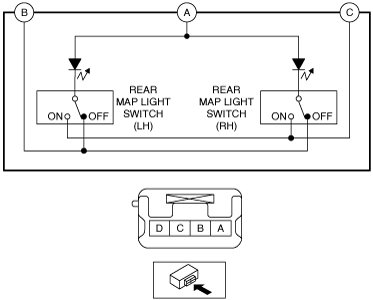
Rear map light
1. Remove the following parts:
2. Verify that the continuity between the rear map light terminals is as indicated in the table.
am6zzw00008047
|
am6zzw00008048
|
Map Light (LED Type)
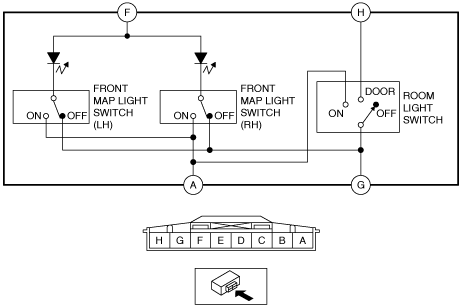
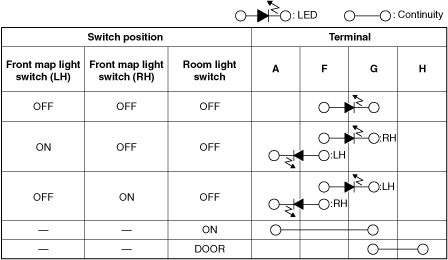
Front map light
1. Disconnect the negative battery cable. (See NEGATIVE BATTERY CABLE DISCONNECTION/CONNECTION [SKYACTIV-G 2.0, SKYACTIV-G 2.5 (WITHOUT i-stop)].) (See NEGATIVE BATTERY CABLE DISCONNECTION/CONNECTION [SKYACTIV-G 2.0, SKYACTIV-G 2.5].) (See NEGATIVE BATTERY CABLE DISCONNECTION/CONNECTION [SKYACTIV-D 2.2].)
2. Remove the front map light. (See MAP LIGHT REMOVAL/INSTALLATION.)
3. Verify that the continuity between the front map light terminals is as indicated in the table.
am6zzw00012769
|
am6zzw00014990
|
Rear map light
1. Remove the following parts:
2. Verify that the continuity between the rear map light terminals is as indicated in the table.
am6zzw00012770
|
am6zzw00012771
|
Down light (with down light)
1. Disconnect the negative battery cable. (See NEGATIVE BATTERY CABLE DISCONNECTION/CONNECTION [SKYACTIV-G 2.0, SKYACTIV-G 2.5 (WITHOUT i-stop)].) (See NEGATIVE BATTERY CABLE DISCONNECTION/CONNECTION [SKYACTIV-G 2.0, SKYACTIV-G 2.5].) (See NEGATIVE BATTERY CABLE DISCONNECTION/CONNECTION [SKYACTIV-D 2.2].)
2. Remove the front map light. (See MAP LIGHT REMOVAL/INSTALLATION.)
3. Apply battery voltage to front map light terminal D, and connect terminal B to ground.
am6zzw00015419
|
4. Verify that the LED turns on.