 |
am6zzw00010201
AUDIO AMPLIFIER REMOVAL/INSTALLATION
id092000801100
L.H.D.
1. Disconnect the negative battery cable. (See NEGATIVE BATTERY CABLE DISCONNECTION/CONNECTION [SKYACTIV-D 2.2].) (See NEGATIVE BATTERY CABLE DISCONNECTION/CONNECTION [SKYACTIV-G 2.0, SKYACTIV-G 2.5].) (See NEGATIVE BATTERY CABLE DISCONNECTION/CONNECTION [SKYACTIV-G 2.0, SKYACTIV-G 2.5 (WITHOUT i-stop)].)
2. Remove the following parts:
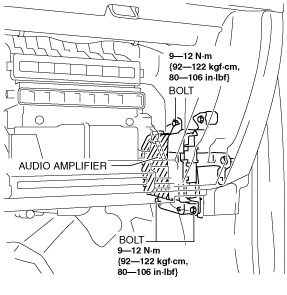
3. Remove the bolts.
am6zzw00010201
|
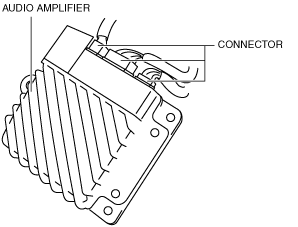
4. Remove the audio amplifier.
5. Disconnect the connectors.
am6zzw00010202
|
6. Install in the reverse order of removal.
R.H.D.
1. Disconnect the negative battery cable. (See NEGATIVE BATTERY CABLE DISCONNECTION/CONNECTION [SKYACTIV-D 2.2].) (See NEGATIVE BATTERY CABLE DISCONNECTION/CONNECTION [SKYACTIV-G 2.0, SKYACTIV-G 2.5].) (See NEGATIVE BATTERY CABLE DISCONNECTION/CONNECTION [SKYACTIV-G 2.0, SKYACTIV-G 2.5 (WITHOUT i-stop)].)
2. Remove the front scuff plate (RH). (See FRONT SCUFF PLATE REMOVAL/INSTALLATION.)
3. Remove the front side trim (RH) (See FRONT SIDE TRIM REMOVAL/INSTALLATION.)
4. Remove the bolts.
am6zzw00010203
|
5. Remove the audio amplifier.
6. Disconnect the connectors.
am6zzw00010202
|
7. Install in the reverse order of removal.