 |
am6zzb00000519
BUMPER BRACKET REMOVAL [PANEL REPLACEMENT]
id098008999500
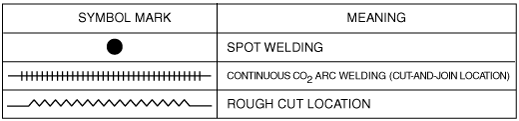
Symbol Mark
am6zzb00000519
|
Removal Procedure
1. Rough cut the location indicated by (A) shown in the figure.
am6zzb00000323
|
2. Grind the 6 locations indicated by (B) shown in the figure.
am6zzb00000324
|
3. Grind the 2 locations indicated by (C) shown in the figure.
4. Drill the 2 locations indicated by (D) shown in the figure, then remove the half portion above the bumper bracket.
5. Drill the 3 locations indicated by (E) shown in the figure.
6. Grind the 1 location indicated by (F) shown in the figure.
7. Drill the 4 locations indicated by (G) shown in the figure.
8. Remove the half portion below the bumper bracket.

