OIL COOLER CLEANING
id051700661600
-
Note
-
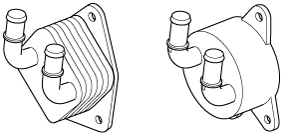
The vehicle is equipped with either a cylindrical or cubic-shaped oil cooler.
The description for the cylindrical-shaped oil cooler is only indicated here because the positions and directions of the water passage and oil passage are the same for both oil coolers.
Cleaning Outside of Oil Cooler
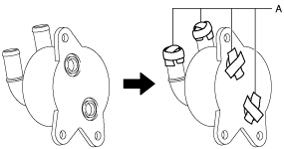
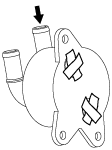
1. Plug to the position shown in the figure with packing tape.
-
Caution
-
• If foreign matter penetrates the oil cooler, it could cause a malfunction. Therefore, when cleaning the outside of the oil cooler, plug the position shown in the figure with packing tape.
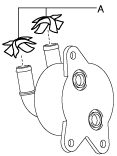
A :Plug (packing tape)
2. Wipe off any dirt or foreign matter adhering to the outside of the oil cooler using a rag. Clean depending on the condition using degreaser and dry them using an air compressor.
-
Warning
-
• Always wear protective eye wear when using the air compressor. Otherwise, degreaser or dirt particles blown off by the air compressor could get into the eyes.
3. Clean away the used packing tape as a plug.
A :Plug (packing tape)
Oil Cooler Flushing (Water Passage)
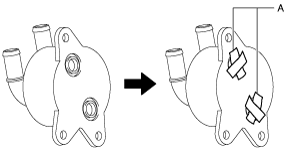
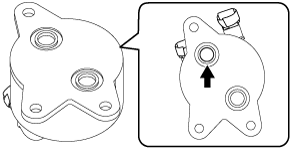
1. Plug the position (water passage) shown in the figure with packing tape.
-
Caution
-
• If engine coolant or water penetrates the oil cooler (in oil passage), it could cause a malfunction. Therefore, when flushing the oil cooler (water passage), plug the position (oil passage) shown in the figure with packing tape.
A :Plug (packing tape)
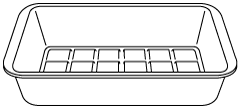
2. Prepare a clean oil receptacle.
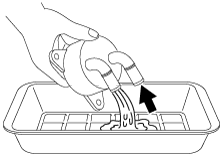
3. Add water to the oil cooler from the water passage shown in the figure.
4. Blow compressed air into the water passage shown in the figure and drain the engine coolant and water in the oil cooler.
-
Warning
-
• Always wear protective eye wear when using the air compressor. Otherwise, engine coolant, water, or dirt particles blown off by the air compressor could get into the eyes.
-
Caution
-
• Perform the work at a position where the engine coolant and water in the oil cooler can be drained into a clean oil receptacle.
• To prevent damage to parts, always use an air compressor which is adjusted to the indicated pressure.
-
Compressed air pressure
-
150—200 kPa {1.53—2.03 kgf/cm2, 21.8—29.0 psi}
5. Verify that none of the following foreign material is mixed in with the engine coolant and water drained from the oil cooler.
-
• Rust or water stain due to deterioration of engine coolant
• Engine oil
• Fragments of cooling system parts (plastic, metal, or rubber fragments)
6. Dispose of the engine coolant and water in the oil receptacle and clean the oil receptacle.
7. Perform Steps 3—6 three times.
-
• If foreign material remains even after the oil cooler is flushed repeatedly, replace the oil cooler with a new one and inspect the cooling system part.
-
Note
-
• For the cooling system part inspection, verify the Workshop Manual.
8. Clean away the used packing tape as a plug.
A :Plug (packing tape)
Oil Cooler Flushing (Oil Passage)
1. Plug to the position (water passage) shown in the figure with packing tape.
-
Caution
-
• If ATF penetrates the oil cooler (in water passage), it could cause a malfunction. Therefore, when flushing the oil cooler (oil passage), plug the position (water passage) shown in the figure with packing tape.
A :Plug (packing tape)
2. Prepare a clean oil receptacle.
3. Add new ATF (ATF FZ) to the oil cooler from the oil passage shown in the figure.
4. Blow compressed air into the oil passage shown in the figure and drain the ATF in the oil cooler.
-
Warning
-
• Always wear protective eye wear when using the air compressor. Otherwise, ATF or dirt particles blown off by the air compressor could get into the eyes.
-
Caution
-
• Perform the work at a position where the ATF in the oil cooler can be drained into a clean oil receptacle.
• To prevent damage to parts, always use an air compressor which is adjusted to the indicated pressure.
-
Compressed air pressure
-
491—882 kPa {5.01—8.99 kgf/cm2, 71.3—127.0 psi}
5. Verify that none of the following foreign material is mixed in with the ATF drained from the oil cooler.
-
• Large metal fragments of φ 0.5 mm {0.02 in} or more that cannot pass through the oil strainer
• Fibrous clutch or brake facing
6. Dispose of the ATF in the oil receptacle and clean the oil receptacle.
7. Perform Steps 3—6 three times.
-
• If foreign material such as metal fragments or facing remain even after the oil cooler is flushed repeatedly, replace the oil cooler with a new one.
8. Clean away the used packing tape used as the plug.
A :Plug (packing tape)