 |
am6zzw00014404
NO.2 AIR BAG SYSTEM WARNING LIGHT ILLUMINATES CONSTANTLY
id080300800300
|
2
|
Air bag system warning light illuminates constantly
|
|
DETECTION CONDITION
|
Air bag system warning light is illuminated constantly and remains illuminated after 6 s have elapsed.
|
|
POSSIBLE CAUSE
|
• Weak battery
• SAS control module malfunction
• SAS control module connectors are poorly connected
• Instrument cluster malfunction
• Instrument cluster connector is poorly connected
• Open circuit in wiring harness between instrument cluster and SAS control module
|
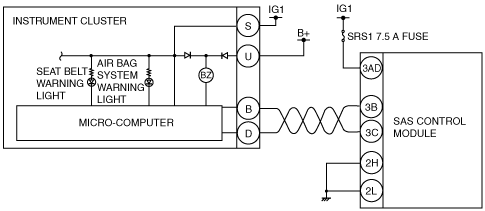
System Wiring Diagram
am6zzw00014404
|
Diagnostic Procedure
|
STEP |
INSPECTION |
ACTION |
|
|---|---|---|---|
|
1
|
INSPECT BATTERY
• Measure the voltage of battery.
• Is the voltage 8 V or more?
|
Yes
|
Go to the next step.
|
|
No
|
Battery is weak.
Inspect charge/discharge system, then go to Step 8.
|
||
|
2
|
VERIFY THAT SAS CONTROL MODULE CONNECTOR IS CONNECTED
• Switch the ignition to off.
• Disconnect the negative battery cable and wait for 1 min or more. (See NEGATIVE BATTERY CABLE DISCONNECTION/CONNECTION [SKYACTIV-G 2.0, SKYACTIV-G 2.5].)(See NEGATIVE BATTERY CABLE DISCONNECTION/CONNECTION [SKYACTIV-G 2.0, SKYACTIV-G 2.5 (WITHOUT i-stop)].)(See NEGATIVE BATTERY CABLE DISCONNECTION/CONNECTION [SKYACTIV-D 2.2].)
• Remove the rear console. (See REAR CONSOLE REMOVAL/INSTALLATION.)
• Are all SAS control module connectors securely connected?
|
Yes
|
Go to the next step.
|
|
No
|
Reconnect the connector properly, then go to Step 8.
|
||
|
3
|
INSPECT DTCS IN SAS CONTROL MODULE
• Connect the negative battery cable. (See NEGATIVE BATTERY CABLE DISCONNECTION/CONNECTION [SKYACTIV-G 2.0, SKYACTIV-G 2.5].)(See NEGATIVE BATTERY CABLE DISCONNECTION/CONNECTION [SKYACTIV-G 2.0, SKYACTIV-G 2.5 (WITHOUT i-stop)].)(See NEGATIVE BATTERY CABLE DISCONNECTION/CONNECTION [SKYACTIV-D 2.2].)
• Inspect the DTC for the SAS control module on-board diagnostic system. (See DTC INSPECTION [SAS CONTROL MODULE].)
• Have DTCs been recorded in memory?
|
Yes
|
Perform the applicable DTC inspection, then go to Step 8. (See DTC TABLE [SAS CONTROL MODULE].)
|
|
No
|
Go to the next step.
|
||
|
4
|
INSPECT DTCS IN INSTRUMENT CLUSTER
• Inspect the DTC for the instrument cluster on-board diagnostic system. (See DTC INSPECTION [INSTRUMENT CLUSTER].)
• Have DTCs been recorded in memory?
|
Yes
|
Perform the applicable DTC inspection, then go to Step 8. (See DTC TABLE [INSTRUMENT CLUSTER].)
|
|
No
|
Go to the next step.
|
||
|
5
|
VERIFY WHERE MALFUNCTION IS IN WARNING LIGHTS INDICATION CIRCUIT OR ELSEWHERE
• Turn on all warning lights and indicator lights using the instrument cluster PID WL+IL of simulation function using the M-MDS. (See ACTIVE COMMAND MODES INSPECTION [INSTRUMENT CLUSTER].)
• Do other warning and indicator lights illuminate?
|
Yes
|
Go to the next step.
|
|
No
|
Repair the instrument cluster. (See INSTRUMENT CLUSTER REMOVAL/INSTALLATION.)
Then go to Step 8.
|
||
|
6
|
INSPECT POWER SUPPLY CIRCUIT OF SAS CONTROL MODULE (TERMINAL 3AD)
• Switch the ignition to off.
• Disconnect the negative battery cable and wait for 1 min or more. (See NEGATIVE BATTERY CABLE DISCONNECTION/CONNECTION [SKYACTIV-G 2.0, SKYACTIV-G 2.5].)(See NEGATIVE BATTERY CABLE DISCONNECTION/CONNECTION [SKYACTIV-G 2.0, SKYACTIV-G 2.5 (WITHOUT i-stop)].)(See NEGATIVE BATTERY CABLE DISCONNECTION/CONNECTION [SKYACTIV-D 2.2].)
• Remove the column cover. (See COLUMN COVER REMOVAL/INSTALLATION.)
• Disconnect the clock spring connector. (See CLOCK SPRING REMOVAL/INSTALLATION.)
• Remove the glove compartment. (See GLOVE COMPARTMENT REMOVAL/INSTALLATION.)
• Disconnect the passenger-side air bag module connector. (See PASSENGER-SIDE AIR BAG MODULE REMOVAL/INSTALLATION.)
• Disconnect the driver and passenger-side front seat connector. (See FRONT SEAT REMOVAL/INSTALLATION.)
• Remove the headliner. (See HEADLINER REMOVAL/INSTALLATION.)
• Disconnect the driver and passenger-side curtain air bag module connectors. (See CURTAIN AIR BAG MODULE REMOVAL/INSTALLATION.)
• Remove the B-pillar lower trim. (See B-PILLAR LOWER TRIM REMOVAL/INSTALLATION.)
• Disconnect the driver and passenger-side pre-tensioner seat belt connectors. (See FRONT SEAT BELT REMOVAL/INSTALLATION.)
• Disconnect all SAS control module connectors. (See SAS CONTROL MODULE REMOVAL/INSTALLATION.)
• Connect the negative battery cable. (See NEGATIVE BATTERY CABLE DISCONNECTION/CONNECTION [SKYACTIV-G 2.0, SKYACTIV-G 2.5].)(See NEGATIVE BATTERY CABLE DISCONNECTION/CONNECTION [SKYACTIV-G 2.0, SKYACTIV-G 2.5 (WITHOUT i-stop)].)(See NEGATIVE BATTERY CABLE DISCONNECTION/CONNECTION [SKYACTIV-D 2.2].)
• Switch the ignition ON (engine off or on).
• Measure the voltage of SAS control module terminal 3C (wiring harness-side).
• Is the voltage 8 V—17.9 V?
|
Yes
|
Go to the next step.
|
|
No
|
If there is a common connector:If there is no common connector:
Refer to the wiring diagram and verify whether or not there is a common connector between SAS control module terminal and IG1 relay terminal.
• Determine the malfunctioning part by inspecting the common connector and the terminal for corrosion, damage, or pin disconnection, and the common wiring harness for a short to power supply.
• Replace the malfunctioning part.
• Replace the wiring harness which has a short to power supply.
Go to Step 8.
|
||
|
7
|
VERIFY THAT SAS CONTROL MODULE CONNECTOR TERMINAL 2C, 2F IS GROUND
• SAS control module connector disconnected.
• Switch the ignition to off.
• Disconnect the negative battery cable and wait for 1 min or more. (See NEGATIVE BATTERY CABLE DISCONNECTION/CONNECTION [SKYACTIV-G 2.0, SKYACTIV-G 2.5].)(See NEGATIVE BATTERY CABLE DISCONNECTION/CONNECTION [SKYACTIV-G 2.0, SKYACTIV-G 2.5 (WITHOUT i-stop)].)(See NEGATIVE BATTERY CABLE DISCONNECTION/CONNECTION [SKYACTIV-D 2.2].)
• Inspect for continuity between the following terminals (wiring harness-side):
• Is there continuity?
|
Yes
|
Replace the SAS control module, then go to the next step. (See SAS CONTROL MODULE REMOVAL/INSTALLATION.)
|
|
No
|
If there is a common connector:If there is no common connector:
Refer to the wiring diagram and verify whether or not there is a common connector between SAS control module terminal 2C, 2F and body ground.
• Determine the malfunctioning part by inspecting the common connector and the terminal for corrosion, damage, or pin disconnection, and the common wiring harness for an open circuit.
• Replace the malfunctioning part.
• Replace the wiring harness which has an open circuit.
Go to the next step.
|
||
|
8
|
CONFIRM THAT MALFUNCTION SYMPTOMS DO NOT RECUR AFTER REPAIR
• Connect the SAS control module connectors.
• Reconnect all disconnected connectors.
• Connect the negative battery cable. (See NEGATIVE BATTERY CABLE DISCONNECTION/CONNECTION [SKYACTIV-G 2.0, SKYACTIV-G 2.5].)(See NEGATIVE BATTERY CABLE DISCONNECTION/CONNECTION [SKYACTIV-G 2.0, SKYACTIV-G 2.5 (WITHOUT i-stop)].)(See NEGATIVE BATTERY CABLE DISCONNECTION/CONNECTION [SKYACTIV-D 2.2].)
• Switch the ignition ON (engine off or on).
• Does the air bag system warning light illuminate for approx. 6 s and turn off?
|
Yes
|
Complete troubleshooting, then explain repairs to customer.
|
|
No
|
Recheck malfunction symptoms, then repeat from Step 1 if malfunction recurs.
|
||