 |
am6zzw00013729
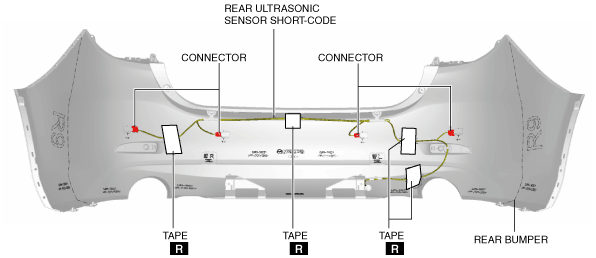
REAR ULTRASONIC SENSOR SHORT-CORD REMOVAL/INSTALLATION
id092200031100
4SD
1. Disconnect the negative battery cable. (See NEGATIVE BATTERY CABLE DISCONNECTION/CONNECTION [SKYACTIV-D 2.2].)(See NEGATIVE BATTERY CABLE DISCONNECTION/CONNECTION [SKYACTIV-G 2.0, SKYACTIV-G 2.5].)(See NEGATIVE BATTERY CABLE DISCONNECTION/CONNECTION [SKYACTIV-G 2.0, SKYACTIV-G 2.5 (WITHOUT i-stop)].)
2. Remove the following parts:
3. Peel off the tape securing the rear ultrasonic sensor short-cord from the rear bumper.
am6zzw00013729
|
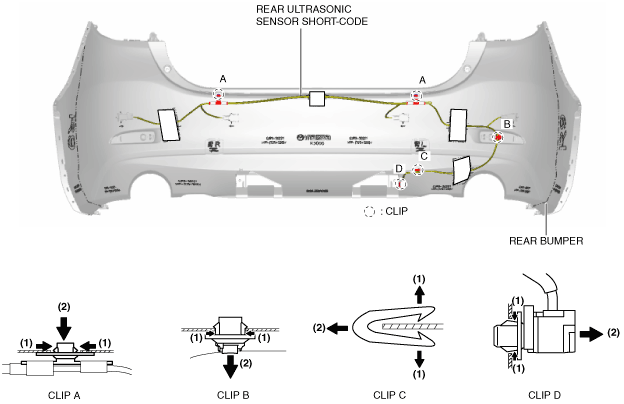
4. Disconnect the connector from the rear ultrasonic sensor.
5. Pull clip A, B, C and D in the direction of the arrow (2) shown in the figure while pressing the tab of clip A, B, C and D in the direction of the arrow (1) shown in the figure, and detach the tab of clip A, B, C and D and rear bumper.
am6zzw00013730
|
6. Install in the reverse order of removal. (See Rear ultrasonic sensor short-cord installation note (4SD).)
Rear ultrasonic sensor short-cord installation note (4SD)
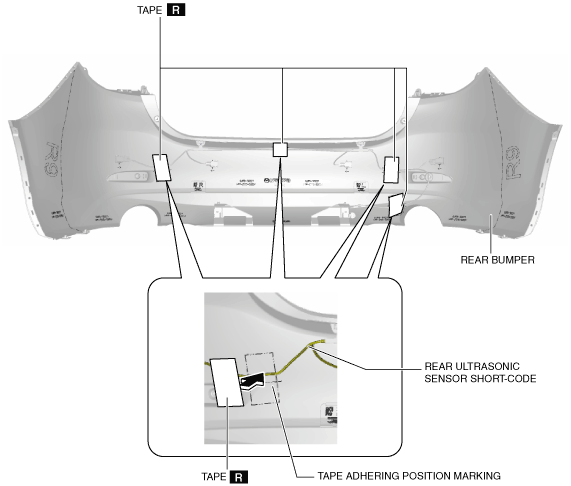
1. Align the height of the rear ultrasonic sensor short-cord with the center of the tape adhering position marking on the rear bumper.
am6zzw00013731
|
2. Align the tape with the mark of the tape adhering position marking and adhere the rear ultrasonic sensor short-cord and rear bumper.
WGN
1. Disconnect the negative battery cable. (See NEGATIVE BATTERY CABLE DISCONNECTION/CONNECTION [SKYACTIV-D 2.2].)(See NEGATIVE BATTERY CABLE DISCONNECTION/CONNECTION [SKYACTIV-G 2.0, SKYACTIV-G 2.5].)(See NEGATIVE BATTERY CABLE DISCONNECTION/CONNECTION [SKYACTIV-G 2.0, SKYACTIV-G 2.5 (WITHOUT i-stop)].)
2. Remove the following parts:
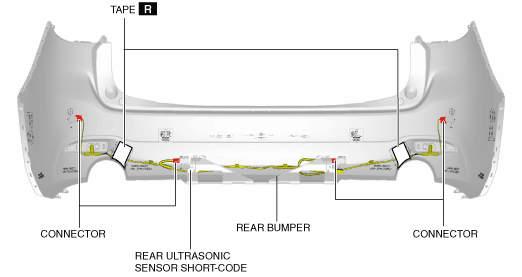
3. Peel off the tape securing the rear ultrasonic sensor short-cord from the rear bumper.
am6zzw00013732
|
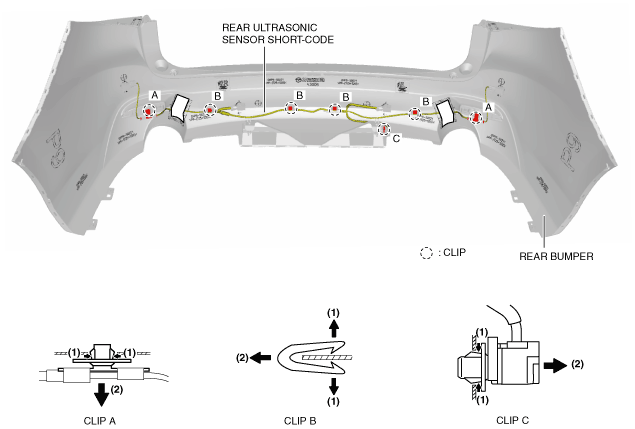
4. Disconnect the connector from the rear ultrasonic sensor.
5. Pull clip A, B, and C in the direction of the arrow (2) shown in the figure while pressing the tab of clip A, B, and C in the direction of the arrow (1) shown in the figure, and detach the tab of clip A, B, and C and rear bumper.
am6zzw00013733
|
6. Install in the reverse order of removal. (See Rear ultrasonic sensor short-cord installation note (WGN).)
Rear ultrasonic sensor short-cord installation note (WGN)
1. Align the height of the rear ultrasonic sensor short-cord with the center of the tape adhering position marking on the rear bumper.
am6zzw00013734
|
2. Align the tape with the mark of the tape adhering position marking and adhere the rear ultrasonic sensor short-cord and rear bumper.