|
chu0110e054
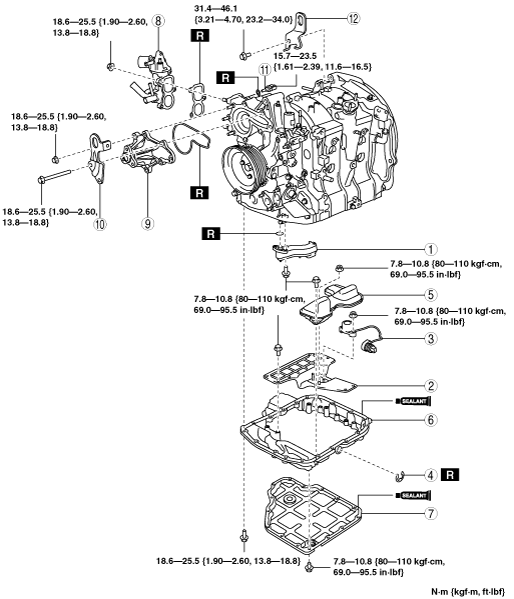
HOUSING ASSEMBLY III
id011000136600
1. Assemble in the order indicated in the table.
Type A
chu0110e054
|
|
1
|
Oil strainer
|
|
2
|
Oil-level sensor
|
|
3
|
Oil baffle plate
|
|
4
|
Clip
|
|
5
|
Oil pan
(See Oil Pan Assembly Note.)
|
|
6
|
Thermostat component
|
|
7
|
Water pump body
|
|
8
|
Engine hanger (engine front side)
|
|
9
|
Engine coolant temperature sensor
|
|
10
|
Engine hanger (engine rear side)
|
|
11
|
Oil filter component
|
Type B
ghe0110e004
|
|
1
|
Oil strainer
|
|
2
|
Baffle plate
|
|
3
|
Oil level switch
|
|
4
|
Clip
|
|
5
|
Baffle plate
|
|
6
|
Oil pan upper block
|
|
7
|
Oil pan
(See Oil Pan Assembly Note.)
|
|
8
|
Thermostat component
|
|
9
|
Water pump body
|
|
10
|
Engine hanger (engine front side)
|
|
11
|
ECT sensor
|
|
12
|
Engine hanger (engine rear side)
|
Oil Pan Upper Block Assembly Note
chu0111w004
|
1. Completely clean and remove any oil, dirt, sealant or other foreign material that may be adhering to the oil pan upper block and housing.
2. When reusing the oil pan upper block installation bolts, clean any old sealant from the bolts.
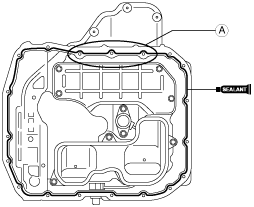
3. Apply silicone sealant to the areas as shown in the figure.
bhj0110f010
|
4. Install the oil pan upper block to the housing.
5. Tighten the oil pan upper block installation bolts.
Oil Pan Assembly Note
Type A
chu0111w004
|
1. Completely clean and remove any oil, dirt, sealant or other foreign material that may be adhering to the housing and oil pan.
2. When reusing oil pan installation bolts, clean any old sealant from the bolts.
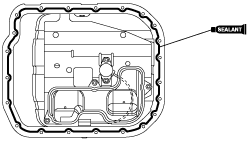
3. Apply silicone sealant to the areas shown in the figure.
bhj0110e100
|
4. Tighten the oil pan installation bolts.
Type B
chu0111w004
|
1. Completely clean and remove any oil, dirt, sealant or other foreign material that may be adhering to the oil pan upper block and oil pan.
2. When reusing the oil pan installation bolts, clean any old sealant from the bolts.
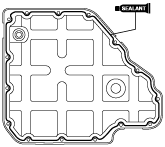
3. Apply silicone sealant to the areas as shown in the figure.
ar8wzw00000734
|
4. Install the oil pan to the oil pan upper block.
5. Tighten the oil pan installation bolts.