 |
ar8wzw00001462
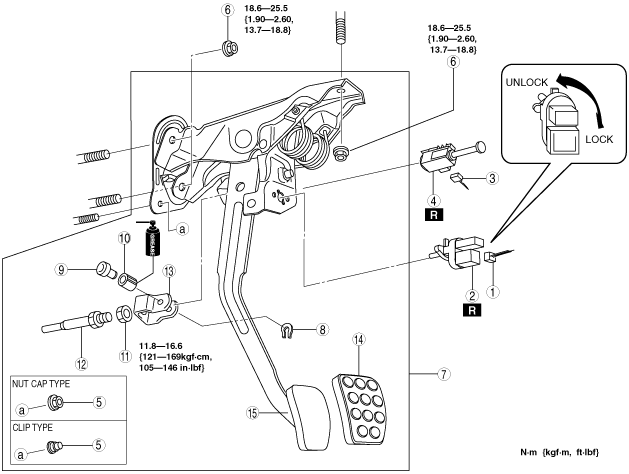
CLUTCH PEDAL REMOVAL/INSTALLATION
id051000801200
1. Disconnect the negative battery cable.
2. Remove in the order indicated in the table.
3. Install in the reverse order of removal.
4. Fully depress the clutch pedal, and verify that the engine starts.
ar8wzw00001462
|
|
1
|
CPP switch connector
|
|
2
|
CPP switch
|
|
3
|
Starter interlock switch connector
|
|
4
|
Starter interlock switch
|
|
5
|
Nut cap / Clip
(See Nut Cap Removal Note)
|
|
6
|
Nut
|
|
7
|
Clutch pedal component
|
|
8
|
Retaining ring
|
|
9
|
Joint pin
|
|
10
|
Bush
|
|
11
|
Nut
|
|
12
|
Push rod
|
|
13
|
Fork
|
|
14
|
Pedal pad
|
|
15
|
Clutch pedal
|
Nut Cap Removal Note
1. Dispose of the nut cap after removal.
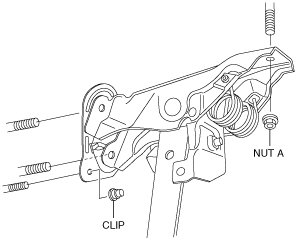
Clutch Pedal Component Installation Note
1. Install the clutch pedal component, and then temporarily tighten the nut A.
ar8wzw00001463
|
2. Insert the clip completely so that the clutch pedal adheres to the installation surface and there are no gaps between them.
3. Tighten the nuts B (2).
ar8wzw00001464
|
4. Tighten the nut A.
5. After installing the clutch pedal component, inspect/adjust the clutch pedal. (See CLUTCH PEDAL INSPECTION/ADJUSTMENT.)
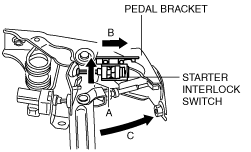
Starter Interlock Switch Installation Note
1. Insert a new starter interlock switch into the pedal bracket hole in direction A.
2. While pushing the starter interlock switch in direction A, slide it in direction B until it locks securely.
3. Fully depress the clutch pedal in the direction of arrow C, and verify that a click sound from the starter interlock switch is heard.
ar8wzw00000558
|