|
ar8wzw00001331
Mazda RX-8 BRAKE DISC INSPECTION
id942000400300
Required tools
Front Brake Disc Inspection
1. Remove the front tire.
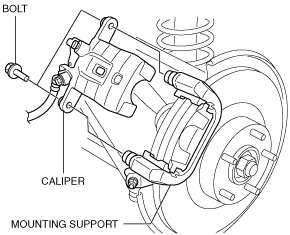
2. Remove the brake hose installation bolt from the upper arm and disconnect the brake hose.
ar8wzw00001331
|
3. Remove the caliper installation bolt on the underside of the vehicle.
ar8wzw00001338
|
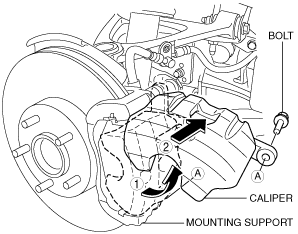
4. Move the caliper in the direction shown by the arrow and remove it from the mounting support.
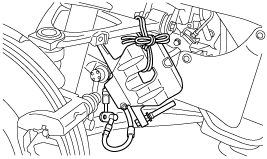
5. Hang the removed caliper in a place out of the way using a cable.
ar8jjw00003819
|
6. Remove the disc pad from the mounting support.
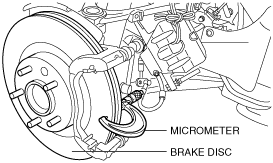
7. Clean the brake disc surface where it contacts the pad using brake cleaner.
8. Measure the thickness of the brake disc using a micrometer.
ar8wzw00001333
|
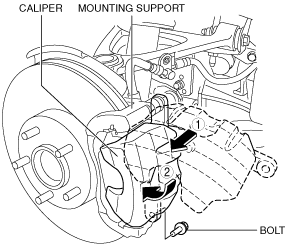
9. Install the disc pad to the mounting support.
10. Move the caliper in the direction shown by the arrow and remove it from the mounting support while being careful not to distort the brake hose.
ar8wzw00001339
|
11. Tighten the caliper installation bolt to the specified torque.
12. Install the brake hose to the upper arm and tighten the brake hose installation bolt to the specified torque.
ar8wzw00001331
|
13. Install the front tire and tighten the nuts to the specified torque.
14. After installation, pump the brake pedal a few times and verify that the brakes do not drag.
Rear brake disc inspection
1. Remove the rear tire.
2. Remove the caliper installation bolts and remove the caliper from the mounting support.
ar8wzw00001335
|
3. Hang the removed caliper in a place out of the way using a cable.
ar8jjw00003822
|
4. Remove the disc pad from the mounting support.
5. Clean the brake disc surface where it contacts the pad using brake cleaner.
6. Measure the thickness of the brake disc using a micrometer.
ar8wzw00001336
|
7. Install the disc pad to the mounting support.
8. Install the caliper to the mounting support with the brake hose not twisted, and tighten the caliper installation bolts to the specified torque.
ar8wzw00001337
|
9. Install the rear tire and tighten the nuts to the specified torque.
10. After installation, pump the brake pedal a few times and inspect the following: