IMMOBILIZER SYSTEM COMPONENT REPLACEMENT/KEY ADDITION AND CLEARING
id091400805000
Foreword
• When performing the following procedures, the immobilizer resetting procedure using the WDS or equivalent must also always be performed: “Keyless unit replacement”, “PCM replacement”, “Keyless unit and PCM joint replacement”, “Key ID number clearing”. The engine will not start unless all work is performed using the WDS or equivalent.
• There are two methods for registering an additional key: Using the WDS or equivalent and using two keys that are able to start the engine.
• When replacing any of the immobilizer system component parts, adding/erasing keys or performing other functions, refer to the following table and perform the applicable procedure (Nos.1 to 7).
|
Situation
|
Items neccesary to perform procedure (always have these ready before beginning the procedure)
|
Cautionary notes
|
No.
|
|
Making a spare key when the customer has two or more keys that can start the engine. Or registering an additional key.
|
• Keys for registration
|
• If “Customer Spare Key Programming Disable” has previously been performed using the WDS or equivalent, the WDS or equivalent must be used to register an additional key. In that case, perform procedure No.2.
|
1
|
|
Making a spare key when the customer has one key that can start the engine or no keys. Or registering an additional key.
|
• Keys for registration
• WDS or equivalent
|
-
|
2
|
|
Clearing previously registered key ID numbers.
|
• Keys for registration (two or more keys)
• WDS or equivalent
|
• All key ID numbers registered in the vehicle are cleared.
• Unless keys are re-registered after clearing the key ID numbers, the engine cannot be started. Before beginning the procedure, verify that the customer has turned in all of the keys for the vehicle.
• Unless two or more keys are registered after clearing the key ID numbers, the engine cannot be started.
• The keys (two or more keys) readied before beginning the procedure do not have to be new keys. Any key that is capable of starting the engine before beginning the procedure can be used.
|
3
|
|
Replacing all keys. (When replacing the steering lock or similar procedure)
|
• New keys (two or more keys)
• WDS or equivalent
|
• Since the steering lock is replaced, keys used before replacement become unusable. Have two new keys or more ready before beginning the procedure.
• Unless keys are registered after replacing the steering lock, the engine cannot be started.
|
3
|
|
Changing the method for registering additional keys. (Method for registering other keys using two keys that can start the engine is disabled.)
|
• WDS or equivalent
|
• After performing this procedure it is not possible to register additional keys according to procedure No.1.The system can be returned to the original setting. The WDS or equivalent must always be used to change the system setting.
|
4
|
|
Changing the method for registering additional keys. (Method for registering other keys using two keys that can start the engine is enabled.)
|
• WDS or equivalent
|
• This is the default setting on new vehicles.
|
4
|
|
Replacing the keyless unit only.
|
• New keyless unit
• Keys for registration (two or more keys)
• WDS or equivalent
|
• Unless keys are re-registered after replacement, the engine cannot be started. Before beginning the procedure, verify that the customer has turned in all of the keys for the vehicle.
• Unless two or more keys are registered after replacement, the engine cannot be started.
• The keys (two or more keys) readied before beginning the procedure do not have to be new keys. Any key that is capable of starting the engine before beginning the procedure can be used.
|
5
|
|
Replacing the PCM only.
|
• New PCM
• WDS or equivalent
|
-
|
6
|
|
Replacing the PCM and keyless unit at the same time.
|
• New PCM
• New keyless unit
• Keys for registration (two or more keys)
• WDS or equivalent
|
• Unless keys are re-registered after replacement, the engine cannot be started. Before beginning the procedure, verify that the customer has turned in all of the keys for the vehicle.
• Unless two or more keys are registered after replacement, the engine cannot be started.
• The keys (two or more keys) readied before beginning the procedure do not have to be new keys. Any key that is capable of starting the engine before beginning the procedure can be used.
|
7
|
|
Replacing the coil.
|
• New coil
|
• It is not neccessary to reset the immobilizer system.
|
-
|
|
Replacing the instrument cluster.
|
• New instrument cluster
|
• It is not neccessary to reset the immobilizer system.
|
-
|
-
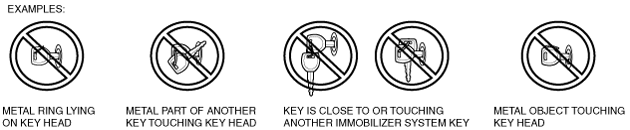
Caution
-
• The following conditions may cause poor signal communication between the key and vehicle, resulting in the engine not starting or a key registration error. Do not perform key registration under the following conditions:
-
― If any of the following items are touching or near the key head.
-
• Spare keys
• Keys for other vehicles equipped with an immobilizer system
• Any metallic object
• Any electronic device, or any credit or other cards with magnetic strips
-
Note
-
• Within the following procedures, the term a “valid key” means a “key that can start the engine”.
• After adding/registering keys, clearing ID numbers or replacing any component part of the immobilizer unit, verify that all keys can start the engine within 5 s.
• When verifying that the keys can start the engine, wait at least 5 s or more between inserting them.
• If the engine cannot be started using a registered key, repeat the procedure from the beginning.
• Do not start the engine until the key registration procedure for all the necessary keys is completed. If the engine is started during the registration procedure, registration is stopped at that point. Repeat the procedure starting from the beginning if the engine is started before completion.
• Two or more key ID numbers must be registered for the engine to start.
• A maximum of eight key ID numbers can be registered for one vehicle. The WDS or equivalent can be used to verify the number of key ID numbers registered to a single vehicle.
• Do not select screen menus of the WDS or equivalent that are not indicated within the procedures.
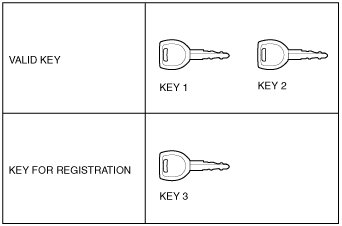
No.1 Additional Key Registration Procedure (Using Two Valid Keys)
Conditions
• Customer has two or more valid keys.
-
Note
-
• A maximum of eight keys can be registered for any one vehicle. If key registration is not successful and DTC 15 appears even though the procedure was performed properly, use the PID/data monitor function of the WDS or equivalent and verify the number of keys that have been registered.
Procedure
1. Have an additional key (key 3) ready for registration.
2. Using key 1, turn the ignition switch to the ON position.
3. Verify that the security light illuminates for approx. 3 s and then goes out.
4. Using key 1, turn the ignition switch to the LOCK position within approx. 4 s after the security light goes out.
5. Remove key 1
6. Repeat Steps 2—5 using key 2.
7. Repeat Steps 2—5 using key 3.
8. If additional keys need to be registered, repeat Steps 2—7 in the same manner as key 3.
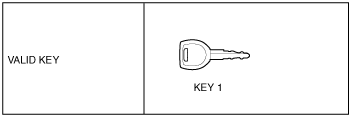
No.2 Additional Key Registration Procedure (Using the WDS or Equivalent)
Conditions
• Customer has only one valid key. Or customer has no valid keys. (Can also be performed even if there are two or more valid keys)
-
Note
-
• A maximum of eight keys can be registered for any one vehicle. If key registration is not successful and DTC 15 appears even though the procedure was performed properly, use the PID/data monitor function of the WDS or equivalent and verify the number of keys that have been registered.
Procedure
1. Have one key (key 1) ready for registration.
2. Connect the WDS or equivalent to the DLC-2.
3. Using key 1, turn the ignition switch to the ON position.
-
Note
-
• Although the security light flashes and DTC 15 is displayed, this does not indicate an improper procedure. Continue to perform the procedure as indicated.
4. Select “Body/Security/PATS function” from the screen menu of the WDS or equivalent.
5. Select “Program Additional Ignition Key” from the screen menu of the WDS or equivalent.
6. Perform security access as indicated on the WDS or equivalent screen. (See No.8 Security Access Procedure.)
-
Note
-
• After selecting this menu, “Successful” appears on the WDS or equivalent screen. When this occurs, registration is completed for the key turning the ignition switch to the ON position.
-
• If the necessary number of keys have been registered, the additional key registration procedure is completed with this step. Go to Step 10.
• If additional keys need to be registered, go to the next step.
7. After verifying that the PATS function menu is displayed again on the WDS or equivalent screen, turn the ignition switch to the LOCK position and remove key 1.
8. Using an additional key requiring registration, turn the ignition switch to the ON position.
9. Return to Step 5.
10. After verifying that the PATS function menu is displayed again on the WDS or equivalent screen, select “Exit” to complete the WDS or equivalent function.
11. After Step 10, wait 10 s or more and turn the ignition switch to the LOCK position.
No.3 Key Replacement Procedure (Clearing Previously Registered Key ID Numbers, Key Re-registration)
Conditions
• Customer has two or more keys for registration after clearing the key ID numbers.
Procedure
1. Have two or more keys (key 1, key 2) ready for registration after the clearing the key ID numbers.
2. Connect the WDS or equivalent to the DLC-2.
3. Using key 1, turn the ignition switch to the ON position.
-
Note
-
• Although the security light flashes and DTC 15 is displayed, this does not indicate an improper procedure. Continue to perform the procedure as indicated.
4. Select “Body/Security/PATS function” from the screen menu of the WDS or equivalent.
5. Select “Ignition key ID number Erase” from the screen menu of the WDS or equivalent and perform the tasks according to the WDS or equivalent screen.
6. Perform security access as indicated on the WDS or equivalent screen. (See No.8 Security Access Procedure.)
7. After verifying that the PATS function menu is displayed again on the WDS or equivalent screen, select “Exit” to complete the WDS or equivalent function.
8. After Step 7, wait 10 s or more and turn the ignition switch to the LOCK position using key 1.
9. Using key 1, turn the ignition switch to the ON position.
-
Note
-
• Although the security light flashes and DTC 21 is displayed, this does not indicate an improper procedure. Continue to perform the procedure as indicated.
10. After Step 9, wait 3 s or more and turn the ignition switch to the LOCK position, remove key 1.
11. Using key 2, turn the ignition switch to the ON position.
12. Verify that the security light illuminates for approx. 3 s and then goes out.
13. After verifying that the security light goes out, turn the ignition switch to the LOCK position using key 2, and then remove key 2.
14. If additional keys need to be registered, repeat Steps 11—13 in the same manner as key 2.Steps 11—13 must be performed within 1 min for each key. If the ignition switch is maintained in the ON position for 1 min or more, key registration according to Steps 11—13 will not be possible. If this occurs, refer to “No.1 Additional Key Registration Procedure (Using Two Valid Keys)” to register any additional keys.
No.4 Changing the Method for Registering Additional Keys
-
Note
-
• This procedure is for changing the enable/disable setting of the “No.1 Additional Key Registration Procedure (Using Two Valid Keys)”.
• The default setting for new vehicles and keyless units is "Enabled".
• By disabling the “No.1 Additional Key Registration Procedure (Using Two Valid Keys)”, only the WDS or equivalent can be used to register additional keys, thereby preventing two valid keys from being used to create an unauthorized spare key. This function is for use by rental car or other companies with vehicle fleets.
Procedure
1. Connect the WDS or equivalent to the DLC-2.
2. Using any key, turn the ignition switch to the ON position. (Either a valid or an unregistered key can be used.)
-
Note
-
• When using an unregistered key, although the security light flashes and DTC 15 is displayed, this does not indicate an improper procedure. Continue to perform the procedure as indicated.
3. Select “Body/Security/PATS function” from the screen menu of the WDS or equivalent.
4. Select either “Customer Spare Key Programming Enable” or “Customer Spare Key Programming Disable” from the screen menu of the WDS or equivalent. Depending on the selected menu, the additional key registration method is as shown below:
|
Setting
|
Additional key registration method
|
|
Procedure using two valid keys
|
Procedure using the WDS or equivalent
|
|
Customer Spare Key Programming Enable
|
X
|
X
|
|
Customer Spare Key Programming Disable
|
-
|
X
|
X :Procedure is possible
- :Procedure is not possible
5. Perform security access as indicated on the WDS or equivalent screen. (See No.8 Security Access Procedure.)
6. After verifying that the PATS function menu is displayed again on the WDS or equivalent screen, select “Exit” to complete the WDS or equivalent function.
7. After Step 6, wait 10 s or more and then turn the ignition switch to the LOCK position.
No.5 Resetting Procedure for the Immobilizer System when Replacing the Keyless Unit
Conditions
• Customer has two or more keys for registration after replacement.
-
Caution
-
• Before starting Step 1, complete the procedure for the keyless unit replacement.
Procedure
1. Have two or more keys (key 1, key 2) ready for registration.
2. Connect the WDS or equivalent to the DLC-2.
3. Using key 1, turn the ignition switch to the ON position.
-
Note
-
• Although the security light flashes and DTC 15 is displayed, this does not indicate an improper procedure. Continue to perform the procedure as indicated.
4. Select “Body/Security/PATS function” from the screen menu of the WDS or equivalent.
5. Select “Ignition key ID number Erase” from the screen menu of the WDS or equivalent and perform the tasks according to the WDS or equivalent screen.
6. Perform security access as indicated on the WDS or equivalent screen. (See No.8 Security Access Procedure.)
7. Select “Parameter Reset” from the screen menu of the WDS or equivalent.
8. Perform security access again as indicated on the WDS or equivalent screen. (See No.8 Security Access Procedure.)
9. Select the replaced part as indicated on the WDS or equivalent screen.
-
• When replacing only the keyless unit: Select “RKE”.
-
Note
-
• At this time, do not select any other parts from the screen menu of the WDS or equivalent.
10. After verifying that the PATS function menu is displayed again on the WDS or equivalent screen, select “Exit” to complete the WDS or equivalent function.
11. After Step 10, wait 10 s or more and turn the ignition switch to the LOCK position using key 1.
12. Using key 1, turn the ignition switch to the ON position.
-
Note
-
• Although the security light flashes and DTC 21 is displayed, this does not indicate an improper procedure. Continue to perform the procedure as indicated.
13. After Step 12, wait 3 s or more and turn the ignition switch to the LOCK position, remove key 1.
14. Using key 2, turn the ignition switch to the ON position.
15. Verify that the security light illuminates for approx. 3 s and then goes out.
16. After verifying that the security light goes out, turn the ignition switch to the LOCK position using key 2, and then remove key 2.
17. If an additional key needs to be registered, repeat Steps 14—16 in the same manner as key 2. Steps 14—16 must be performed within 1 min for each key. If the ignition switch is maintained in the ON position for 1 min or more, key registration according to Steps 14—16 will not be possible. If this occurs, refer to “No.1 Additional Key Registration Procedure (Using Two Valid Keys)” to register any additional keys.
No.6 Resetting Procedure for the Immobilizer System when Replacing the PCM Replacement
Conditions
• There is only one valid key.
-
Caution
-
• Before starting Step 1, complete the procedure for the PCM replacement.
Procedure
1. Connect the WDS or equivalent to the DLC-2.
2. Using key 1, turn the ignition switch to the ON position.
-
Note
-
• Although the security light remains illuminated and DTC 23 is displayed after approx. 1 min, this does not indicate an improper procedure. Continue to perform the procedure as indicated.
3. Select “Body/Security/PATS Function” from the WDS or equivalent screen menu.
4. Select “Parameter Reset” from the WDS or equivalent screen menu.
5. Perform security access as indicated on the WDS or equivalent screen. (See No.8 Security Access Procedure.)
6. Select the replaced part as indicated on the WDS or equivalent screen.
-
• If the PCM is replaced: Select “PCM”.
-
Note
-
• At this time, do not select any other parts from the WDS or equivalent screen menu.
7. After verifying that the PATS function menu is displayed again on the WDS or equivalent screen, select “Exit (From This Menu)” to finish the WDS or equivalent procedure.
8. After Step 7, wait 5 s or more and then turn the ignition switch to the LOCK position.
9. Disconnect the WDS or equivalent from the DLC-2.
10. Using key 1, turn the ignition switch to the ON position.
11. After verifying that the security light illuminates for 3 s or more, turn the ignition switch to the LOCK position, remove key 1.
No.7 Resetting Procedure for the Immobilizer System when Replacing the PCM or Keyless Unit
Conditions
• Customer has two or more keys for registration after replacement.
-
Caution
-
• Before starting Step 1, complete the procedure for the PCM and keyless unit replacement.
Procedure
1. Have two or more keys (key 1, key 2) ready for registration.
2. Connect the WDS or equivalent to the DLC-2.
3. Using key 1, turn the ignition switch to the ON position.
-
Note
-
• Although the security light flashes and DTC 15 is displayed, this does not indicate an improper procedure. Continue to perform the procedure as indicated.
4. Select “Body/Security/PATS function” from the screen menu of the WDS or equivalent.
5. Select “Ignition key ID number Erase” from the screen menu of the WDS or equivalent and perform the tasks according to the WDS or equivalent screen.
6. Perform security access as indicated on the WDS or equivalent screen. (See No.8 Security Access Procedure.)
7. Select “Parameter Reset” from the screen menu of the WDS or equivalent.
8. Perform security access again as indicated on the WDS or equivalent screen. (See No.8 Security Access Procedure.)
9. Select the replaced part as indicated on the WDS or equivalent screen.
-
• When replacing only the keyless unit: Select “RKE”.
-
Note
-
• At this time, do not select any other parts from the screen menu of the WDS or equivalent.
10. After verifying that the PATS function menu is displayed again on the WDS or equivalent screen, select “Exit” to complete the WDS or equivalent function.
11. After Step 10, wait 10 s or more and turn the ignition switch to the LOCK position using key 1.
12. Using key 1, turn the ignition switch to the ON position.
-
Note
-
• Although the security light flashes and DTC 21 is displayed, this does not indicate an improper procedure. Continue to perform the procedure as indicated.
13. After Step 12, wait 3 s or more and turn the ignition switch to the LOCK position, remove key 1.
14. Using key 2, turn the ignition switch to the ON position.
15. Verify that the security light illuminates approx. 3 s and then goes out.
16. After verifying that the security light goes out, turn the ignition switch to the LOCK position using key 2, and then remove key 2.
17. If an additional key needs to be registered, repeat Steps 14—16 in the same manner as key 2. Steps 14—16 must be performed within 1 min for each key. If the ignition switch is maintained in the ON position for 1 min or more, key registration according to Steps 14—16 will not be possible. If this occurs, refer to “No.1 Additional Key Registration Procedure (Using Two Valid Keys)” to register any additional keys.
No.8 Security Access Procedure
-
Note
-
• Security access must be performed when performing the following functions: “Program Additional Ignition Key”, “Ignition key ID number Erase”, “Customer Spare Key Programming Enable/Disable” and “Parameter Reset”.
Procedure
1. Connect the WDS or equivalent to the DLC-2.
2. Select “Body/Security/PATS function” from the screen menu of the WDS or equivalent.
3. Security access is started and the WDS or equivalent displays “Outcode”.
-
Note
-
• When “Outcode” is first displayed, turning the ignition switch from the LOCK to the ON position 5 times will change the “Outcode”.
4. Input the corresponding “Incode” for the “Outcode” displayed on the WDS or equivalent screen.
5. After successfully performing security access, “Program Additional Ignition Key”, “Ignition key ID number Erase” or “Customer Spare Key Programming Enable/Disable” is displayed on the WDS or equivalent screen. When performing “Parameter Reset”, security access is requested two times and after successfully performing it the second time, “Replacement Module” is displayed.
 ar8wzw00001431