|
atraaw00002330
RADIATOR REMOVAL/INSTALLATION[L3]
id0112a1801400
1. Disconnect the negative battery cable.
2. Remove the both splash shields.
3. Drain the engine coolant. (See ENGINE COOLANT REPLACEMENT[L3].)
4. Remove the front bumper. (See FRONT BUMPER REMOVAL/INSTALLATION.)
5. Remove in the order indicated in the table.
6. Install in the reverse order of removal.
7. Refill the engine coolant. (See ENGINE COOLANT REPLACEMENT[L3].)
8. Inspect for engine coolant leakage. (See ENGINE COOLANT LEAKAGE INSPECTION[L3].)
9. Inspect the ATF level. (See AUTOMATIC TRANSAXLE FLUID (ATF) INSPECTION[GF4AX-EL].)
atraaw00002330
|
|
1
|
Radiator bracket
|
|
2
|
Hood latch
(See Hood Latch Removal Note.)
|
|
3
|
Center support
(See Center Support Removal Note.)
|
|
4
|
Connector
|
|
5
|
Radiator upper hose
|
|
6
|
ATF oil cooler hose
|
|
7
|
Coolant reserve tank hose
|
|
8
|
Radiator lower hose
|
|
9
|
Radiator and cooling fan component
|
|
10
|
Cooling fan component
|
|
11
|
Radiator
|
Hood Latch Removal Note
1. Remove the hood latch with the cable still connected. Position the hood latch so that it is out of the way.
atraaw00002331
|
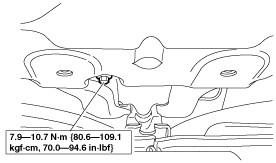
Center Support Removal Note
1. Remove the two bolts and the center support.
atraaw00002332
|
Radiator and Cooling Fan Component Removal Note
1. Remove the radiator and cooling fan component from above the engine compartment.