|
atraaw00001146
QUICK RELEASE CONNECTOR REMOVAL/INSTALLATION[L3]
id0114a2801700
Quick Release Connector Type
atraaw00001146
|
Type A Removal
1. Follow BEFORE SERVICE PRECAUTION to perform the "Fuel Line Safety Procedure" before servicing the fuel system quick release connector, and wipe off the foreign material on the surface of the connecting area. (See BEFORE SERVICE PRECAUTION[L3].)
2. Rotate the quick release connector release tab to the stopper position.
atraaw00000850
|
3. Pull out the quick connector straight from the pipe and disconnect it.
atraaw00000851
|
4. Cover the disconnected quick release connector and pipe with vinyl sheeting or a similar material to prevent it from becoming scratched or dirty.
Type A Installation
atraaw00000852
|
1. Inspect the fuel hose and pipe sealing surface for damage and deformation.
2. Apply a small amount of clean engine oil to the sealing surface of the pipe.
3. Reconnect the fuel hose straight to the pipe until a click is heard.
4. Lightly pull and push the quick release connector a few times by hand, and then verify that it can move (2—3 mm {0.079—0.118 in}) and is connected securely.
5. Inspect all related parts by performing AFTER SERVICE PRECAUTION. (See AFTER SERVICE PRECAUTION[L3].)
Type B Removal
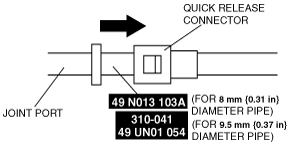
When using SST 49 N013 103A or 310-041 (49 UN01 054)
1. Follow “BEFORE SERVICE PRECAUTION” and remove dirt from the connecting surfaces before performing any work operations. (See BEFORE SERVICE PRECAUTION[L3].)
2. Verify that the quick release connector joint area is free of foreign material. Clean if necessary.
3. Install the SST as shown in the figure and push into the quick release connector to disconnect the fuel pipe.
atraaw00000239
|
4. Cover the disconnected quick release connector and fuel pipe to prevent them from being scratched or contaminated with foreign material.
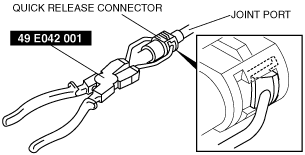
When using SST 49 E042 001
1. Follow “BEFORE SERVICE PRECAUTION” and remove dirt from the connecting surfaces before performing any work operations. (See BEFORE SERVICE PRECAUTION[L3].)
2. Set the SST parallel to the quick release connector.
atraaw00000250
|
3. Hold the center of the retainer tabs with the SST ends and press the retainer.
4. Pull the connector side and disconnect the quick release connector.
5. Raise a retainer tab using the SST and remove the retainer.
atraaw00000251
|
6. Cover the disconnected quick release connector and fuel pipe with vinyl sheeting or a similar material to prevent it from scratches or dirt.
Type B Installation
1. Verify that the sealing surfaces of the fuel hose or fuel pipe have no damage or deformation. Replace if necessary.
2. Install a new retainer to the quick release connector, then visually verify that the retainer tab is installed securely to the connector.
3. Apply a small amount of clean engine oil to the sealing surface of the fuel pipe.
4. Push the quick release connector into the fuel pipe until a click is heard.
atraaw00000242
|
5. Lightly pull and push the quick release connector a few times by hand, and then verify that it can move 2.0—3.0 mm and is connected securely.