 |
atraaw00000502
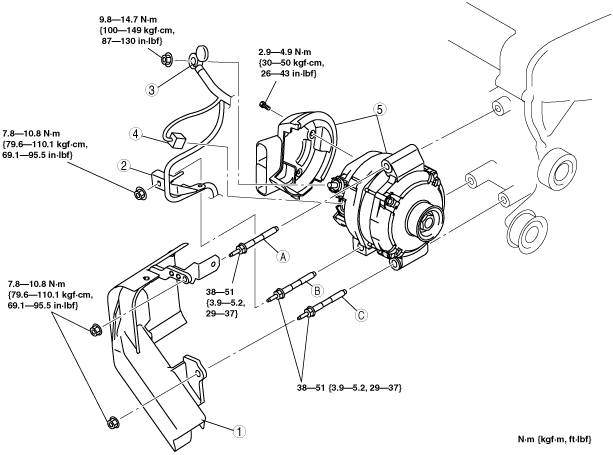
GENERATOR REMOVAL/INSTALLATION[L3]
id0117a3800200
1. Disconnect the negative battery cable.
2. Remove the splash shield (RH).
3. Remove the drive belt. (See DRIVE BELT REMOVAL/INSTALLATION[L3].)
4. Position the P/S pressure hose out of the way.
5. Remove the exhaust manifold insulator. (See EXHAUST SYSTEM REMOVAL/INSTALLATION[L3].)
6. Remove in the order indicated in the table.
7. Install in the reverse order of removal.
atraaw00000502
|
|
1
|
Generator duct
|
|
2
|
Wiring harness bracket
|
|
3
|
Terminal B cable
|
|
4
|
Generator connector
|
|
5
|
Generator and generator heat insulator
|
Generator and Generator Heat Insulator Removal Note
1. Remove the generator and generator heat insulator together from the engine, and position them in the engine compartment in a location where no part can be damaged.
2. Remove the generator heat insulator from the generator.
3. Remove the generator from above the engine compartment.
Generator and Generator Heat Insulator Installation Note
1. From above the engine compartment, set the generator down inside the engine compartment in a position where no part can be damaged.
2. Install the generator heat insulator to the generator.
3. Install the generator and generator heat insulator together to the engine.
4. Tighten bolt A temporarily.
5. Tighten bolt B, C to the specified tightening torque.
6. Tighten bolt A to the specified tightening torque.