|
atraaw00002563
JOINT SHAFT REMOVAL/INSTALLATION[L3]
id0313008009a1
1. Drain the ATF.
2. Remove in the order indicated in the table.
3. Install in the reverse order of removal.
4. Add the ATF. (See AUTOMATIC TRANSAXLE FLUID (ATF) REPLACEMENT[GF4AX-EL].)
atraaw00002563
|
|
1
|
Tie-rod end
(See Tie-rod End Removal Note.)
|
|
2
|
Lower arm ball joint
|
|
3
|
Drive shaft, axle component
|
|
4
|
Joint shaft
(See Joint Shaft Removal Note.)
|
|
5
|
Clip
(See Clip Installation Note.)
|
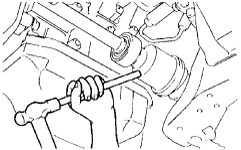
Tie-rod End Removal Note
1. Detach the tie-rod end from the steering knuckle using the SST.
atraaw00002926
|
Lower Arm Ball Joint Removal Note
1. Remove the lower arm ball joint bolt and nut.
2. Using a clean rag-wrapped tire lever or equivalent, push down on the lower arm to disconnect it from the steering knuckle.
atraaw00002565
|
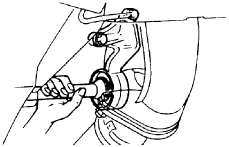
Drive Shaft, Axle Component Removal Note
1. Using a brass bar and hammer, disconnect the drive shaft from the joint shaft by tapping the outer ring on the differential side.
atraaw00002566
|
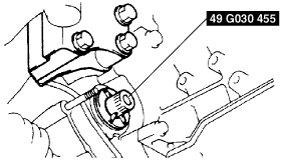
Joint Shaft Removal Note
1. Disconnect the joint shaft bracket from the cylinder block and remove the joint shaft.
atraaw00002567
|
2. Install the SST to the transaxle after the joint shaft is removed.
atraaw00003194
|
Clip Installation Note
1. Install a new joint shaft clip to the clip groove at the end of the joint shaft.
atraaw00002569
|
Joint Shaft Installation Note
1. Install the joint shaft to the transaxle.