 |
atraaw00001773
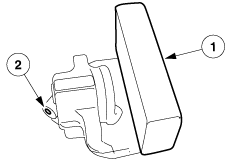
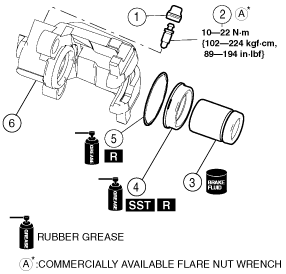
CALIPER (REAR) DISASSEMBLY/ASSEMBLY
id041100800600
1. Remove the brake caliper. (See REAR BRAKE (DISC) REMOVAL/INSTALLATION.)
2. Secure the brake caliper in a vise.
3. Disassemble in the order indicated in the table.
atraaw00001773
|
|
1
|
Bleeder cap
|
|
2
|
Bleeder screw
|
|
3
|
Piston
(See Piston Disassembly Note.)
|
|
4
|
Dust seal
(See Dust Seal Assembly Note.)
|
|
5
|
Piston seal
(See Piston Seal Disassembly Note.)
(See Piston Seal Assembly Note.)
|
|
6
|
Caliper body
|
4. Assemble in the reverse order of disassembly.
Piston Disassembly Note
1. Remove the piston.
atraaw00001774
|
Piston Seal Disassembly Note
1. Remove the piston seal using a plastic or wooden tool.
Piston Seal Assembly Note
1. Lubricate the piston seal with clean brake fluid.
2. Assembly the piston seal.
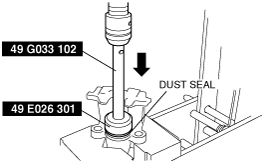
Dust Seal Assembly Note
1. Assemble a new dust seal to the caliper using the SSTs and a press.
atraaw00002456
|
2. Verify that there is no deformation or damage on the dust seal, or gaps between the dust seal and caliper body.
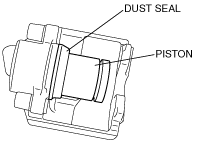
Piston Assembly Note
1. Press the piston into the dust seal opening as shown in the figure.
atraaw00001776
|
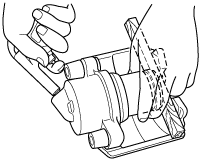
2. Insert a piece of wood between the caliper body and the piston, and while supporting the piston by hand, blow compressed air through the brake hose installation hole.
atraaw00001777
|
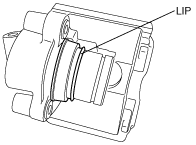
3. Verify that the dust seal lip covers the piston end as shown in the figure.
atraaw00001778
|
4. Press the piston into the caliper body completely.