AUTOMATIC TRANSAXLE FLUID (ATF) REPLACEMENT[LA4AX-EL (CD4E)]


id051708800600

Warning
•  When the transaxle and ATF are hot, they can cause severe burns. Turn off the engine and wait until they are cool before replacing the ATF.
Caution
•  Use of a non-approved ATF can cause transaxle damage.
•  Too much ATF can cause shift or clutch engagement problems.

1.  Lift up the vehicle.

2.  Place a suitable container under the transaxle drain plug.

Note
•  If internal damage to the transaxle is suspected, drain the ATF through a paper filter.
A few particles produced from friction materials indicate normal operating condition. If there are excessive metal particles or friction material particles in the ATF, the transaxle must be completely cleaned and repaired.

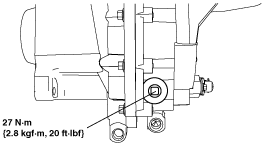
3.  Remove the transaxle drain plug and drain the ATF.

atraaw00002648

4.  Clean the drain plug threads and apply a light coat of silicone sealant.

5.  Install the transaxle drain plug.

6.  Lower the vehicle.

Note
•  Before adding any ATF, make sure the correct type is used. The type of ATF used is normally indicated on the oil dipstick or oil dipstick handle.
•  If necessary, add ATF in 0.25 L {0.26 US qt, 0.22 lmp qt} increments through the filler tube until the level is correct.
•  If an overfill condition occurs, excess ATF should be removed.

7.  Add the specified ATF.

ATF type
Mercon® ATF or equivalent

8.  Inspect the ATF level. (See AUTOMATIC TRANSAXLE FLUID (ATF) INSPECTION[LA4AX-EL (CD4E)].)