|
atraaw00002382
MAIN CONTROL VALVE BODY REMOVAL/INSTALLATION[LA4AX-EL (CD4E)]
id051708805600
On-vehicle Removal
1. Disconnect the negative battery cable.
2. Remove the battery and battery tray. (See BATTERY REMOVAL/INSTALLATION[AJ (3.0L Duratec)].)
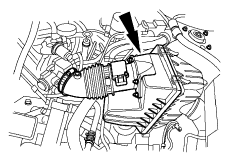
3. Disconnect the crankcase vent hose and MAF sensor connector.
atraaw00002382
|
4. Remove the air hose and air cleaner cover.
atraaw00002383
|
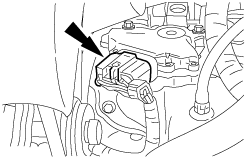
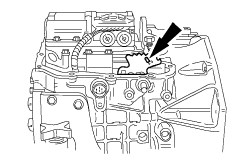
5. Disconnect the transaxle wiring harness connector.
atraaw00002834
|
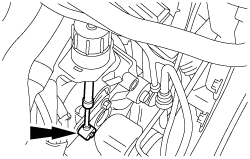
6. Disconnect the TR switch connector.
atraaw00002826
|
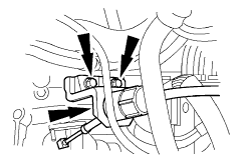
7. Disconnect the selector cable.
atraaw00002828
|
8. Remove the selector cable and bracket, then position them out of the way.
atraaw00002577
|
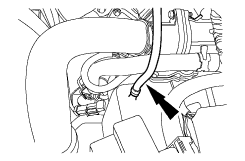
9. Remove the vent tube hose.
atraaw00002694
|
10. Lift up the vehicle.
11. Remove both front wheels. (See WHEEL AND TIRE REMOVAL/INSTALLATION.)
12. Remove the splash shield.
atraaw00002403
|
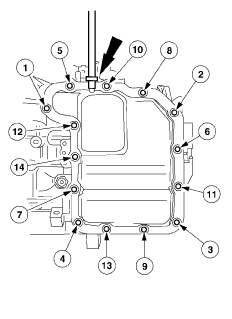
13. Remove the bolts in the order as shown in the figure, and then remove the main control cover.
atraaw00002695
|
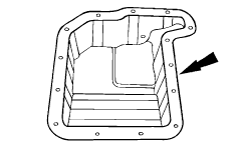
14. Remove the main control cover gasket.
atraaw00002696
|
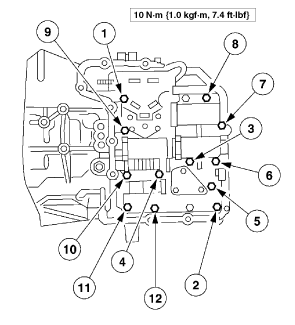
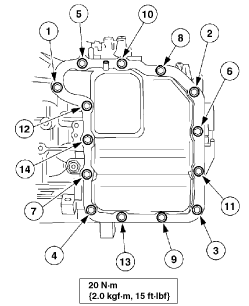
15. Remove the main control valve body bolts in the order as shown in the figure.
atraaw00002697
|
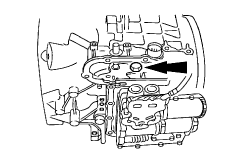
16. Lift the main control valve body while disconnecting the manual valve link.
atraaw00002698
|
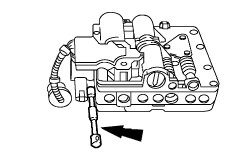
17. Depress the retaining tabs and push the solenoid valve body connector down through the transaxle case.
atraaw00002699
|
18. Make sure the manual valve control lever does not fall out of the main control valve body while removing from the vehicle.
atraaw00002700
|
On-vehicle Installation
1. Install the manual control valve.
atraaw00002701
|
2. Inspect the wiring harness connector O-ring of the solenoid valve body for damage.
atraaw00002699
|
3. Push the solenoid valve body wiring harness connector into the case.
4. Connect the manual valve link to the main control valve body.
atraaw00002698
|
5. Install the main control valve body and tighten the bolts in the order as shown in the figure.
atraaw00002702
|
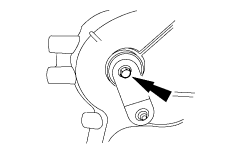
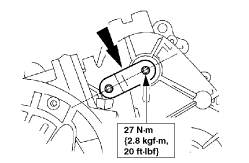
6. Loosen the nut on the ball stud for the manual valve detent lever actuating rod component.
atraaw00002703
|
7. Remove the manual control lever outer component bolt.
atraaw00002704
|
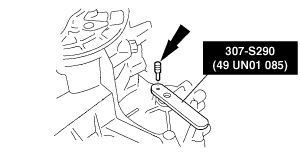
8. Using the SST and pin, align the shifter shaft.
atraaw00002705
|
9. Rotate the manual valve detent lever component to the D range.
atraaw00002706
|
10. Tighten the nut on the ball and remove the SST.
atraaw00002703
|
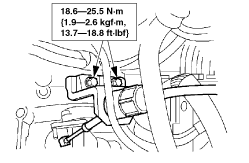
11. Tighten the detent nut. Rotate back to the D range and inspect the adjustment.
atraaw00002707
|
12. Using the SST and pin, align the shifter shaft.
atraaw00002705
|
13. Install the manual control lever.
atraaw00002708
|
14. Install and rotate the manual valve detent lever component to the N position.
atraaw00002709
|
15. Install a new gasket on the main control cover.
atraaw00002696
|
16. Install the main control cover, and tighten the bolts in the order as shown in the figure.
atraaw00002710
|
17. Install the splash shield.
atraaw00002403
|
18. Install the front wheel (LH). (See WHEEL AND TIRE REMOVAL/INSTALLATION.)
19. Lower the vehicle.
20. Install the selector cable and bracket.
atraaw00002711
|
21. Connect the selector cable.
atraaw00002828
|
22. Clean out any obstructions in the vent tube hose using low air pressure.
atraaw00002694
|
23. Install the vent tube hose and clamp.
24. Connect the TR switch connector.
atraaw00002826
|
25. Connect the transaxle wiring harness connector.
atraaw00002834
|
26. Install the air hose and air cleaner cover.
atraaw00002383
|
27. Connect the crankcase vent hose and MAF sensor connector.
atraaw00002382
|
28. Verify that there is no blockage or kinks, and the vent hose routing is correct.
29. Install the battery and battery tray. (See BATTERY REMOVAL/INSTALLATION[AJ (3.0L Duratec)].)
30. Connect the negative battery cable.
31. Inspect the ATF level and add Mercon® ATF if necessary.
32. Start the engine and shift the selector lever and pause momentarily in each shift position while depressing the brake pedal. Add ATF if necessary.