STEP
INSPECTION
ACTION
1
INSPECT HEADLIGHT RELAY
Disconnect the headlight relay connector.
Do the headlights go out?
Yes
Go to Step 4.
No
Go to the next step.
2
INSPECT HEADLIGHT RELAY
Inspect the headlight relay. (See RELAY INSPECTION.)
Is the headlight relay normal?
Yes
Go to the next step.
No
Replace the headlight relay.
3
INSPECT RELATED WIRING HARNESS FOR SHORT TO POWER SUPPLY
Disconnect the H/L-RH 15 A fuse.
Measure the voltage at the H/L-RH 15 A fuse.
Is the voltage more than 10 V?
Yes
Repair the related wiring harness.
No
Reconnect the headlight relay.
4
INSPECT GEM
Disconnect GEM connector.
Do the headlight go out?
Yes
Go to Step 6.
No
Go to the next step.
5
INSPECT RELATED WIRING HARNESS FOR SHORT TO GROUND
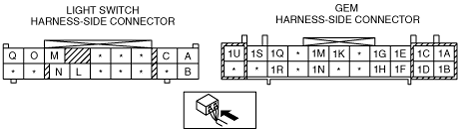
Measure the resistance between GEM terminal I and ground.
Is the resistance more than 10,000 ohms?
Yes
Replace the headlight relay.
No
Repair the related wiring harness.
6
INSPECT LIGHT SWITCH
Connect the GEM connector.
Disconnect the light switch connector.
Do the headlights go out?
Yes
Replace the light switch.
No
Go to the next step.
7
INSPECT RELATED WIRING HARNESS FOR SHORT TO GROUND
Measure the resistance between light switch terminal H and ground.
Is the resistance more than 10,000 ohms?
Yes
Go to the next step.
No
Repair the related wiring harness.
8
INSPECT GEM OPERATION
Disconnect all GEM connectors.
Inspect for the following items:
• Corrosion
• Terminal separation
Connect all the connectors and verify that their positions are correct.
Operate the system and inspect for any malfunction.
Is there any malfunction?
Yes
Replace the GEM.
Clear the DTC.
Repeat GEM DTC inspection.
No
The malfunction may result from loose connectors or corrosion.
Clear the DTC.
Repeat the DTC inspection.