WHEEL AND TIRE REMOVAL/INSTALLATION
id021200800700
Removal
1. Loosen the wheel nuts.
-
Caution
-
• Do not use heat to loosen a seized wheel nut. Heat can damage the wheel and wheel bearings.
-
Note
-
• To avoid damage or scratching to the center cap, place facing up when removed.
-
(1) If necessary, remove the center cap.
-
(2) With the weight of the vehicle on the wheels, loosen the wheel nuts.
2. Lift up the vehicle.
3. Remove the wheel and tire assembly.
-
(1) Remove the wheel nuts.
-
(2) Remove the wheel and tire assembly, using a side-to-side rocking motion.
Installation
1. Clean the wheel hub mounting surface and wheel pilot.
-
Warning
-
• Whenever a wheel is installed, always remove any corrosion, dirt or foreign material present on the mounting surfaces of the wheel or the surface of the wheel hub, brake drum or brake disc that contacts the wheel. Installing wheels without correct metal-to-metal contact at the wheel mounting surfaces can cause the wheel nuts to loosen and the wheel to come off while the vehicle is in motion, causing loss of control. Failure to follow these instructions may result in personal injury.
2. Install the tire and wheel assembly.
-
(1) Position the tire and wheel assembly.
-
(2) Install the wheel nuts hand-tight, then lower the vehicle.
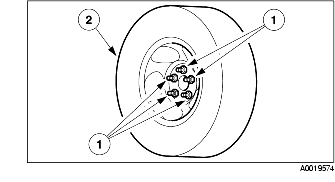
3. Tighten the wheel nuts in the sequence shown.
-
Caution
-
• Tighten the wheel nuts in a criss-cross pattern. Failure to tighten this can result in high brake disc runout, which will speed up the development of brake roughness, shudder and vibration.
4. Install the center cap.