• When performing an asterisked (*) troubleshooting inspection, shake the wiring harness and connectors while doing the inspection to discover whether poor contact points are the cause of any intermittent malfunctions. If there is a problem, check to make sure connectors, terminals and wiring harness are connected correctly and undamaged.
Diagnostic procedure
|
STEP
|
INSPECTION
|
ACTION
|
|
|---|---|---|---|
|
1
|
VERIFY THAT SAS CONTROL MODULE CONNECTOR IS CONNECTED
• Turn ignition switch to LOCK position.
• Disconnect negative battery cable and wait for more than 1 minute.
• Turn up floor covering.
• Are all SAS control module connectors securely connected?
|
Yes
|
Go to next step.
|
|
No
|
Reconnect connector properly, then go to Step 6.
|
||
|
2
|
INSPECT SAS CONTROL MODULE TERMINAL 2T
• Remove clock spring.
• Remove glove compartment.
• Disconnect passenger-side air bag module connector.
• Disconnect driver and passenger-side side air bag module connectors. (Vehicles with side air bag)
• Remove B-pillar lower trims. (Vehicle with pre-tensioner front buckle)
• Disconnect driver- and passenger-side pre-tensioner seat belt connectors. (Vehicle with pre-tensioner front buckle)
• Disconnect all SAS control module connectors.
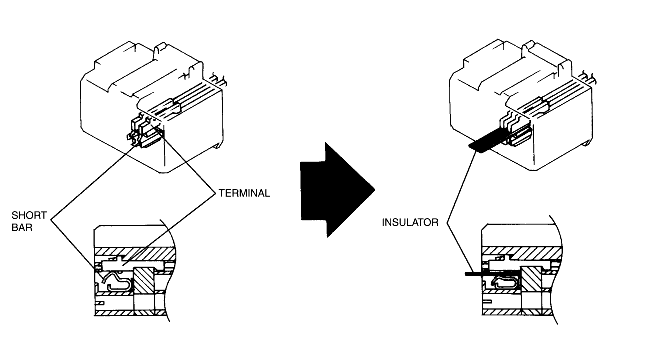
• Is short bar between SAS control module connector terminal 2T bent?
|
Yes
|
Replace wiring harness, then go to Step 6.
|
|
No
|
Go to next step.
|
||
|
3
|
INSPECT SHORT BAR HOOK OF SAS CONTROL MODULE
• Is short bar hook of SAS control module okay?
|
Yes
|
Go to next step.
|
|
No
|
Replace SAS control module, then go to Step 6.
|
||
|
* 4
|
INSPECT WIRING HARNESS BETWEEN SAS CONTROL MODULE AND INSTRUMENT CLUSTER FOR SHORT TO GROUND
• Remove instrument cluster.
• Insert insulator between SAS control module connector terminal 2T so short bar cannot function.
• Is there continuity between SAS control module connector terminal 2T and ground?
|
Yes
|
Replace wiring harness, then go to Step 6.
|
|
No
|
Go to next step.
|
||
|
5
|
INSPECT FOR SHORT TO GROUND IN INSTRUMENT CLUSTER CIRCUIT
• Is there continuity between terminal 1L and any of following terminals of print plate on instrument cluster?
|
Yes
|
Replace instrument cluster, then go to next step.
|
|
No
|
Replace SAS control module, then go to next step.
|
||
|
6
|
VERIFY WHETHER MALFUNCTION SYMPTOM OCCURS AFTER REPAIR OR NOT
• Connect all SAS control module connectors.
• Connect driver and passenger-side
pre-tensioner front buckle connectors. (Vehicle with pre-tensioner front buckle)
• Disconnect driver and passenger-side side air bag module connectors. (Vehicle with side air bag)
• Connect passenger-side air bag module connector.
• Connect clock spring connector.
• Connect instrument cluster connector.
• Connect negative battery cable.
• Turn ignition switch to ON position.
• Does air bag system warning light operate properly?
|
Yes
|
Complete troubleshooting, then explain repairs to customer.
|
|
No
|
Recheck malfunction symptoms, then repeat from Step 1 if malfunction recurs.
|
||