FRONT SEAT BELT RETRACTOR REMOVAL/INSTALLATION
id081100801000
Removal/Installation
-
Warning
-
• All seat belt components including seat belt retractors/buckles/anchors, seat belt shoulder height adjusters (if equipped), child seat anchors, and installation hardware should be inspected after any collision. All seat belt components should be replaced unless a qualified technician finds the components show no damage and operate properly. Seat belt components not in use during a collision should also be inspected and replaced if either damage or improper operation is noted.
-
Note
-
• The passenger's seat is shown in the figure. The driver's seat is the same as the passenger's seat.
1. Remove the B pillar trim. (See B-PILLAR TRIM REMOVAL/INSTALLATION.)
2. Remove the seat belt anchor.
-
(1) Remove the bolt.
-
(2) Remove the seat belt anchor.
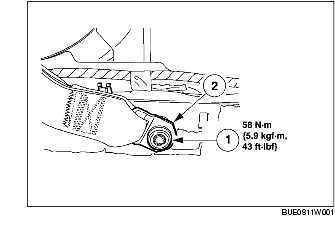
3. Remove the front seat belt retractor from the B pillar.
-
(1) Remove the bolt.
-
(2) Remove the front seat belt retractor from the B pillar.
4. Remove the front seat belt retractor.
-
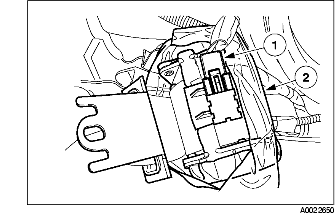
(1) Disconnect the front seat belt retractor connector.
-
(2) Remove the front seat belt retractor.
5. Install in the reverse order of removal.
-
• After installing the front seat belt retractor, verify that the retractor is not in the Automatic Locking Retractor (ALR) mode.
-
Note
-
• Before installing, verify that the seat belt is not twisted.
-
• Tighten the bolts to the specified torque.
6. Inspect the seat belt system for normal operation.
-
• To verify that the new retractor is operating normally, perform the Emergency Locking Retractor (ELR) mode functional test.