Control Arm: Service and Repair
Lower Control Arm ReplacementRemoval Procedure
1. Raise and support the vehicle. Refer to Vehicle Lifting.
2. Remove the tire and wheel assembly.
3. Remove the stabilizer shaft link.
4. Remove the ABS harness from the lower control arm.
5. Remove the ball joint from the knuckle.
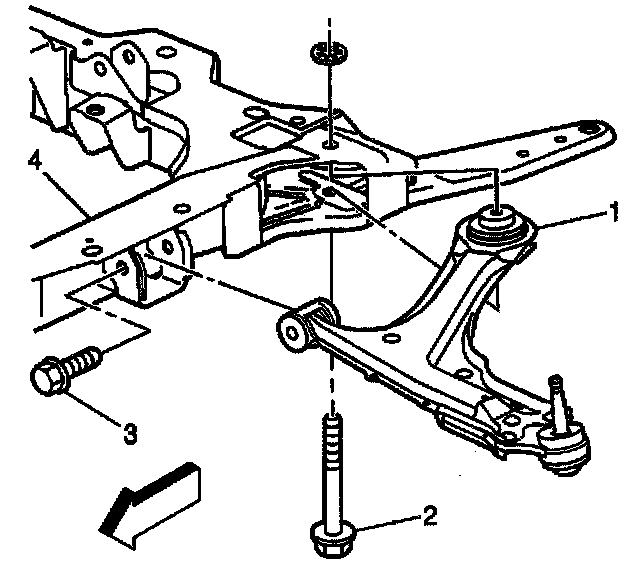
6. Remove the bolt (2) attaching the control arm (1) to the front suspension crossmember (4).
7. Remove the bolt (3) from the control arm (1).
8. Remove the control arm (1) from the vehicle.
Installation Procedure
1. Install the control arm (1) into position and install the bolt (2) attaching the control arm (1) to the crossmember (4). Hand tighten the bolt.
2. Install the bolt (3) to the control arm (1). Hand tighten the bolt.
3. Install the lower ball joint to the steering knuckle.
4. Install the stabilizer shaft link.
5. Install the ABS harness onto the lower control arm.
6. Slightly raise the vehicle.
7. Remove the jack stands from under the crossmember.
8. Install the tire and wheel assembly.
Notice: Refer to Fastener Notice in Service Precautions.
9. With the vehicle at curb height, tighten the control arm attaching bolts.
^ Tighten the front suspension crossmember front bolt (3) to 60 Nm (45 ft. lbs.) plus 120 degrees rotation.
^ Tighten the front suspension crossmember rear bolt (2) to 100 Nm (74 ft. lbs.) plus 180 degrees rotation.
10. Check the front wheel alignment. Refer to Wheel Alignment Specifications.