Clutch Disc and Pressure Plate
Clutch Disc and Pressure Plate

Removal
WARNING: Do not breathe dust or use compressed air to blow dust from storage containers or friction components. Remove dust using government-approved techniques. Friction component dust may be a cancer and lung disease hazard. Exposure to potentially hazardous components may occur if dusts are created during repair of friction components, such as brake pads and clutch discs. Exposure may also cause irritation to skin, eyes and respiratory tract, and may cause allergic reactions and/or may lead to other chronic health effects. If irritation persists, seek medical attention or advice. Failure to follow these instructions may result in serious personal injury.
1. Remove the transmission. For additional information, refer to Manual Transaxle/Transmission Manual Transmission.
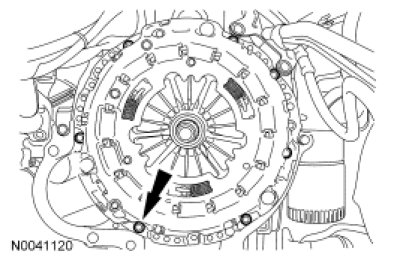
2. NOTICE: If the clutch disc and pressure plate are to be reinstalled, bolts must be removed evenly or permanent damage to the diaphragm spring will occur, resulting in complete clutch release.
NOTE: If the parts are to be reused, index-mark the clutch pressure plate to the flywheel.
Remove the 6 bolts, clutch pressure plate and the clutch disc.


3. Inspect the transmission pilot bearing:
- for misalignment and looseness in the crankshaft or flywheel.
- needle rollers for scoring, discoloration, wear and broken rollers.
- seal for damage and lubricant leakage.
- Install a new transmission pilot bearing if any of these conditions are present. For additional information, refer to Pilot Bearing Removal and Replacement.
4. NOTE: Use emery cloth to remove minor imperfections in the clutch disc friction surface.
Inspect the clutch disc for:
- oil and grease saturation.
- worn and loose rivets at the hub.
- broken springs.
- wear and rust on the splines.
- Install a new clutch disc if any of these conditions are present.
5. NOTE: If necessary, use a suitable cleaning solution to remove any oil film from the clutch pressure plate friction surface.
Inspect the clutch pressure plate levers for heavy wear associated with binding. Also, inspect for substantial difference in lever wear. Inspect the clutch pressure plate friction surface for scoring, burning, heat checking, distortion, warping and dishing.
- Install a new clutch pressure plate if any of these conditions are present.
6. NOTE: If necessary, use a suitable cleaning solution to clean the flywheel clutch surface.
Inspect the flywheel for:
- surface cracks.
- heat check.
- glazing.
- scoring.
- scratches or grooves.
- For minor damage, finish the flywheel surface with coarse emery cloth or with a fine grade (400 grit) sandpaper. To polish the surface, stroke parallel to the machine lines.
7. Inspect the flywheel or ring gear for worn, chipped or broken teeth.
Installation
1. Lubricate the transmission pilot bearing with grease.

2. Adjust the clutch pressure plate.
1. Using a suitable press, press downward on the fingers until the adjusting ring moves freely.
2. Rotate the adjusting ring counterclockwise to compress the tension springs. Hold the adjusting ring in this position.
3. Release the pressure on the fingers. The adjusting ring will stay in the reset position.

3. Using a suitable clutch aligner, position the clutch disc on the flywheel.

4. NOTE: If reusing the clutch pressure plate and flywheel, align the marks made during removal.
Using a suitable aligner, align the clutch disc and the clutch pressure plate. Install the 6 bolts and tighten in a cross pattern sequence.
- Tighten to 27 Nm (20 lb-ft).
5. NOTE: Apply a thin film of Dow Corning(R) Molykote(R) G-n Metal Assembly Paste to the clutch slave cylinder bearing face.
NOTE: Before securing the transmission to the engine, connect the hydraulic tube to the clutch slave cylinder.
Install the transmission. For additional information, refer to Manual Transaxle/Transmission Manual Transmission.