Door Lamps and Switches
Door Lamps and Switches
Mirror Adjustment Switch
Removing

- Switch off ignition and remove ignition key.
- Remove front door trim..
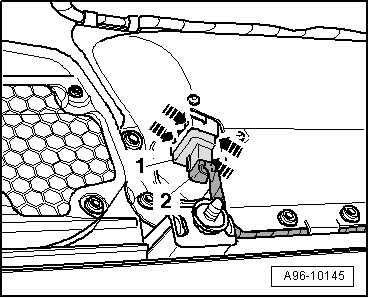
- Release retaining spring - 1 - and push electrical harness connector - 2 - out of bracket - arrow -.
- Disconnect electrical harness connector at mirror adjustment switch.
- Remove the screws - 3 - and - 4 - and - 6 through 12 -.
- Remove armrest and disconnect electrical harness connector - 5 - for window regulator switch.
- Remove screws - arrows -.

- Remove switch mount cover - 1 - from armrest.
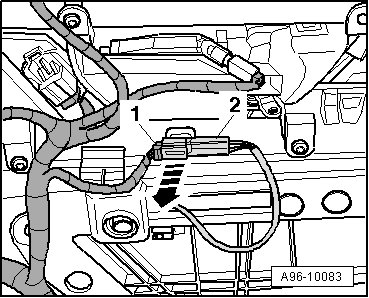
- Disconnect electrical harness connector - 1 - at mirror adjustment switch - 2 -.

- Carefully release catches - arrows - using a small screwdriver.
- Pull mirror adjustment switch downward out of switch mount.
Installing
Install in reverse order of removal, observing the following:
• When installing, make sure that symbol panel is inserted in front of mirror adjustment switch.
- Press switch into switch mount until fasteners engage.
- Install front door trim.
Tightening Specifications

Power Window Control Head
Removing

- Switch off ignition and remove ignition key.
- Remove front door trim.
- Disconnect the Power Window Control Head (in Driver door) (E512) connector.
- Release catches - 2 - on armrest side by pressing on retaining element - arrows -.
- Pull Power Window Control Head (in drivers's door) (E512) - item 1 - downward out of door trim.
• If it is difficult to remove the Power Window Control Head (in Driver door) (E512) as described, remove the armrest. Refer to => Body Interior 70 Removal and Installation
Installing
Install in reverse order of removal, observing the following:
- Press Power Window Control Head (in drivers's door) (E512) into switch mount until catches engage.
- Install front door trim.
Luggage Compartment Rear Lid Lock and Fuel Tank Lid Unlock Buttons
Removing
- Switch off ignition and remove ignition key.
- Remove front door trim.
- Disconnect electrical harness connector - 2 - at switch for Rear Lid Remote Control Lock Switch (E233) and Fuel Tank Lid Unlock Button (E319) - item 1 -.
- Carefully release catches - arrows - using a small screwdriver.
- Pull switch for Rear Lid Remote Control Lock Switch (E233) and Fuel Tank Lid Unlock Button (E319) downward out of switch mount.
Installing
Install in reverse order of removal, observing the following:
- Press switch into switch mount until fasteners engage.
- Install front door trim.
Window Regulator Switch
Removing

- Switch off ignition and remove ignition key.
- Remove front door trim.
- Carefully release catches - arrows - using a small screwdriver.
- Pull Window Regulator Switch (in RF door) (E107) - item 2 - downward out of switch mount.
- Disconnect electrical connector - 1 -.
Installing
Install in reverse order of removal, observing the following:
- Press Window Regulator Switch (in RF door) (E107) into switch mount until catches engage.
- Install front door trim.
Left/Right Rear Window Switch
Removing

- Switch off ignition and remove ignition key.
- Remove rear door trim..
- Remove screws - arrows -.
- Disconnect electrical harness connector - 1 - for window regulator switch and for ashtray illumination - 2 -.
- Remove armrest at door trim.
- Carefully release catches - arrows - using a small screwdriver.

- Pull rear window switch - 1 - downward out of switch mount.
Installing
Install in reverse order of removal, observing the following:
- Press switch into switch mount until fasteners engage.
- Install rear door trim.
Tightening Specifications

Front Seat Memory Program Control Head
Removing

- Carefully remove decorative panel - 1 - from door trim - arrow -.
- Remove screws - arrows -.

- Remove Front Seat Memory Program Control - 1 - from door trim.
- Unplug connector.
Installing
Install in reverse order.
Tightening Specifications

Driver/Front Passenger Interior Locking Switch
Removing

- Switch off ignition and remove ignition key.
- Remove relevant front door trim.. Disconnect electrical connector - 1 -.
- Release retaining clips - arrows - and press interior locking switch from door trim toward vehicle interior.
Installing
Install in reverse order of removal, observing the following:
- Press interior locking switch into switch mount until retaining springs engage.
- Install front door trim.
Rear Interior Locking Switches
Removing
- Switch off ignition and remove ignition key.
- Remove relevant rear door trim.
- Disconnect electrical connector - 1 -.
- Release retaining clips - arrows - and press rear interior locking switch from door trim toward vehicle interior.
Installing
Install in reverse order of removal, observing the following:
- Press rear interior locking switch into switch mount until retaining springs engage.
- Install rear door trim..
Door Opener Lamp Bulb
Removing

- Remove relevant door trim.
- Disconnect electrical connector - 3 -.
- Turn socket - 2 - to the left and pull out at door opening handle - 1 -.
Installing
Install in reverse order of removal, observing the following:
- Insert light bulb for door opener light into opening and engage.
- Install respective door trim.
Interior Door Lighting Strip
Removing
- Remove relevant door trim.
- Disconnect electrical connector - 1 -.
- Unclip connector - 2 - at door trim in - direction of arrow -.
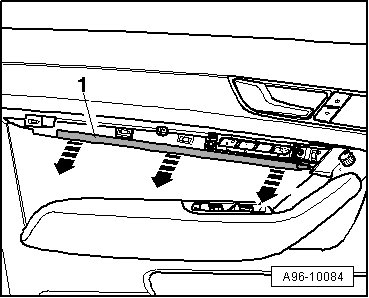
- Carefully pull light strip for door illumination - 1 - off of door trim - arrows -.
- Guide electrical wire out of door trim.
Installing
Install in reverse order of removal, observing the following:
- Insert light strip for door illumination into door trim and engage.
- Install respective door trim.
Central Locking -SAFE- Indicator Lamp
Removing

- Switch off ignition and remove ignition key.
- Remove front door trim..
- Release the retaining clips - arrows -.
- Remove the central locking LED - 1 - down out of the door trim - 2 -.
Installing
Install in reverse order of removal, observing the following:
• The new Central Locking -Safe- Indicator Lamp (K133) must be connected with the door trim wiring harness.
- Disconnect the electrical wire and connect it with the new electrical wire for the Central Locking -Safe- Indicator Lamp (K133) => Electrical Equipment General Information 97.
- Slide the central locking LED in until it engages audibly.
- Install front door trim.
Door Safety and Entry Lamp
Removing

- Press in catch - 1 - using a flat screwdriver and pry out door safety lamp or door entry lamp - 2 -.
- Disconnect electrical connector - 3 -.
- If present, release clips - arrows - and pull cover - 1 - off above light bulb.

- Remove bulb - 1 - (12V, 3 W) on back of door safety light/entry light from socket - 2 -.

Installing
Install in reverse order of removal, observing the following:
- If present, install cover on door safety lamp.
- Insert door safety lamp or access lamp into opening and engage on opposite side.
Rear Door Ashtray Lamp
Removing
- Switch off ignition and remove ignition key.
- Remove rear door trim..
- Remove screws - arrows -.
- Disconnect electrical harness connector - 1 - for window regulator switch and for ashtray illumination - 2 -.
- Remove armrest at door trim.
- Remove insert of rear ashtray.

- Release clips - 2 - and - 3 - and remove ashtray illumination - 1 - toward rear.
Installing
Install in reverse order of removal, observing the following:
- Press ashtray illumination into mount until catches engage.
- Install rear door trim..
Tightening Specifications
