Steering Column Switch Module
Steering Column Switch Module
Special tools, testers and auxiliary items required
• Special Screwdriver (T40056 A)
Removing
- Adjust steering wheel downward and to rear as far as possible, use entire adjustment range of steering column adjustment for this.
- Remove airbag unit.
- Remove steering wheel.
- On vehicles with electrically adjustable steering column, remove lower instrument panel cover on driver's side.
- Remove bolts - 3 - and - 4 - using (T40056 A).

- If present, open mechanical steering column adjustment with handle - 5 -.
- Remove Torx bolts - 6 -.
- Disconnect upper trim - 2 - for steering column switch from lower trim - 1 - and remove both sections.
- If installed, disconnect electrical harness connector at lower trim.
- Remove bolt - 2 -.
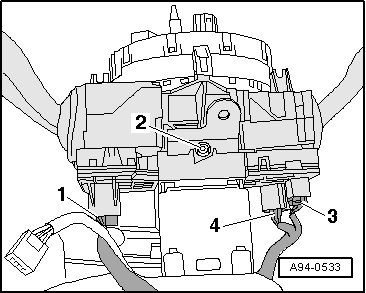
- Disconnect electrical connectors - 1 - and - 3 -.
CAUTION!
The technician must discharge static electricity before disconnecting the electrical connector - 4 -, for example by touching the door striker pin.
- Disconnect electrical connector - 4 -.
- Press catch - 1 - in direction of - arrow - until harness connector - 2 - disengages.

- Carefully pull off steering column switch together with steering column electronic systems control module (J527).
Installing
• Tightening Specifications, refer to => [ Steering Column Switch Module Assembly Overview ] Steering Column Switch Module Assembly Overview and => [ Tightening Specification, Steering
Column Trim ] Steering Column Switch Module Assembly Overview.
Install in reverse order of removal, observing the following:
- Make sure that all harness connectors are engaged properly.
- Insert top trim piece for steering column switch into catches of bottom trim piece, press together and bolt.
- Install lower instrument panel cover on driver's side.
- Install steering wheel.
- Install airbag unit.