Side Trim, Sill Side
Standard Front Seats
• From 07.2006, the usual wiring harness routing to connector station under front seat => [ Connectors, Disconnecting ] Standard Front Seats Overview has been replaced with modular wiring routing => [ Modular Wiring Routing, from 07.2006, Assembly Overview ] Standard Front Seats Overview.
• The modular wiring routing has not been implemented for all countries.
Side Trim, Sill Side
Special tools, testers and auxiliary items required
• Engine and transmission holder (VAS 6095)
• Fixture for seat repair (VAS 6136)

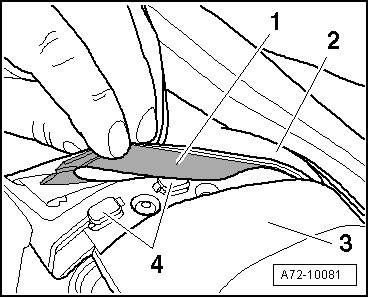
1 Catch
2 Side trim (sill side)
• Removing
- Remove seat => [ Standard Front Seat ].
- Mount the fixture for seat repair (VAS 6136) on the engine and transmission holder (VAS 6095).
- Attach the front seat to the fixture for seat repair (VAS 6136).
- Remove backrest adjustment wheel => [ Backrest Adjusting Wheel ].
- Remove seat height adjustment handle => [ Seat Height Adjustment Handle ].
- Loosen footwell cover retaining strip from side panel => [ Footwell cover retaining strip, loosening ].
- Position a screwdriver to head of plastic rivet - 5 - (Qty. 2).
- Pry out plastic rivet - 5 - (Qty. 2) by turning the screwdriver.
- Remove screw - 4 -.
- Disengage front side panel from locking mechanism - 1 -.
- Pull side panel toward front in order to disengage eyelet - 3 -.
- Disengage side panel toward top.
- Remove connector - 6 -.
• Installing
To install, perform the steps used in removal in reverse order. When doing so, note the following:
- Slide footwell cover retaining strip into side panel brackets - 2 - => [ Footwell cover retaining strip, loosening ].
3 Eye
4 Bolt
5 Plastic rivets (Qty. 2)
6 Connector
7 Wire to four-way lumbar support
Footwell cover retaining strip, loosening
- Disengage retaining strip - 1 - on footwell cover - 2 - from brackets - 4 - (Qty. 2) on side panel - 3 -.