Drive Belts, Mounts, Brackets and Accessories: Service and Repair
Auxiliary Components Bracket
Special tools, testers and auxiliary items required
• Drip Tray for VAS 6100 (VAS 6208)
• Locking Tool (T40098)
• Oil Filter Wrench (3417)
Removing
- Drain the coolant. Refer to => [ Coolant, Draining and Filling ] Service and Repair.

Risk of destroying due to reversed running direction on a used ribbed belt.
• Before removing ribbed belt, marking running direction with chalk or felt-tip pen for reinstallation later.
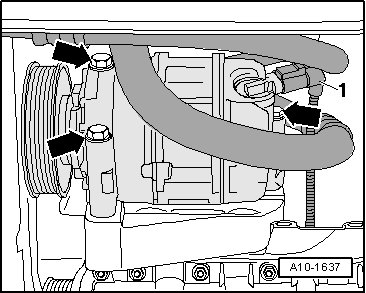
- To release ribbed belt tension, rotate tensioner in direction of - arrow -.
- Secure the tensioner with the (T40098).
- Remove the ribbed belt.
- Remove the bolt - 1 - and remove the ribbed belt tensioner from the accessory assembly bracket.
• Place a cloth under the accessory assembly bracket to collect leaking engine oil.
- Disconnect the connectors - 1 and 4 - from the oil pressure switch (F22) and the reduced oil pressure switch (F378).

- Loosen the hose clamps - arrows - and remove the air guide hose.

- Remove the generator.
- Disconnect solenoid clutch electrical connector - 1 - on Air Conditioning (A/C) compressor.
Refrigerant can cause serious personal injury.
• Do not open the A/C refrigerant circuit.
- Remove A/C compressor bolts - arrows -.
Risk of damaging refrigerant lines and hoses.
• Do not stretch, kink or bend refrigerant lines and hoses.
- Tie up the compressor with the refrigerant lines attached to the longitudinal member.
• The power steering pump hydraulic lines remain connected.
- Remove the bolts - 1 - from the front through the belt pulley and then remove the bolt - 2 - from the back.

• The power steering pump is shown in the illustration without the belt pulley and without the hydraulic lines.
- Remove the power steering pump with the hydraulic lines connected on the longitudinal member.
- Remove the oil filter - arrow - using the (3417).

- Remove the bolt - arrow - for the oil dipstick guide tube.

- Remove the bolts - 1 through 5 - and pull off the accessory assembly bracket from the coolant pump housing.
Installing
Install in reverse order of removal. Note the following:
• Tightening specifications, refer to => [ Ribbed Belt Drive and Auxiliary Component Bracket Overview ] Ribbed Belt Drive and Auxiliary Component Bracket Overview.
• Replace any bolts that were tightened with an additional turn.
• Replace the O-rings and seals.
- Coat the O-rings - 4 - with coolant additive. For the correct coolant, refer to the Parts Catalog.

- Install the connection - 2 - into the coolant pump housing - 3 -.
- Press the accessory assembly bracket - 1 - onto the connection, mount the bolts and tighten to tightening specification. Refer to => [ Accessory Assembly Bracket Tightening Sequence ] Ribbed Belt Drive and Auxiliary Component Bracket Overview.
- Install the power steering pump.
- Install A/C compressor.
- Install generator.
- Install the ribbed belt. Refer to => [ Ribbed Belt ] Ribbed Belt.
- Fill with coolant. Refer to => [ Filling ] Service and Repair.
- Check the oil level.