Cylinder Head Overview, Without Screwdriver Access
Cylinder Head Overview, without Screwdriver Access
• Replace the cylinder head bolts.
• Always replace self-locking nuts, bolts which have been tightened to tightening specifications as well as gaskets and O-rings.
• The plastic protectors installed to protect the open valves must only be removed immediately before fitting the cylinder head.
• The engine oil and coolant must be changed if the cylinder head or cylinder head seal are replaced.

1 Cylinder Head Gasket
• Replace
• Note installation position: Parts number to cylinder head
2 Bolt
• 25 Nm
3 Transport Strap
4 Bolt
• Replace
• Follow the procedure when loosening. Refer to => [ Loosening Cylinder Head ].
• Follow the procedure when tightening. Refer to => [ Cylinder Head Tightening Sequence ].
5 Cylinder Head
• Removing and installing, refer to => [ Cylinder Head, without Screwdriver Access ] Cylinder Head, Without Screwdriver Access
• Check for distortion, refer to => [ Checking Cylinder Head for Distortion ]
6 Cylinder Head Bolt
• Replace
• Follow the procedure when loosening. Refer to => [ Loosening Cylinder Head ].
• Follow the procedure when tightening. Refer to => [ Cylinder Head Tightening Sequence ].
7 O-ring
• Replace
• Coat with engine oil
8 Camshaft Adjuster Actuator
9 Bolt
• 5 Nm
10 O-ring
• Replace
• Lubricate with engine oil
11 Plug
• 5 Nm
• With ball head for the engine cover
12 Cap
• With gasket
13 O-ring
• Replace
• Lubricate with engine oil
14 Plug
15 To Intake Manifold
16 Heat Shield
17 Bolt
• 20 Nm
18 Bolt
• 20 Nm
19 To Intake Manifold/Turbocharger
20 Ventilation Pipe
21 O-ring
• No replacement part
22 Seal
• No replacement part
23 Engine Cover
24 Bolt
• Tightening sequence, refer to => [ Crankcase Ventilation, Tightening Sequence ]
25 Crankcase Ventilation
26 Seal
• No replacement part
27 Seal
• Replace if damaged
28 Vacuum Pump
29 Bolt
30 Connection
31 Retaining Plate
32 Bolt
• 9 Nm
33 O-ring
• Replace
• Coat with coolant
34 Transport Strap
35 Bolt
• 25 Nm
36 Bolt
• 9 Nm
37 Camshaft Position (CMP) Sensor (G40)
38 Partition Plate
39 O-ring
• Replace
• Lubricate with engine oil
Crankcase Ventilation, Tightening Sequence

• The bolts are self-tapping. Only use original bolts when replacing the cylinder head, since the cylinder head is delivered without a thread for the installing the crankcase ventilation.
• It is not permitted to cut the thread with a thread cutter.
• Tighten the crankcase ventilation bolts to 11 Nm in - 1 to 10 - sequence.
Checking Cylinder Head for Distortion

- Check the cylinder head in several places for distortion using a straight edge and a feeler gauge.
• Maximum permissible distortion: 0.05 mm
Loosening Cylinder Head

- Remove the bolts - arrows -.
- Loosen the cylinder head bolts in - 1 to 10 - sequence
Cylinder Head Tightening Sequence
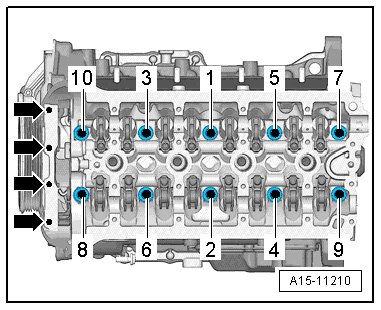
- Tighten the cylinder head bolts in - 1 to 10 - sequence.
- Tighten to 40 Nm using a torque wrench.
- Tighten further 90° using a rigid wrench.
- Tighten further 90° using a rigid wrench.
- Tighten the bolts - arrows - to 8 Nm.
- Tighten the bolts - arrows - 90° further using a rigid wrench.