Timing Chain Cover Removal and Installation
COVER - TIMINGREMOVAL

1. Disconnect the battery negative cable.
2. Drain cooling system.
3. Remove electric cooling fan and fan shroud assembly.
4. Remove radiator fan.
5. Disconnect both heater hoses at timing cover.
6. Disconnect lower radiator hose at engine.
7. Remove accessory drive belt tensioner assembly (1).
8. Remove crankshaft damper.
9. Remove the generator.
10. Remove A/C compressor.
CAUTION: The 3.7L engine uses an anaerobic sealer instead of a gasket to seal the front cover to the engine block, from the factory. For service, Mopar Grey Engine RTV sealant must be substituted.
NOTE: It is not necessary to remove the water pump for timing cover removal.

11. Remove the bolts holding the timing cover to engine block.
12. Remove the timing cover.
INSTALLATION
CAUTION: Do not use oil based liquids to clean timing cover or block surfaces. Use only rubbing alcohol, along with plastic or wooden scrapers. Use no wire brushes or abrasive wheels or metal scrapers, or damage to surfaces could result.

1. Clean timing chain cover and block surface using rubbing alcohol.
CAUTION: The 3.7L uses a special anaerobic sealer instead of a gasket to seal the timing cover to the engine block, from the factory. For service repairs, Mopar Engine RTV must be used as a substitute.
2. Inspect the water passage o-rings (2) for any damage, and replace as necessary
3. Apply Mopar Engine RTV sealer to front cover as shown (3) using a 3 to 4 mm thick bead.
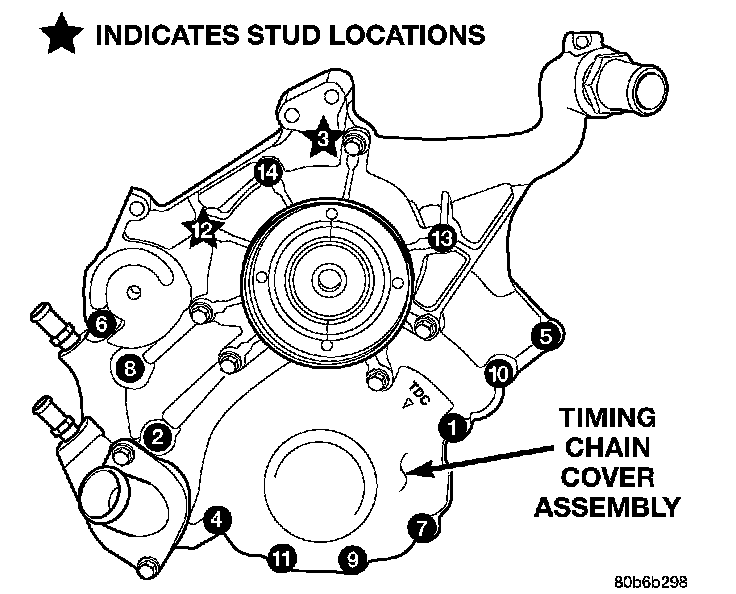
4. Install cover. Tighten fasteners in sequence as shown in to 58 Nm (43 ft. lbs.).
5. Install crankshaft damper.
6. Install the A/C compressor.
7. Install the generator.
8. Install accessory drive belt tensioner.
9. Install radiator upper and lower hoses.
10. Install both heater hoses.
11. Install radiator fan.
12. Fill cooling system.
13. Connect the battery negative cable.