Forward Clutch Sprag Assembly

1. Remove forward sprag outer race, then the overrun clutch hub retaining snap ring and clutch hub.
2. Remove sprag assembly wear plate, then the forward clutch retainer and race assembly.
3. Inspect forward clutch sprag assembly for wear, damage, missing retainer caps and weak or broken springs.
4. Inspect overrun clutch hub for spline damage, plugged lubrication holes, damaged tangs and cracks.
5. Inspect forward clutch retainer and race assembly for spline damage, ring groove damage, surface finish damage and loose retainer.
6. Inspect forward sprag outer race for spline damage, surface finish damage and plugged lubrication holes.

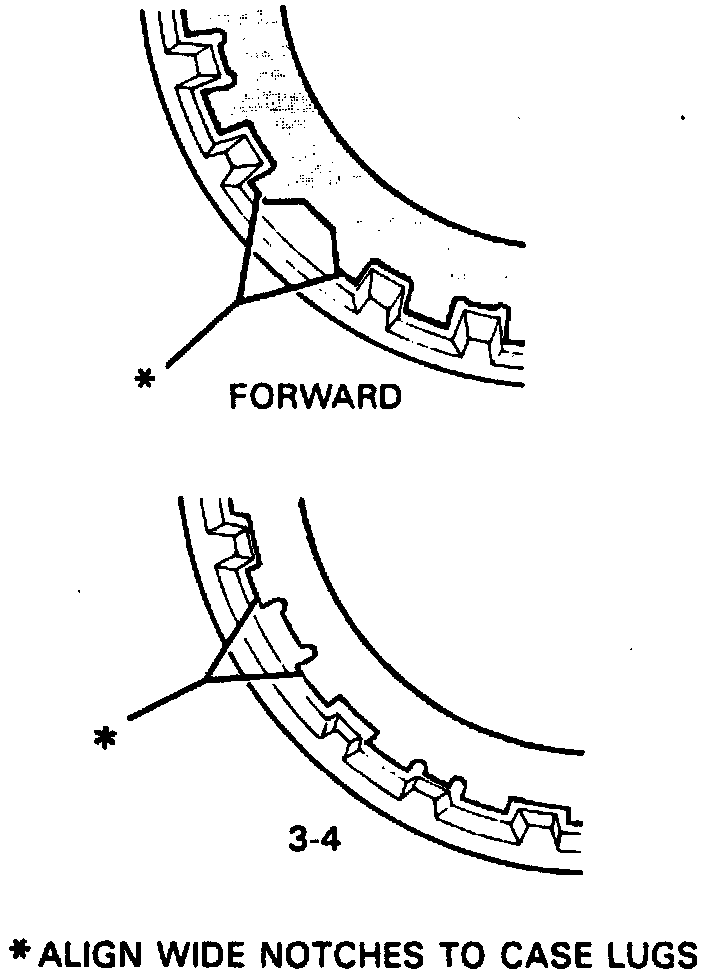
7. Install forward clutch sprag assembly into outer race with notches in sprag case facing upward.
8. Install one brass sprag retainer ring onto race and retainer assembly. Ensure flange on retainer ring faces away from retainer.

9. Install race and retainer assembly into sprag assembly as shown.
10. Install remaining brass retainer ring onto sprag assembly.
11. Install wear plate onto retainer ring, then the overrun clutch hub onto the wear plate.

12. Install overrun clutch hub retaining snap ring into snap ring groove of race and retainer assembly, then test assembly as shown. If sprag assembly can be turned counterclockwise, improper assembly is indicated. Reassemble as necessary.
13. Install forward clutch sprag assembly into input clutch housing.
14. Inspect forward and 3-4 clutch plates for damaged tangs, delamination, wear or heat damage.
15. Inspect forward and 3-4 clutch backing plates for flatness, surface finish damage, burrs or nicks.
16. Inspect forward clutch apply plate and spacer plate for flatness, surface finish damage, burrs or nicks.
17. Inspect forward clutch apply plate and spacer plate for flatness, surface finish damage, burrs or nicks.
18. Inspect 3-4 clutch apply plate for flatness and surface finish damage.

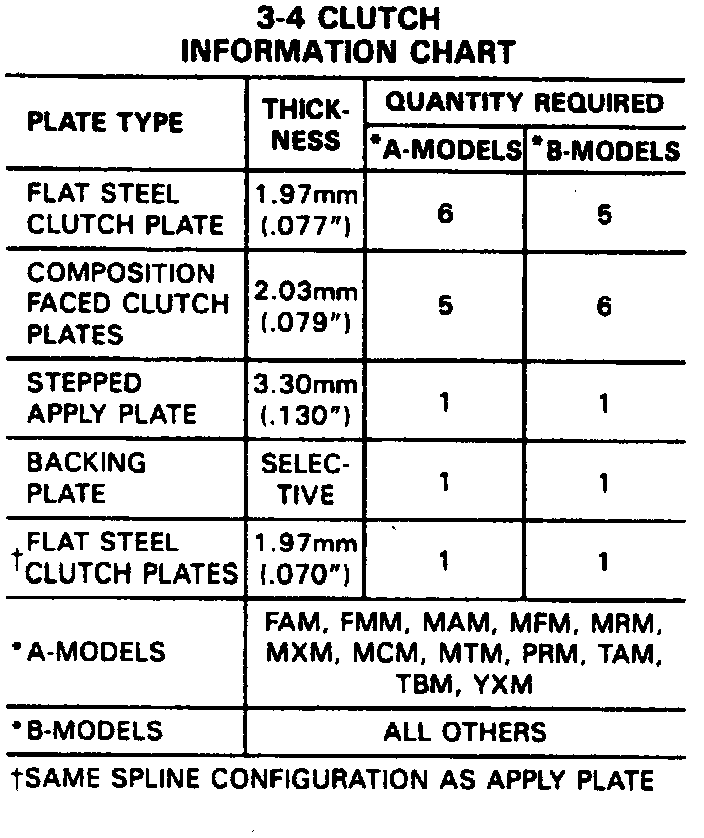
19. Inspect 3-4 clutch ring retainer plate for bent tangs and flatness. Refer to clutch plate application charts.
20. Install forward clutch apply plate into input clutch housing. A forward clutch which requires five steel forward clutch plates will use a single thick apply plate. A forward clutch which requires four steel forward clutch plates will use a thin apply plate and thick spacer plate.
21. Install spacer plate into the input clutch housing, if necessary.
22. Install waved steel forward clutch plate into input clutch housing.
23. Install remaining forward clutch plates into input clutch housing. Start with composition plate and alternate with steel plate.

24. Install forward clutch backing plate with chamfered side up.
25. To select the proper forward clutch backing plate, proceed as follows:
a. With the overrun clutch and the forward clutches fully assembled in the input housing and shaft assembly, measure backing plate travel.
b. Using a feeler gauge, measure backing plate travel.
c. Proper forward clutch backing plate travel is 0.030-.0063 inch.
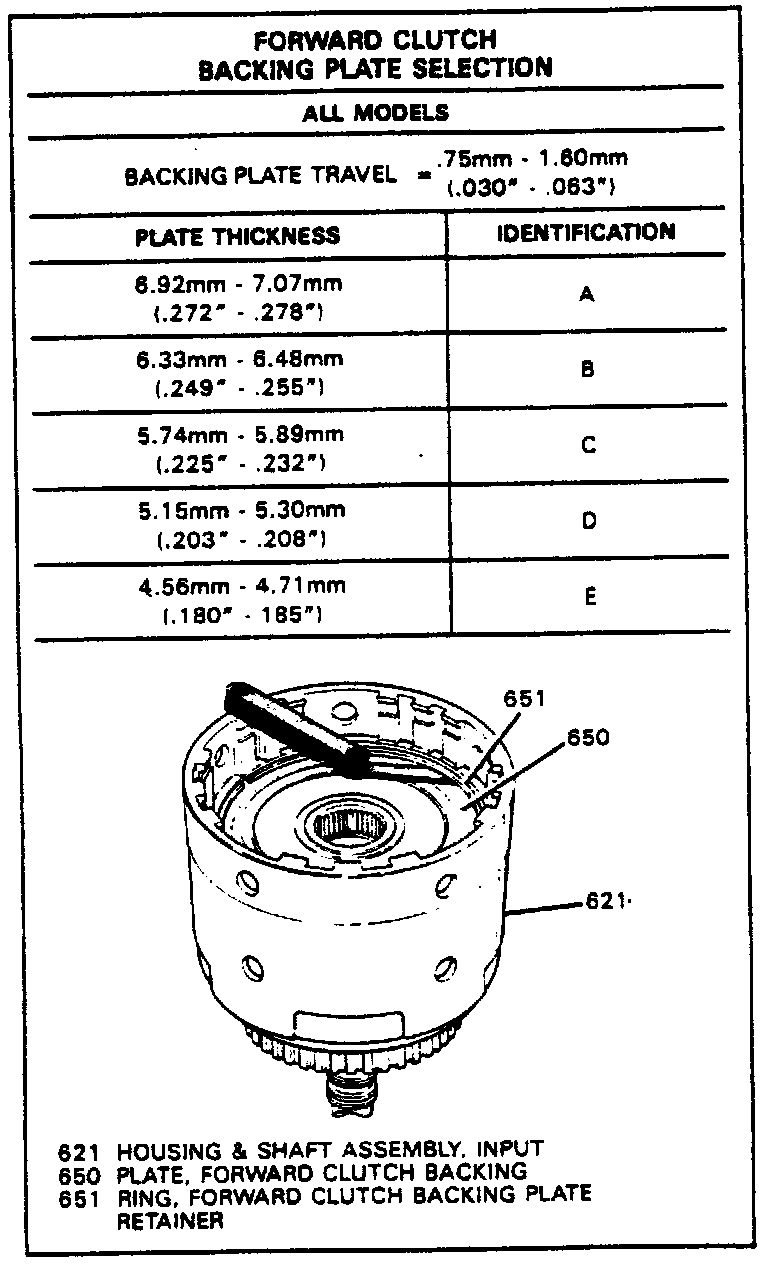
d. Select the proper forward clutch backing plate to obtain specified travel.
26. Install forward clutch retainer ring. The forward clutch retainer ring is a small ring with a larger gap.
27. Install 3-4 clutch ring retainer plate, then the 3-4 clutch apply plate and clutch plates. Start with the composition plate and alternate with steel.
28. Install 3-4 clutch backing plate and retainer ring with chamfered side up.