Fuel Tank: Service and Repair
Fuel Tank And Associated Parts:
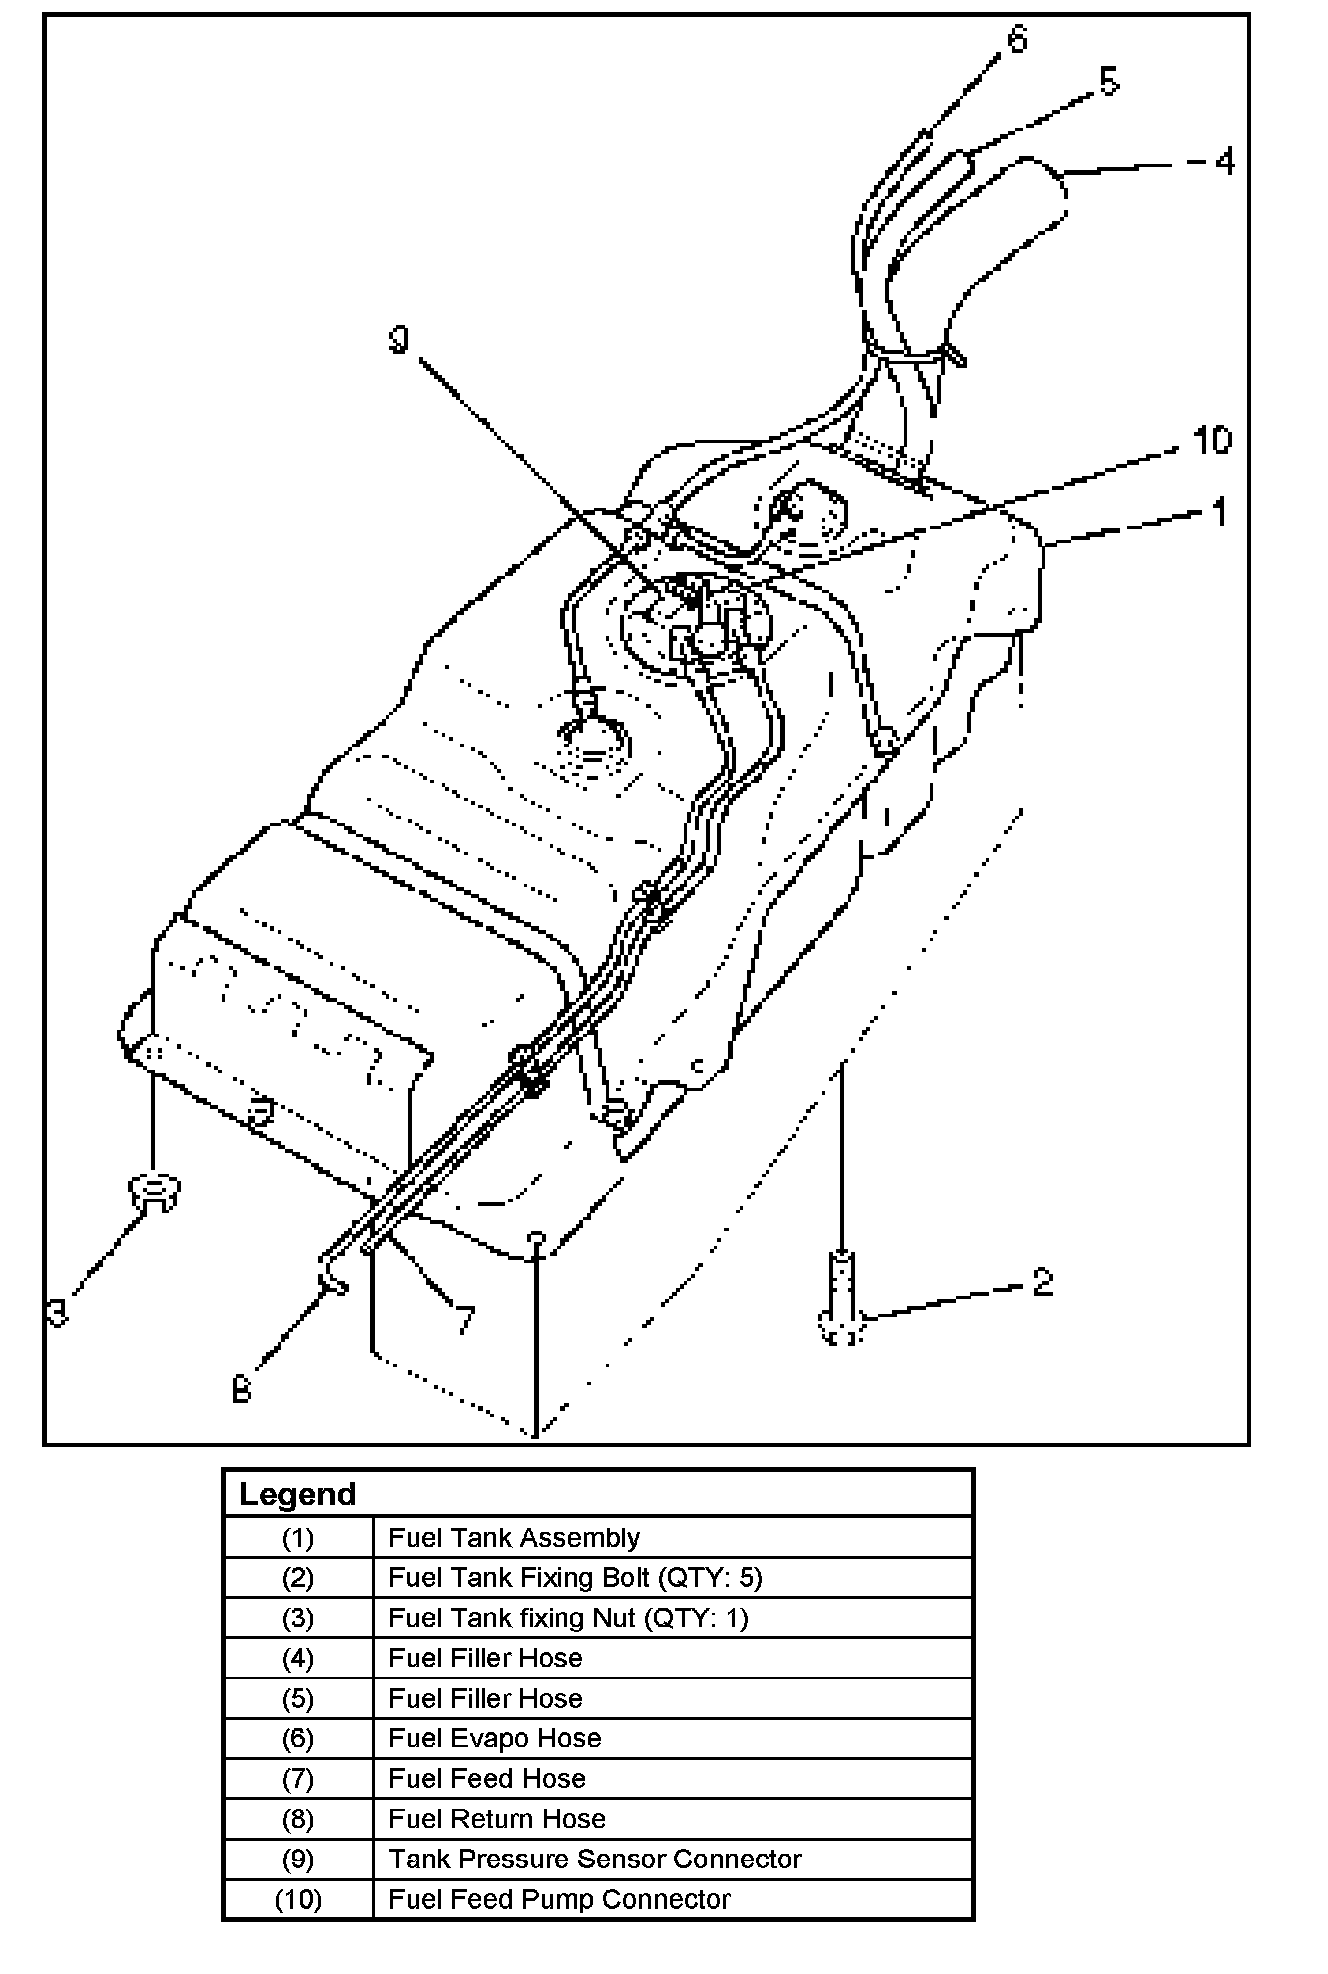
FUEL TANK AND ASSOCIATED PARTS
REMOVAL # 1
CAUTION: When repair to the fuel system has been completed, start engine and check the fuel system for loose connection or leakage. For the fuel system diagnosis, refer to Computers and Control Systems.
1. Drain the fuel, from the fuel tank refer to Fuel Pump Flow Test.
2. Disconnect battery ground cable.
3. Loosen fuel filler cap for reduce the pressure in fuel tank.
4. Support underneath of the fuel tank assembly (1) with a lifter.
5. Disconnect fuel feed hose (7) and fuel return hose (8) near the fuel filter.
NOTE: Plug both ends of the fuel hoses to prevent fuel leakage.
6. Disconnect fuel filler hose (4) and fuel breather hose (5) and fuel evaporator hose (6) at the fuel filler neck.
NOTE: Cover fuel hose to prevent any dust entering.
7. Remove the five fuel tank assembly fixing bolts (2) and one nut (3).
8. Lower the tank and disconnect the electrical connectors (9,10)
NOTE: Cover fuel hoses to prevent any dust entering.
INSTALLATION
1. Raise the fuel tank assembly and connect the evaporative hose (6) to the roll over & float valve and the wiring connectors (9, 10) on the fuel pump and sending assembly.
2. Install fuel tank assembly along with protectors and tighten the five fixing bolts (2) and a nut (3) to the specified torque.
Torque: 68 N.m (50 lb ft)
3. Connect fuel filler hose (4), fuel breather hose (5), evaporator hose (6), and clip them firmly.
4. Connect fuel feed hose, fuel return hose, and clip them firmly.
5. Tighten fuel filler cap with less than 3 clicks.
6. Connect battery ground cable.
REMOVAL PROCEDURE # 2
1. Disconnect the negative battery cable.
2. Remove fuel filer cap.
3. Drain the fuel from fuel filler neck.
4. Disconnect the fuel filler hose at fuel tank.
5. Disconnect the air breather hose at the fuel tank.
6. Disconnect the evaporator hose at the fuel tank.
7. Hold entire fuel tank at the bottom with stands.

8. Disconnect fuel supply lines and fuel return line at near the fuel filter inside of body frame.
9. Remove four bolts (two in front and two in rear) holding fuel tank to the frame.
10. Lower tank assembly from the vehicle a little to make access space on top.

11. Disconnect two electrical connectors at fuel pump.
12. Remove fuel tank assembly from the vehicle.
13. Remove four nuts retaining tank under guard to the tank.

14. Remove the tank from the guard.
INSTALLATION PROCEDURE
1. Secure fuel tank into under guard with four retaining bolts, if necessary.
2. Place the fuel tank assembly onto stands.
3. Lift the fuel tank assembly near the position.
4. Connect two electrical connectors at fuel pump.

5. Lift the fuel pump to its position and secure it with four mounting bolts. Make sure that all hoses and fuel lines are out of way between the fuel tank and the fuel tank bracket. Tighten the fuel tank retaining bolts to 36 N.m (27 lb ft).
6. Connect fuel supply and return lines.
7. Connect the fuel filler hose, the air breather hose and EVAP hose onto fuel tank and secure them with clamps.
8. Pour fuel into fuel tank.
9. Install fuel filler cap securely.
10. Connect the battery negative cable.