Engine - Replacement Cylinder Head Changes
TSB: SB08-01-S001Issue Date: FEBRUARY 2008
LL8 Cylinder Head - Information On Service Replacement Cylinder Head Changes That Apply To 2006 And 2007 Model Years
Affected Vehicles:
2006-2007 Isuzu Ascender with 4.2L Engine
Service Information
For 2006-2007, Inline 6 cylinder engines requiring a cylinder head replacement with P/N 8-89017-826-0 technicians will notice that the left threaded bolt hole for the timing chain stationary guide upper mounting hole has been enlarged to 8 mm (0.31 in) and the fourth fuel rail mounting hole has been eliminated.
To install this replacement head on 2006 and 2007 vehicles, you must first remove the left timing chain stationary guide from the engine and enlarge the upper mounting hole on the guide to accept a new 8 mm bolt. You must also adjust the fourth injector fuel rail bracket tab for clearance.
IMPORTANT:
Refer to the Service Manual for all Disassembly and Assembly service procedures.
Service Procedure
NOTICE:
Do not drill the guide while installed on the engine, metal fallout from drilling operation may cause consequential engine damage.
1. Remove the left timing chain guide bolts and remove the timing chain guide from the vehicle. Refer to the Service Manual for oil pan and front cover removal.
2. To accommodate the larger bolt to fit enlarge the upper hole only in the left timing chain guide (1) by using a 5/16 drill bit.
3. Install the larger guide bolt P/N 8-11588-725-0 (1) to the left upper timing chain guide.
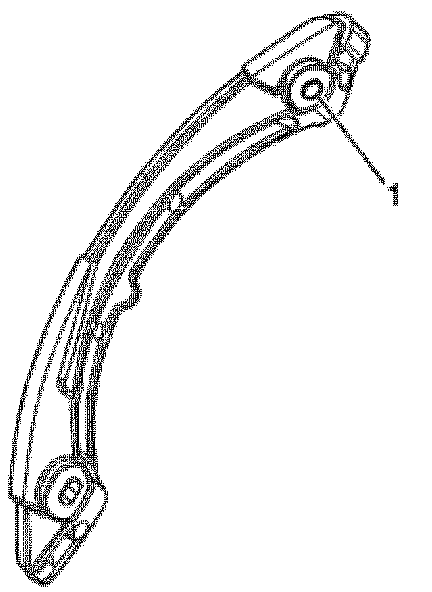
4. Install the timing chain guide and secure the guide with the bolts.
Tighten
Tighten the timing chain guide to 10 Nm (89 lb in).
NOTICE:
Do not pry on the fuel injectors or the fuel injector rail when adjusting the bracket. refer to callout # 1 in the fuel rail illustration as a rotating point to adjust the beacket using two pairs of pliers.
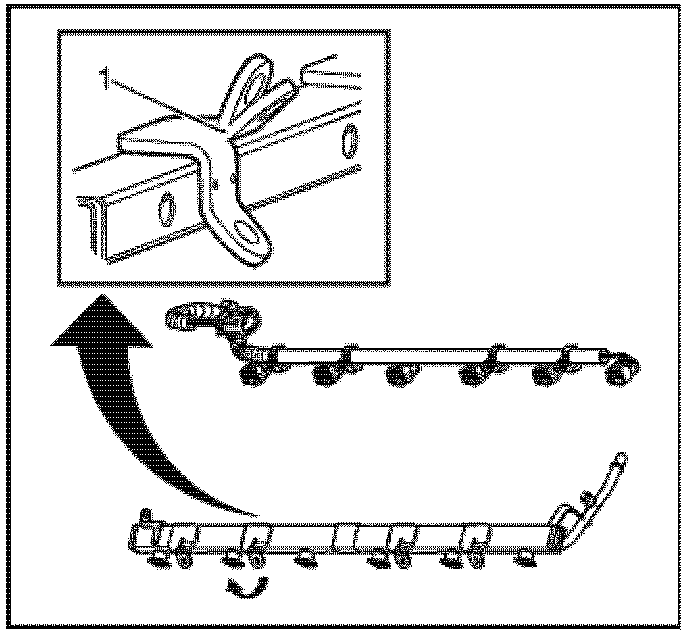
5. To avoid the possibility of the injector rail bracket tab contacting the cylinder head and causing a noise or vibration issue adjust the bracket tab to an angle similar to the one shown in the illustration (1). Use two pairs of pliers and carefully rotate the bracket tab upwards.
Parts Information
Always refer to AIPDN publications for the most current parts information.
Warranty Claim Information
Always refer to the Isuzu Service Policy Procedure Manual for specific details on warranty coverage and policies. Reference published Labor Time Guide for claim processing if applicable.

Disclaimer