Part 2

30. REMOVE FORWARD CLUTCH HUB AND SUN GEAR INPUT DRUM
a. Remove the forward clutch hub and the sun gear input drum.
b. Remove the assembled bearing & race, 2 races, bearing and sun gear input drum, from forward clutch hub.

31. REMOVE 2 BRAKE DRUM GASKETS

32. REMOVE NO.1 ONE-WAY CLUTCH MULTIPLE DISC BRAKE AND FRONT PLANETARY GEAR
a. Using SST, remove the snap ring.
SST 09350-30020 (09350-07060)
b. Remove the No.1 one-way clutch from the case.

c. Remove the thrust washer from the No. 1 one-way clutch.

d. Remove the multiple disc brake from the case.

e. Remove the 2 washers and front planetary gear from the case.
f. Remove the thrust washer from the front planetary gear.

g. Remove the front & center planetary sun gear from the case.

33. REMOVE OUTPUT SHAFT WITH CENTER & REAR PLANETARY GEAR
a. Remove the 2nd brake pack (flange, 5 discs and 5 plates) from the case.
b. Remove the spring from the case.

c. Remove the output shaft with center & rear planetary gear from the case.

d. Remove the thrust washer from the output shaft with center & rear planetary gear.

34. REMOVE REAR PLANETARY RING GEAR
a. Using SST, remove the snap ring.
SST 09350-30020 (09350-07070)
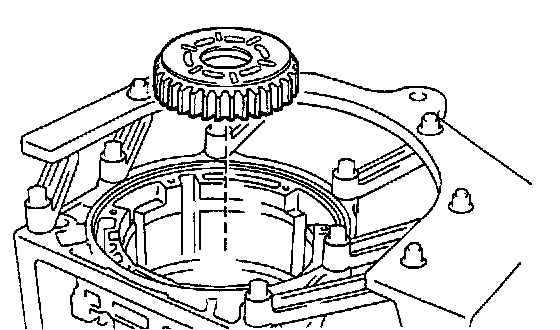
b. Remove the rear planetary ring gear from the case.

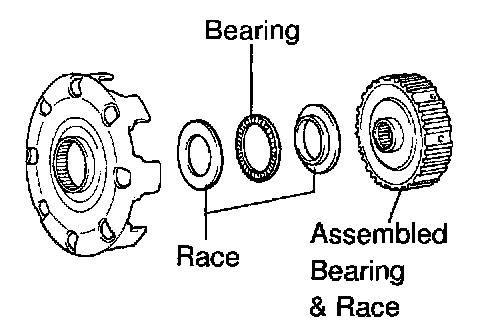
c. Remove the assembled bearing & race and 2 races from the rear planetary ring gear.

d. Remove the assembled bearing & race from the case.
REASSEMBLY

1. INSTALL TRANSMISSION CASE ON OVERHAUL ATTACHMENT

2. INSTALL REAR PLANETARY RING GEAR
a. Install the assembled bearing & race.

Assembled bearing & race diameter: mm (inch)

b. Install the rear planetary ring gear.

c. Using SST, install the snap ring.
SST 09350-03002 (09350-07070)

3. INSTALL OUTPUT SHAFT WITH CENTER AND REAR PLANETARY GEAR
a. Install the 2 races and bearing onto the rear planetary ring gear.

Bearing and race diameter: mm (inch)

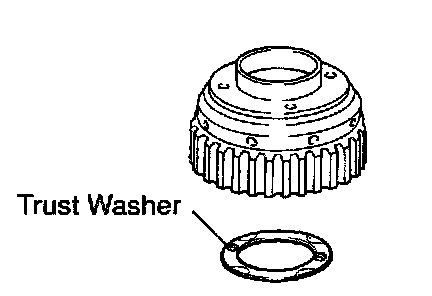
b. Install the thrust washer to the output shaft with center & rear planetary gear.

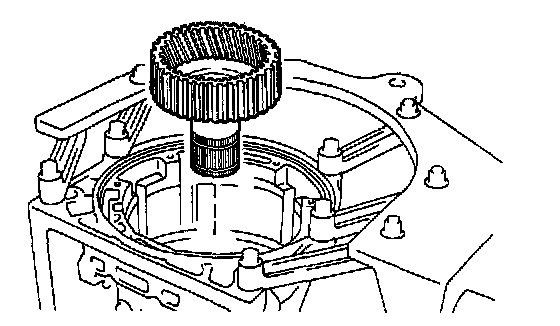
c. Install the output shaft with center & rear planetary gear.

4. INSTALL FRONT PLANETARY GEAR
a. Install the spring to the case.
b. Install the 2nd brake pack (5 plates, 5 discs and flange).
Install in order: P = Plate, D = Disc
P-D-P-D-P-D-P-D-P-D

Flange thickness: mm (inch)

c. Install the front & center planetary sun gear from the case.

d. Coat the thrust washer, with petroleum jelly and install it onto front planetary gear.

e. Install the front planetary gear and 2 washers from the case.

5. INSTALL MULTIPLE DISC BRAKE AND NO.1 ONE-WAY CLUTCH
a. Lay the transmission case.

b. Install the multiple disc brake to the case.

c. Install the No. 1 one-way clutch to the multiple disc brake.

d. Using SST, install the snap ring.
SST 09350-30020 (09350-07060)

6. INSTALL BRAKE DRUM GASKET
a. Coat 2 new gaskets with ATF.
b. Install the 2 brake drum gaskets.
7. INSTALL SUN GEAR INPUT DRUM
a. Install the thrust washer.

b. Install the sun gear input drum.

c. Coat the bearing, 2 races with petroleum jelly and install them onto the sun gear input drum.
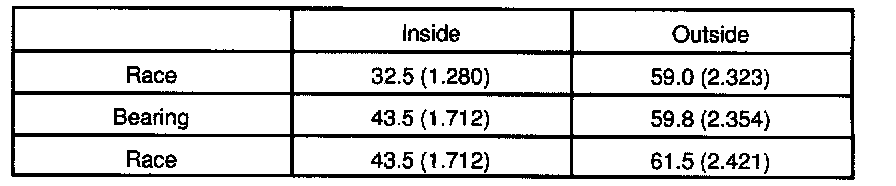
Bearing and race diameter: mm (inch)

8. INSTALL 3RD COAST BRAKE BAND
a. Install the 3rd coast brake band to the transmission case.

b. Install the E-ring to the pin.
c. Install the pin through the brake band.

d. Using a needle nose plier, install the E-ring to the pin.

9. INSTALL DIRECT CLUTCH WITH FORWARD CLUTCH
a. Coat the assembled bearing & race, race with petroleum jelly and install them onto the forward clutch hub.

Assembled bearing & race and diameter: mm (inch)

b. Install the assembled bearing & race and thrust washer to the forward clutch.

Assembled bearing & race diameter: mm (inch)

c. Install the direct clutch and forward clutch hub to the forward clutch.

d. Insert the direct clutch with forward clutch to the case.

e. With the case set upright, using vernier calipers, measure the distance between the sun gear input drum and direct clutch drum.
Height: 4.1 - 6.0 mm (0.161 - 0.236 inch)
If the height is non-standard, check for improper installation.

10. INSTALL 3RD COAST BRAKE COVER, PISTON ASSEMBLY AND SPRING
a. Coat 2 new O-rings with ATF and install them to the cover.
b. Install the spring, piston assembly and cover to the case.

c. Using SST, install the snap ring.
SST 09350-30020 (09350-07060)

11. CHECK PISTON ROD STROKE OF 3RD COAST BRAKE
a. Place a mark on the 2nd coast brake piston rod.

b. Using SST, measure the stroke while applying and releasing compressed air (392 kPa, 4 kgf/cm2, 57 psi).
SST 009240-00020
Piston rod stroke: 2.0 - 3.0 mm (0.079 - 0.118 inch)
If the stroke is more than the specified, replace the piston rod with a longer one.

Piston rod length: mm (inch)
If it is still more than standard value, replace the brake band with a new one.

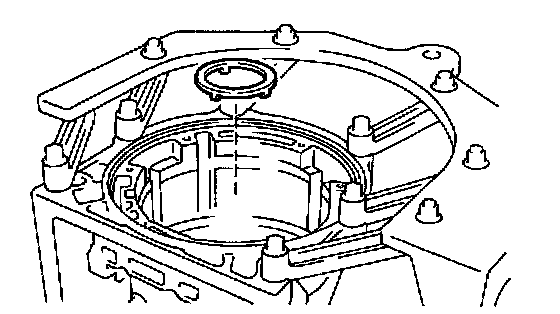
12. INSTALL O/D SUPPORT ASSEMBLY
a. Coat the assembled bearing & race and race with petroleum jelly and install them onto the O/D support assembly.

Assembled bearing & race and race diameter: mm (inch)

b. Coat the thrust washer with petroleum jelly and install it onto the O/D support assembly.
HINT: Make sure that the lug shapes match the holes on the O/D support.

c. Using 2 bolts of SST, face the bolt and oil holes of the O/D support toward the valve body side, align them with the bolt holes of the transmission case and install the bolts.
SST 09350-30020 (09350-07020)

d. Install the 2 bolts.
Torque: 25 Nm (260 kgf.cm, 19 ft. lbs.)

e. Using SST, install the snap ring.
SST 09350-30020 (09350-07060)