Removal
ENGINE ASSEMBLYCOMPONENTS:
COMPONENTS:
COMPONENTS:
COMPONENTS:
COMPONENTS:

COMPONENTS:
COMPONENTS:
COMPONENTS:
COMPONENTS:

COMPONENTS:

COMPONENTS:

COMPONENTS:
COMPONENTS:
REMOVAL
1. DISCHARGE FUEL SYSTEM PRESSURE
2. DISCONNECT CABLE FROM NEGATIVE BATTERY TERMINAL
CAUTION: Wait at least 90 seconds after disconnecting the cable from the negative (-) battery terminal to prevent airbag activation.
3. REMOVE HOOD SUB-ASSEMBLY
a. Disconnect the windshield washer hose.
b. Disconnect the hood dampers.
c. Remove the 4 bolts and hood.
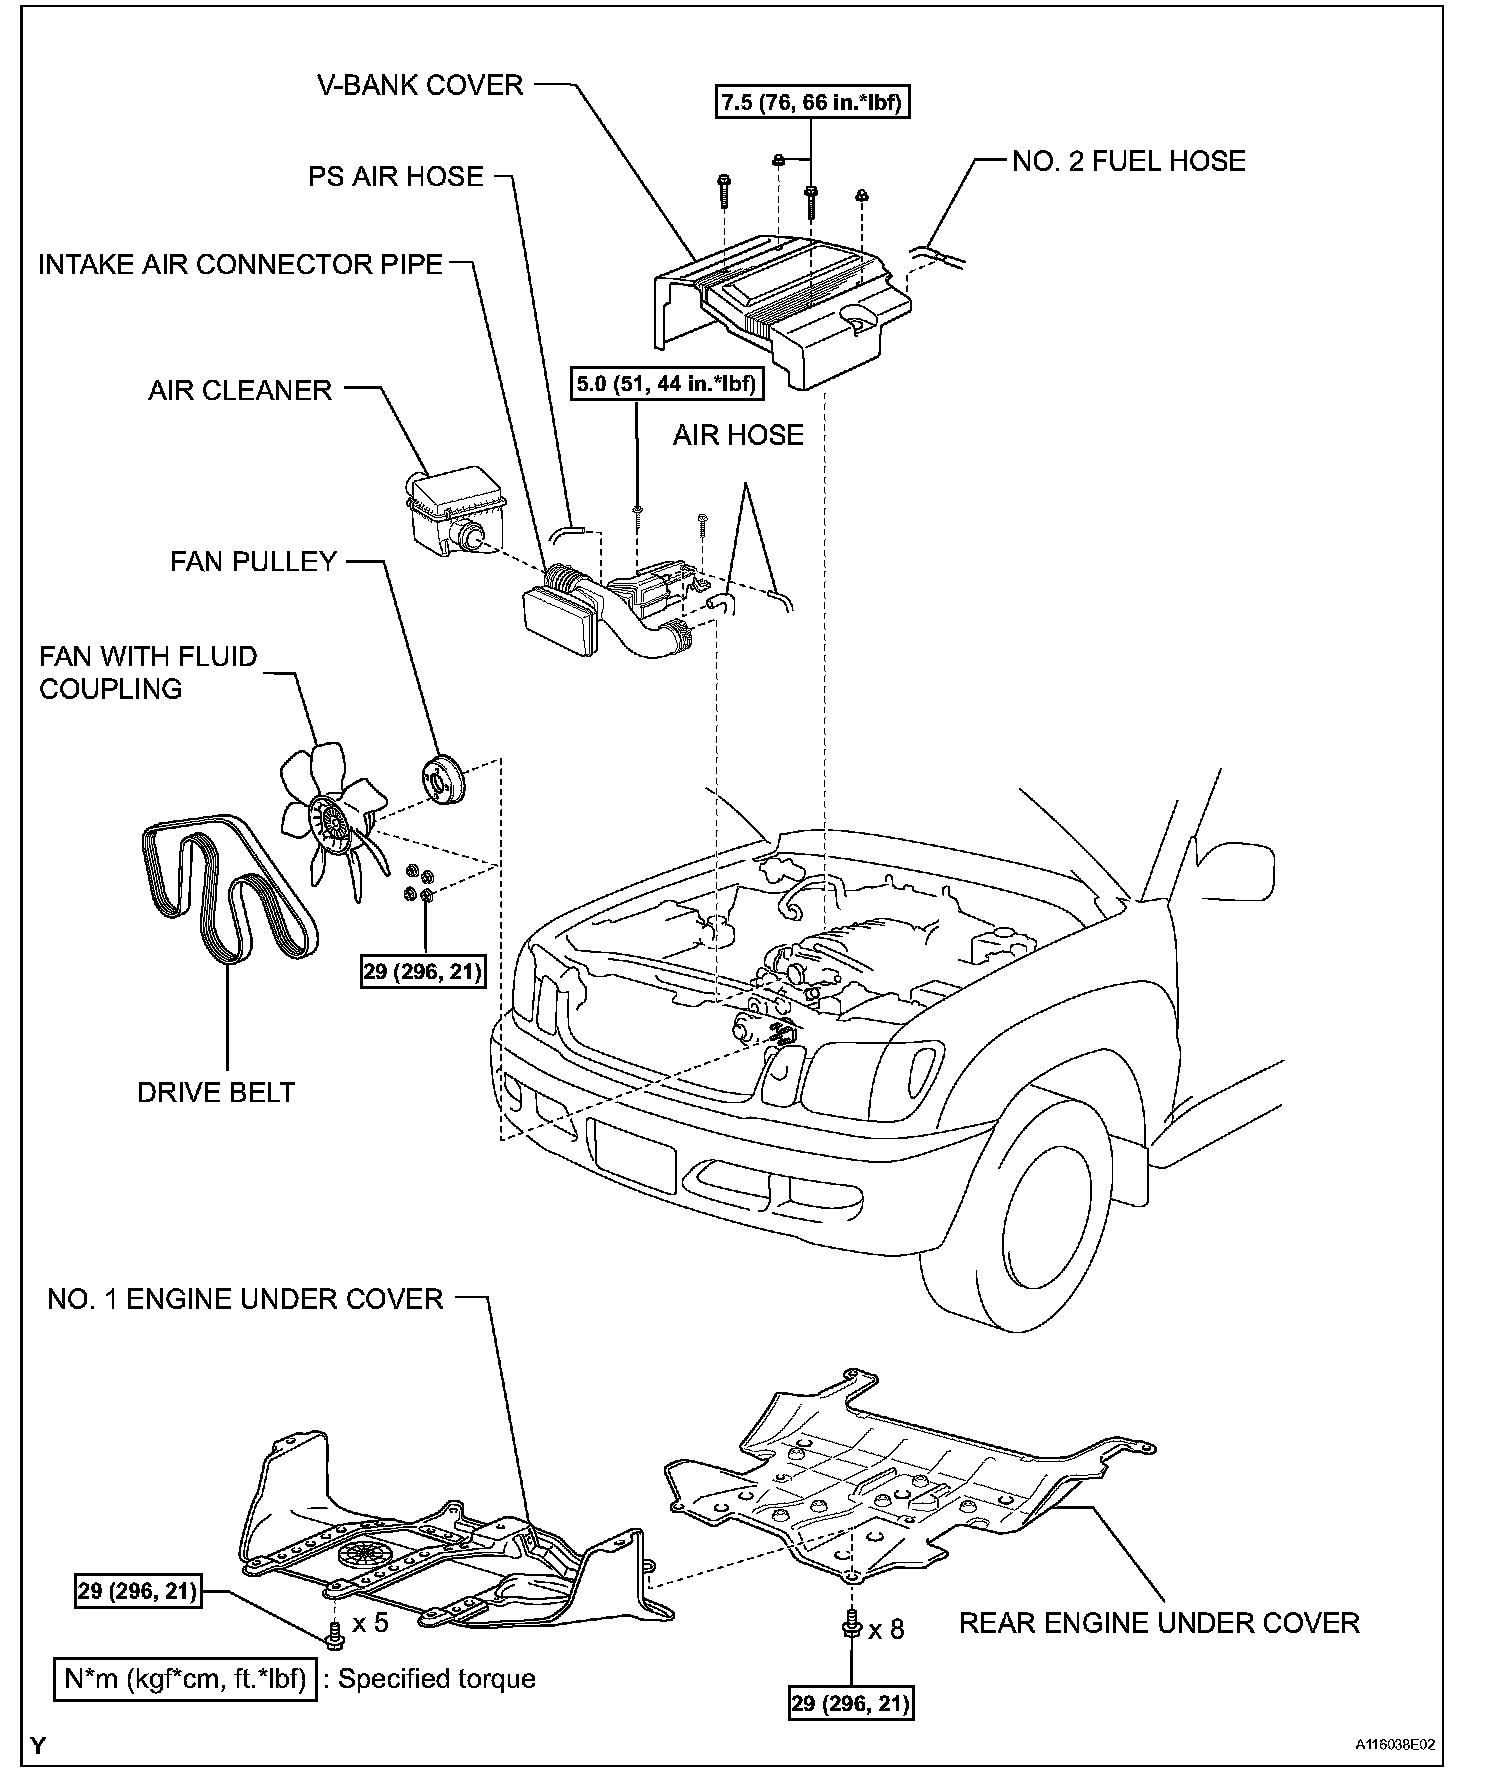
4. REMOVE REAR ENGINE UNDER COVER
5. REMOVE NO. 1 ENGINE UNDER COVER
6. DRAIN ENGINE OIL
7. DRAIN ENGINE COOLANT
8. DRAIN AUTOMATIC TRANSMISSION FLUID
Drain the automatic transmission fluid.
9. REMOVE V-BANK COVER
10. REMOVE INTAKE AIR CONNECTOR PIPE
11. REMOVE AIR CLEANER ASSEMBLY
a. Disconnect the MAF meter connector and clamp.
b. Remove the 3 bolts and air cleaner assembly.
12. REMOVE DRIVE BELT
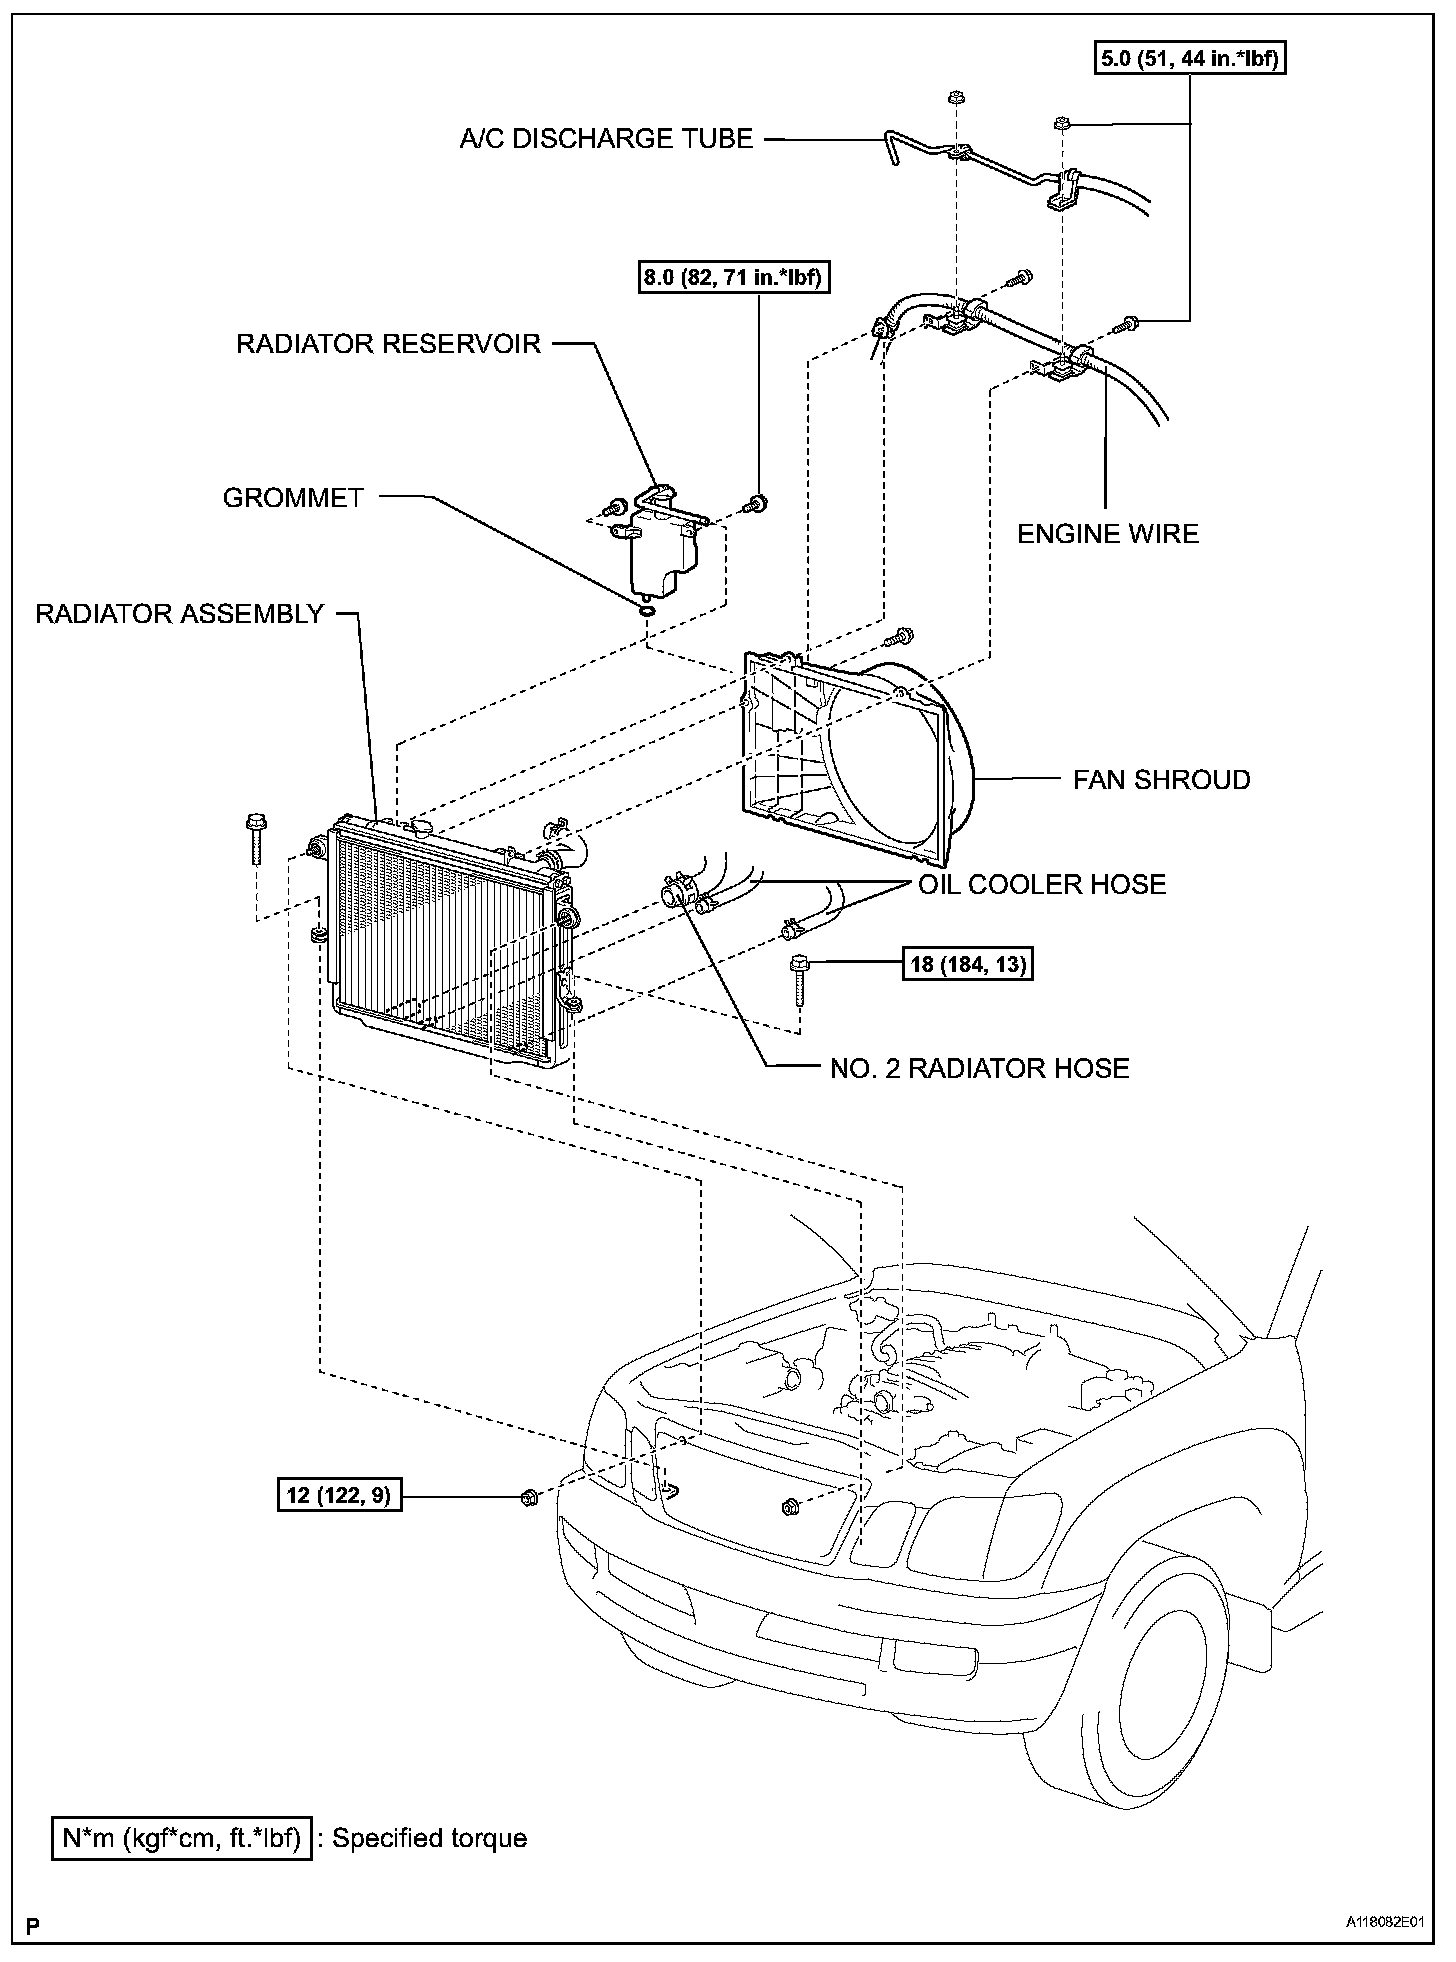
13. DISCONNECT NO. 1 RADIATOR HOSE
14. DISCONNECT NO. 2 RADIATOR HOSE
15. DISCONNECT NO. 1 OIL COOLER INLET TUBE
16. DISCONNECT NO. 1 OIL COOLER OUTLET TUBE
17. REMOVE FAN SHROUD
18. REMOVE RADIATOR ASSEMBLY
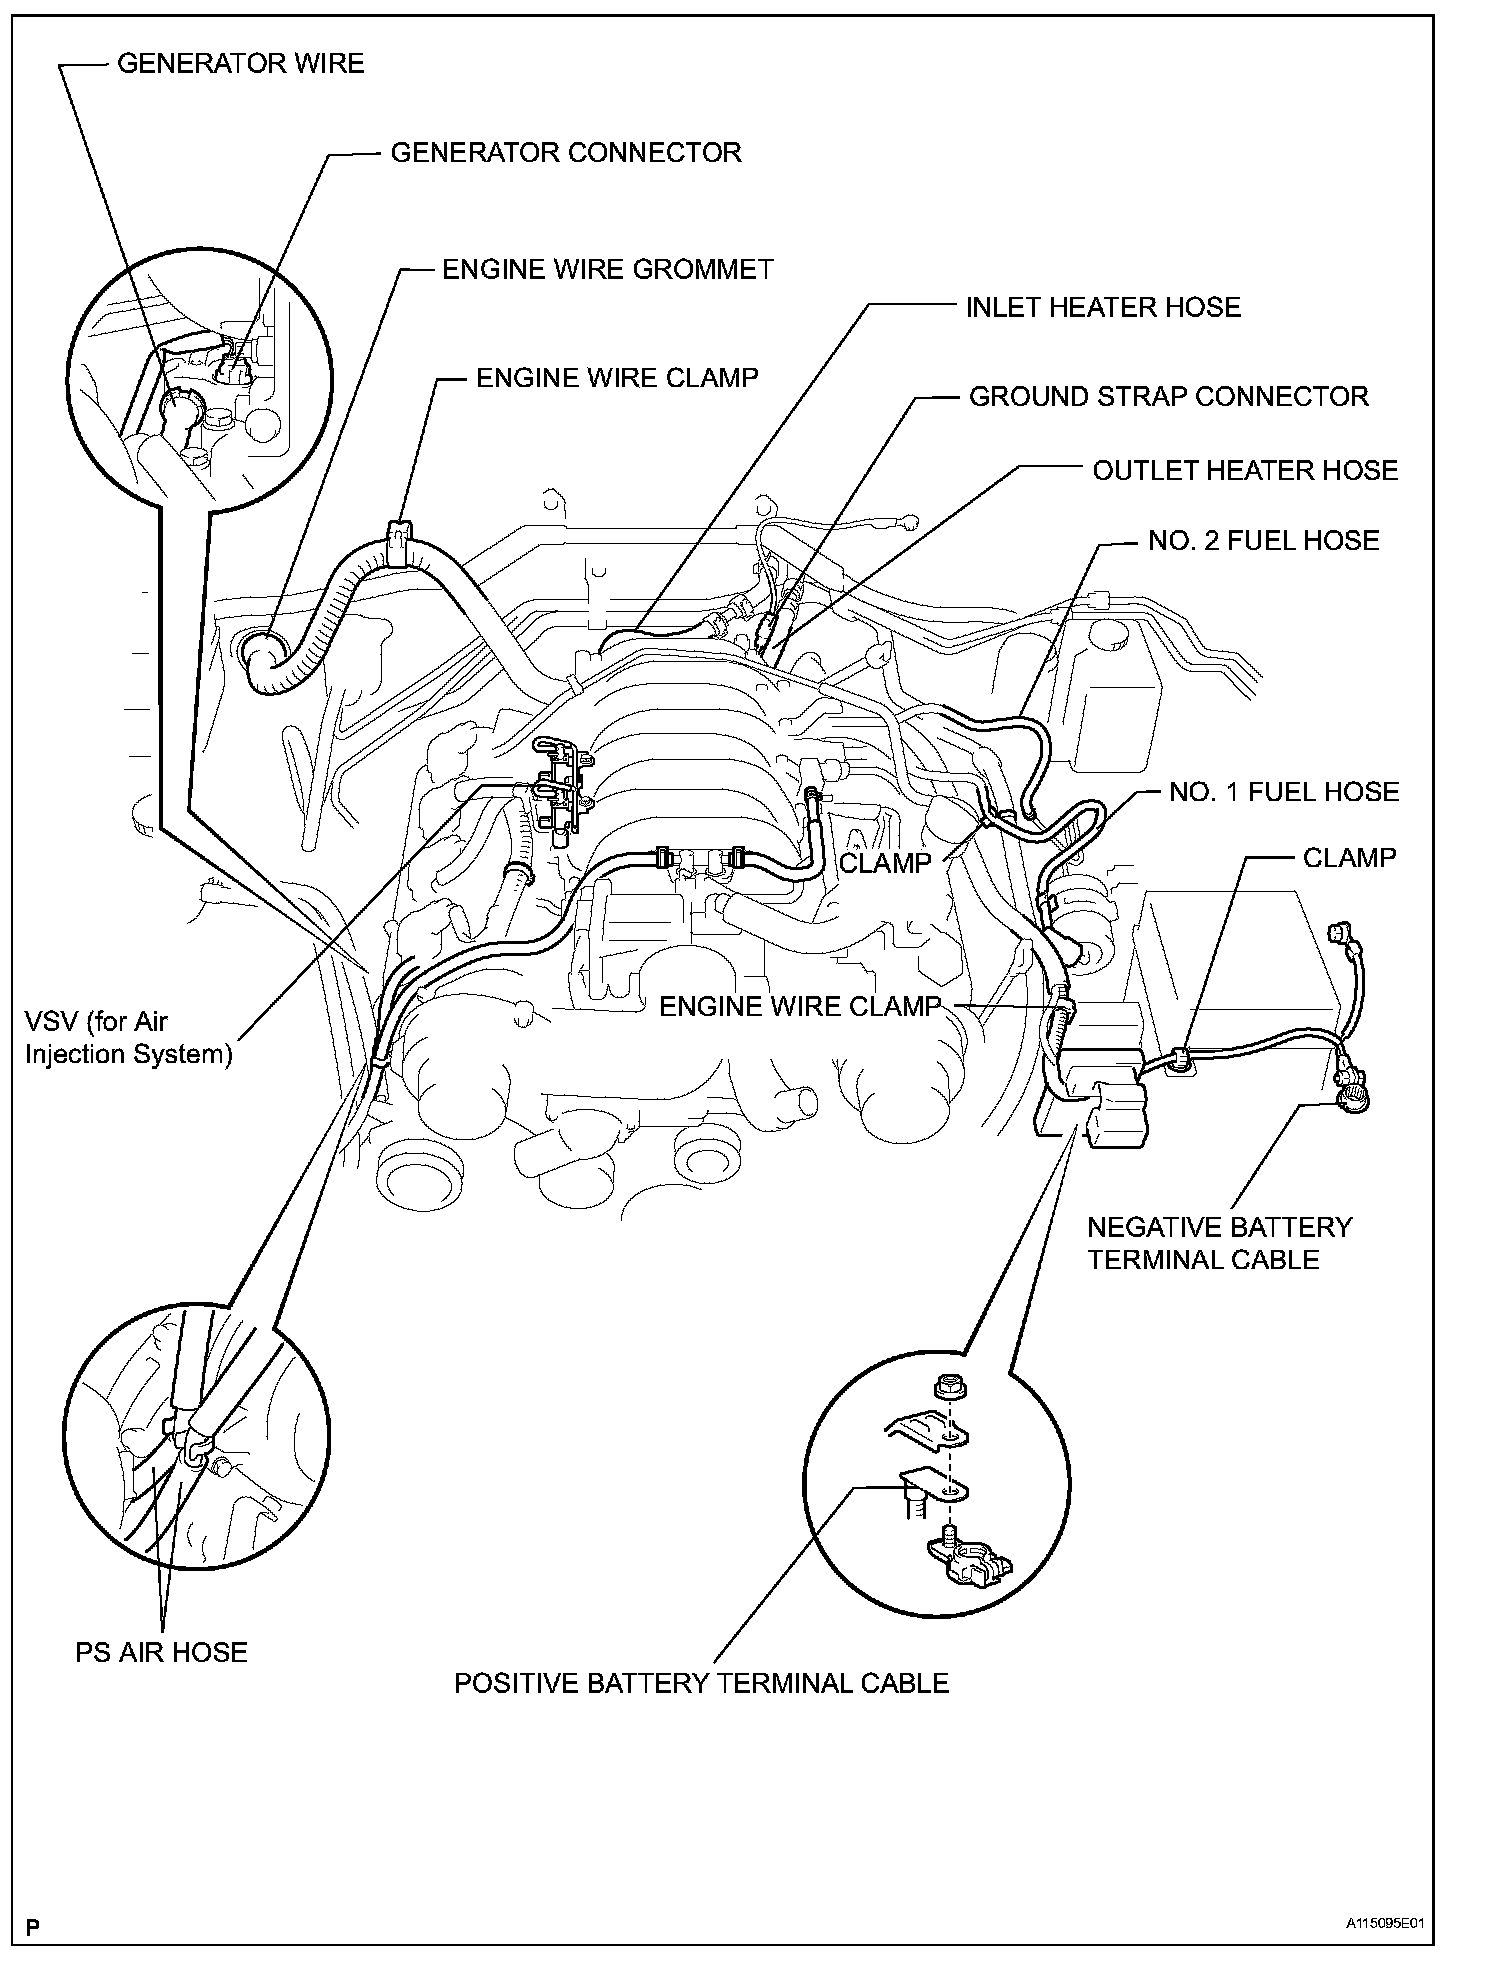
19. DISCONNECT ENGINE WIRE
a. Disconnect the 3 ECM connectors.
b. Disconnect the nut and disconnect the positive battery (+) cable.
c. Disconnect the engine wire clamp from the bracket on the cowl panel.
d. Disconnect the engine wire grommet from the cowl panel.
e. Disconnect the ground strap connector.
f. Disconnect the engine wire from the clamp on the right fender apron.
g. Disconnect the clamp on the negative (-) battery cable from the relay box.
h. Disconnect the negative (-) battery cable from the right fender apron.
20. DISCONNECT NO. 1 FUEL HOSE
21. DISCONNECT NO. 2 FUEL HOSE
22. DISCONNECT HEATER HOSE
23. REMOVE FRONT EXHAUST PIPE ASSEMBLY LH
24. REMOVE FRONT EXHAUST PIPE ASSEMBLY RH
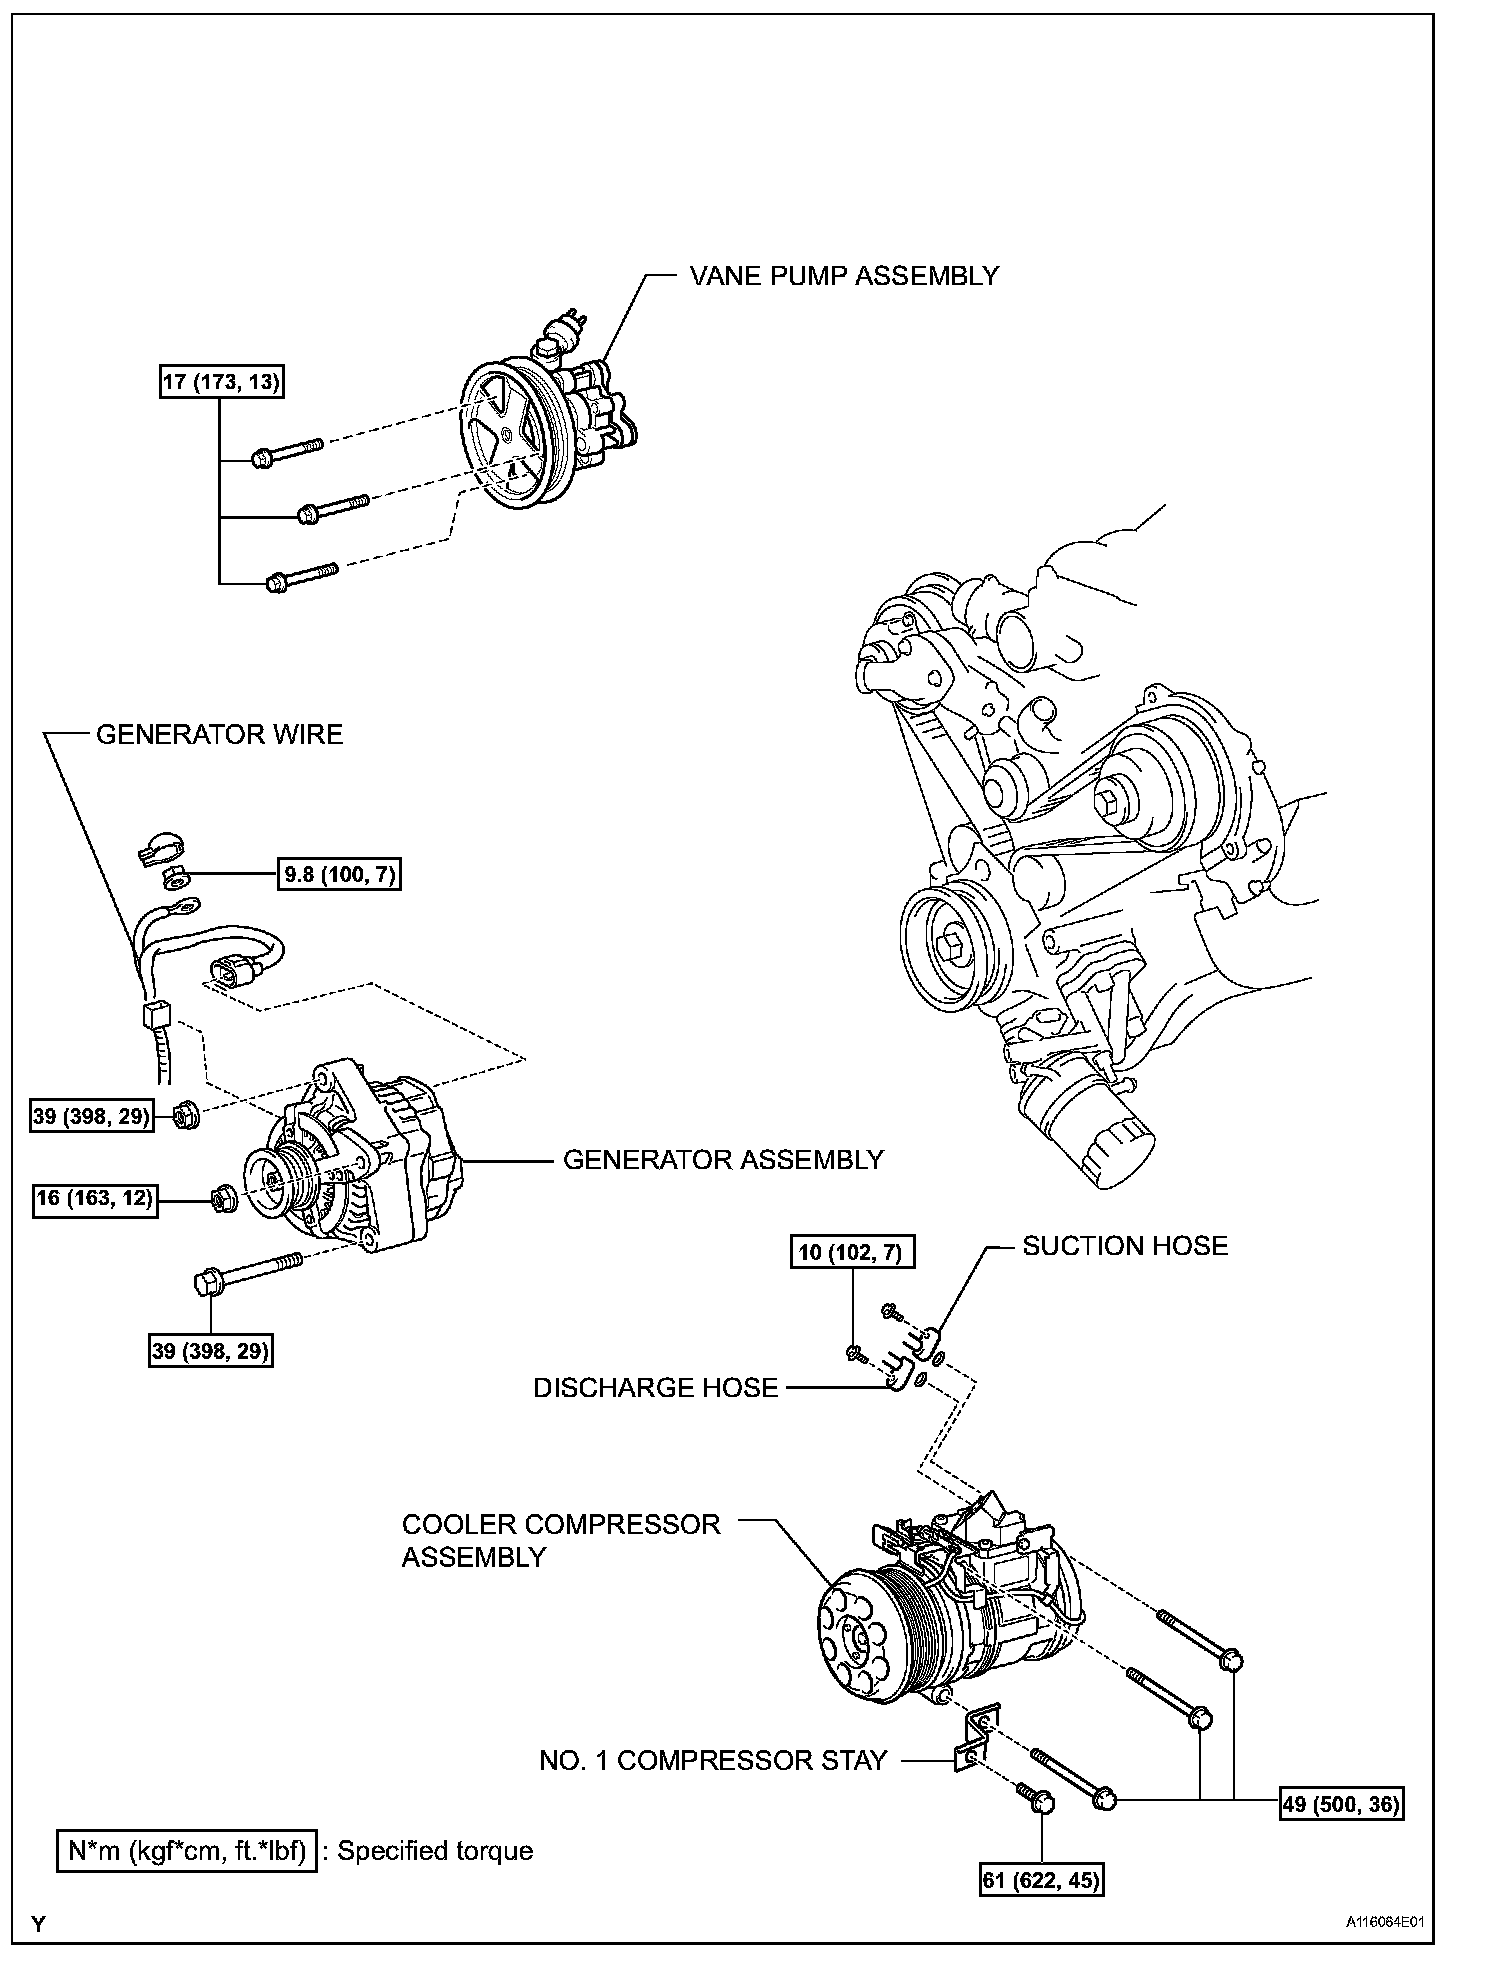
25. DISCONNECT COMPRESSOR ASSEMBLY
26. DISCONNECT VANE PUMP
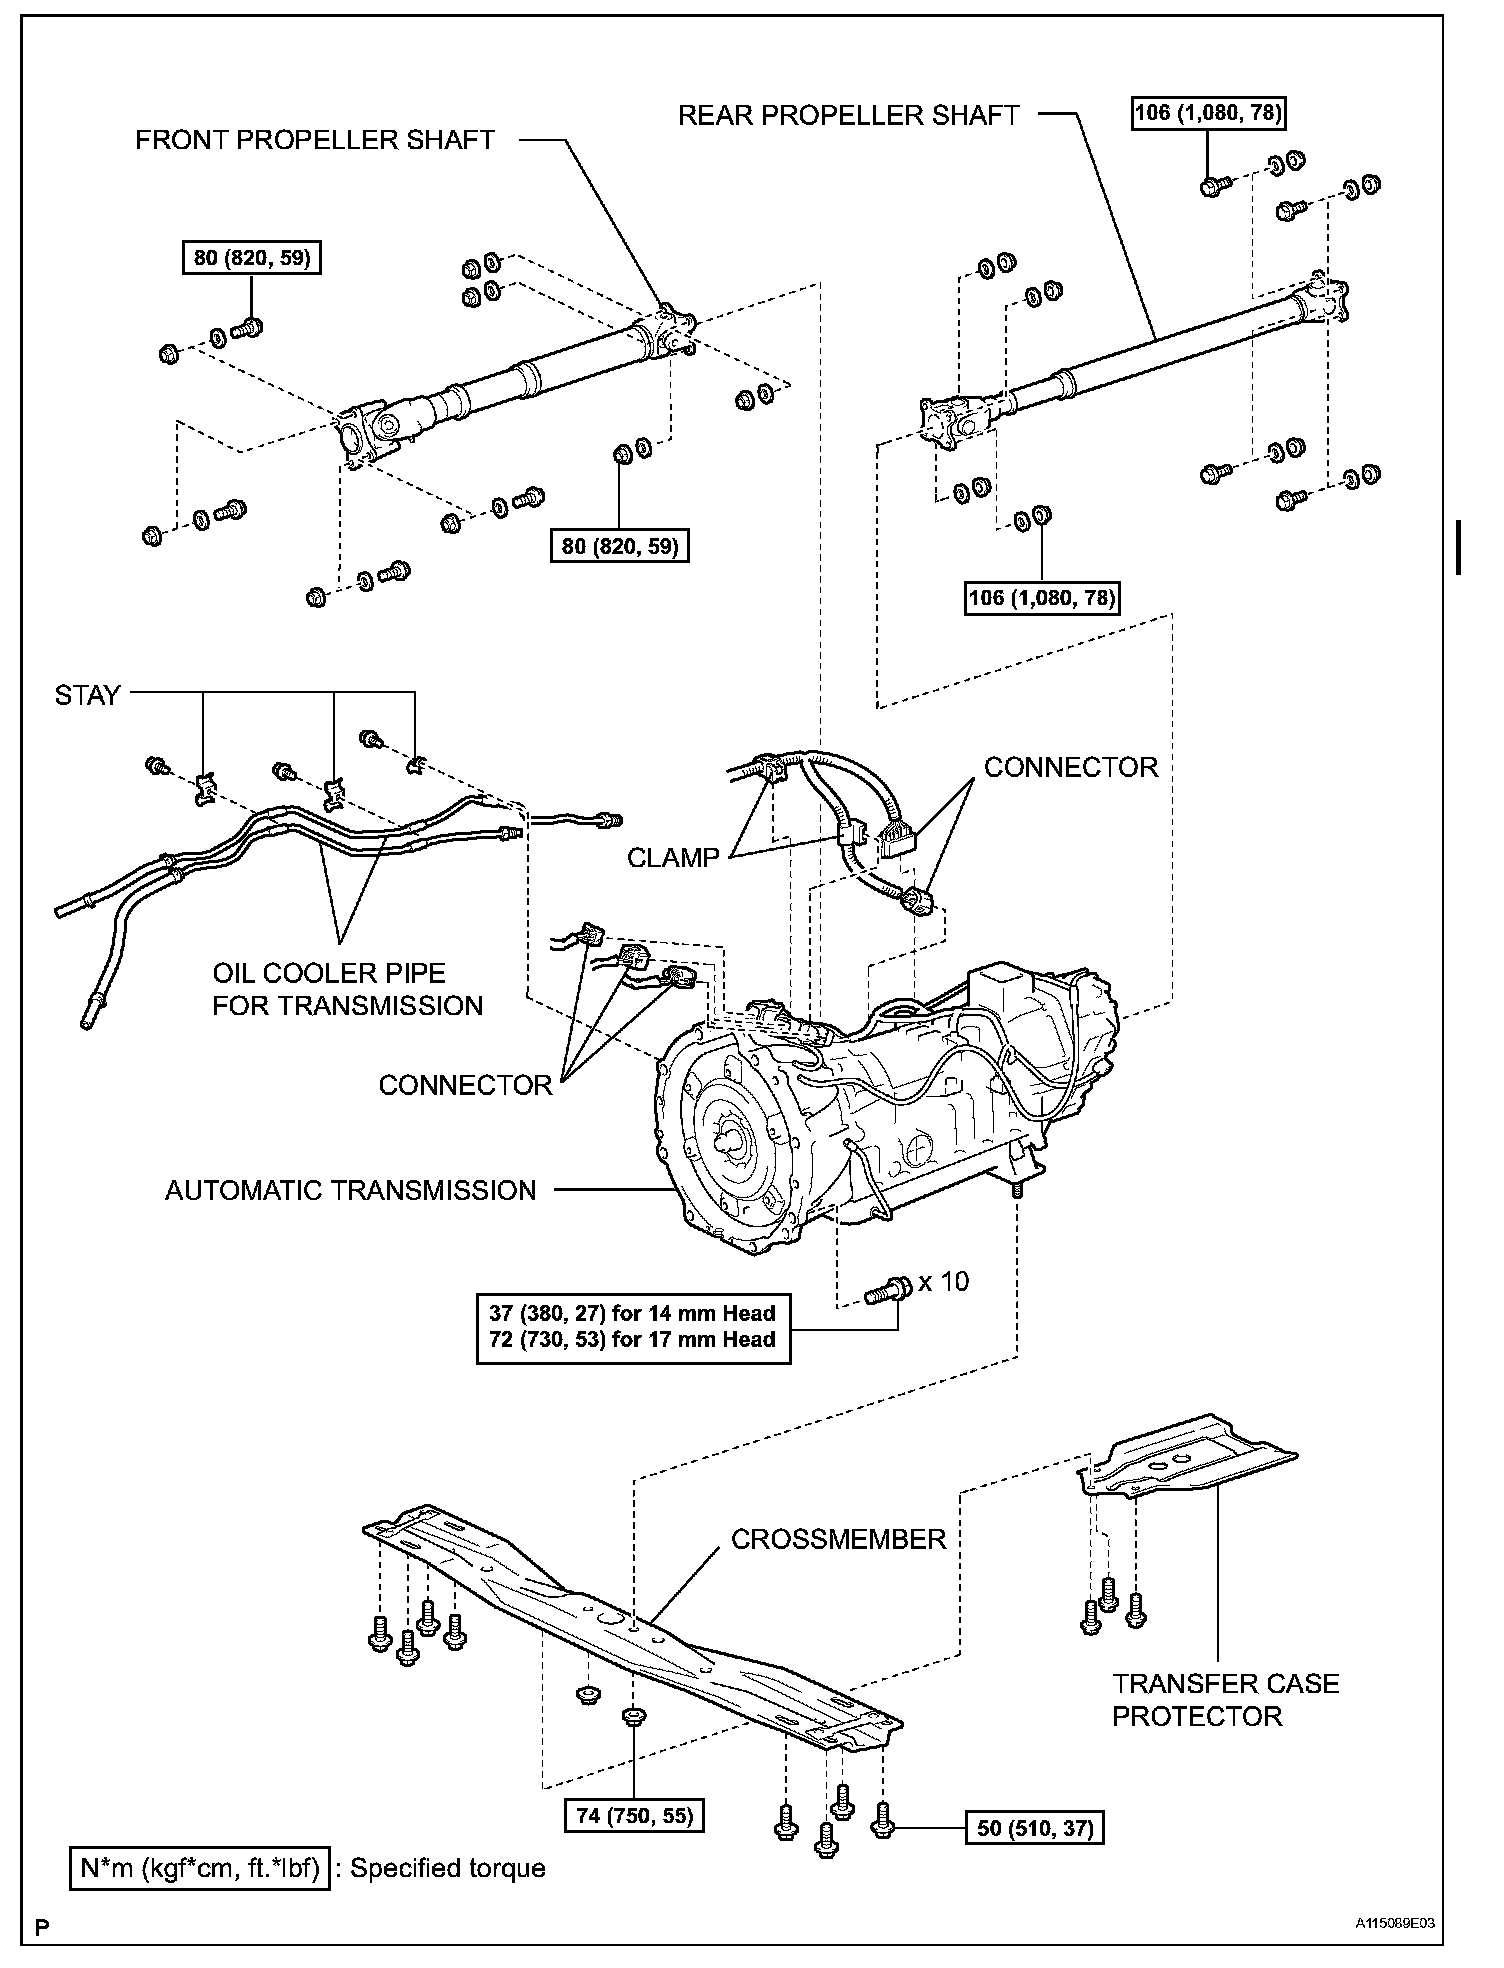
27. REMOVE REAR PROPELLER SHAFT
28. REMOVE FRONT PROPELLER SHAFT
29. REMOVE ENGINE AND TRANSMISSION
a. Attach the engine chain hoist to the engine hangers.
b. Remove the 2 nuts and 4 bolts holding the engine mounting brackets to the frame brackets.
c. Remove the 3 bolts and transfer case protector.
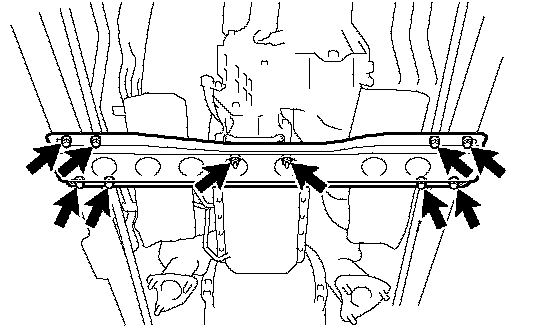
d. Remove the 8 bolts, 2 nuts and frame crossmember.

e. Lift the engine out from the vehicle slowly and carefully.
HINT: Make sure the engine is clear of all wiring, hoses and cables.
f. Place the engine and transmission assembly onto a stand.
30. DISCONNECT ENGINE WIRE FROM TRANSMISSION
a. Disconnect the 5 connectors.
b. Disconnect the 2 wire clamps.
31. REMOVE OIL COOLER PIPE FOR TRANSMISSION
a. Remove the 3 bolts and 3 stays.
b. Loosen the 2 union nuts and remove the 2 oil cooler pipes.
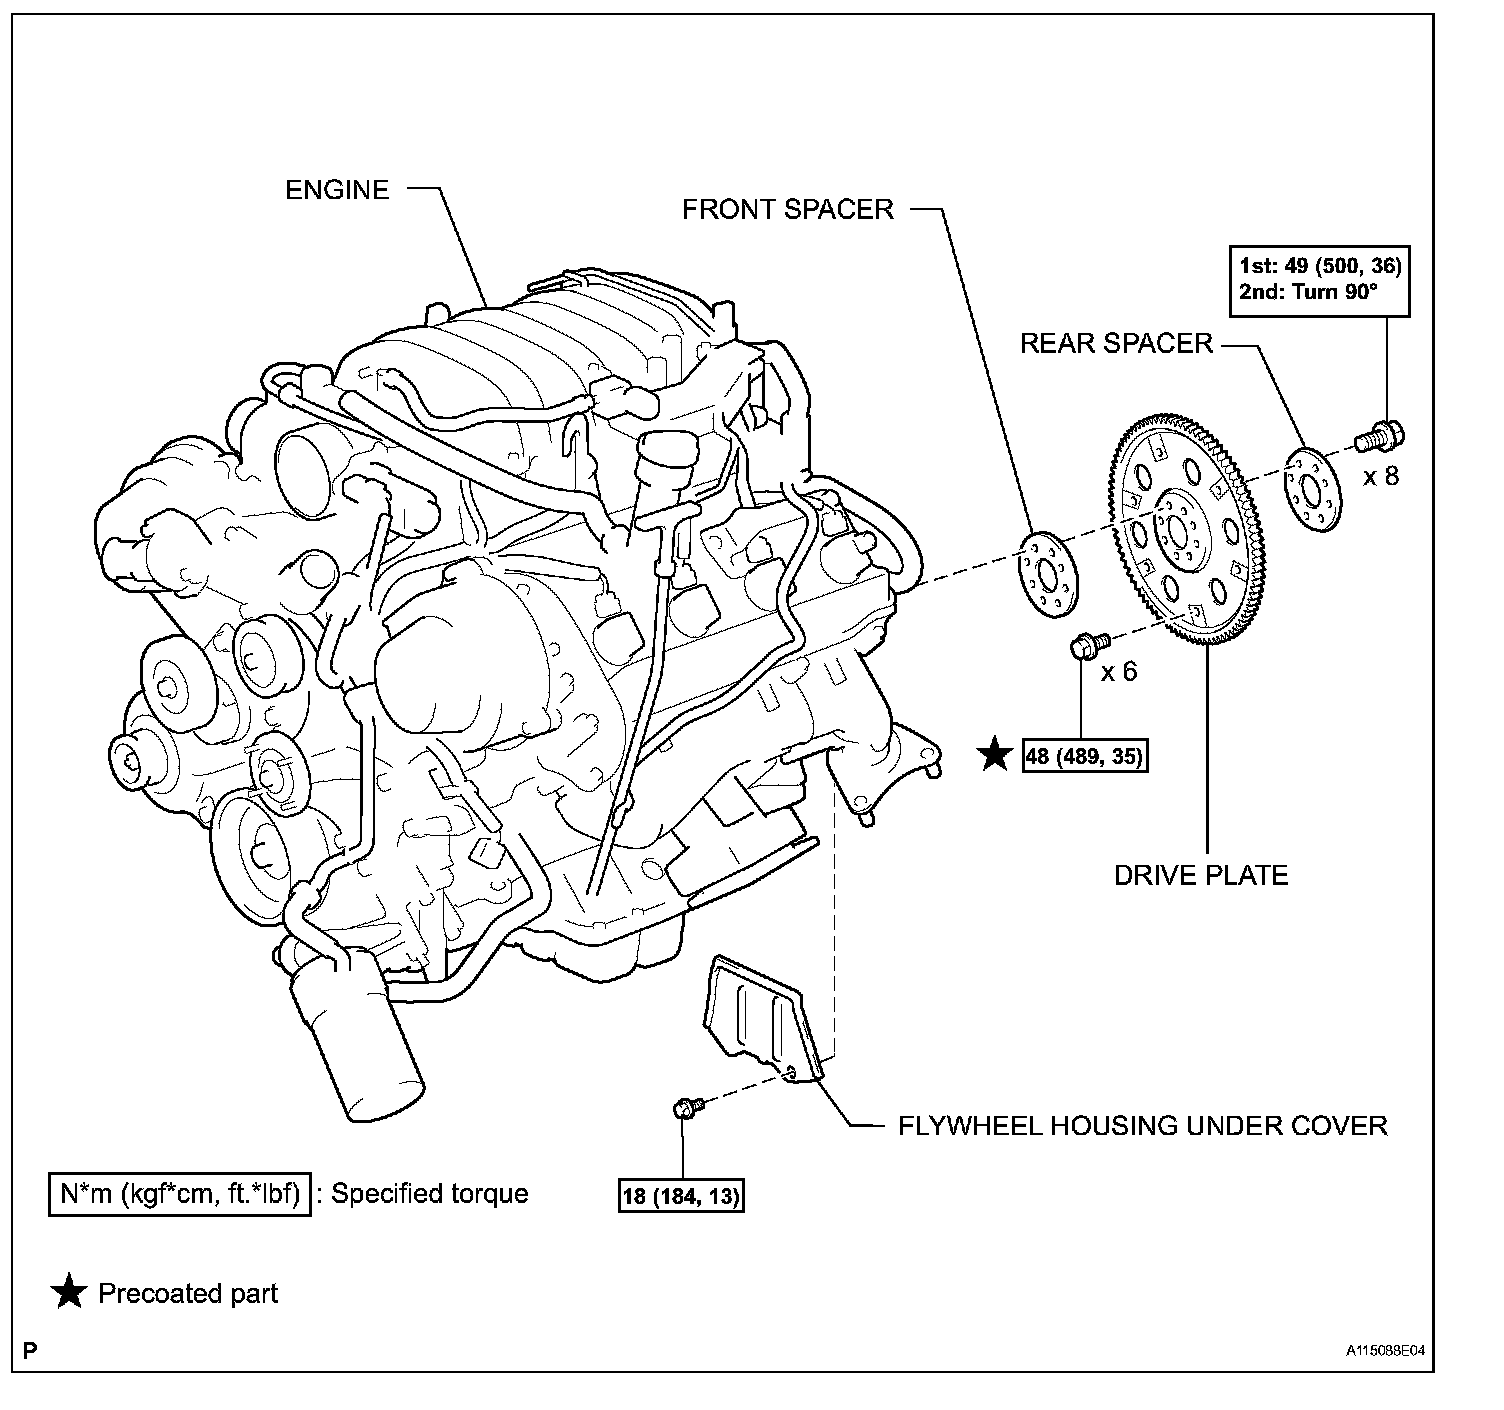
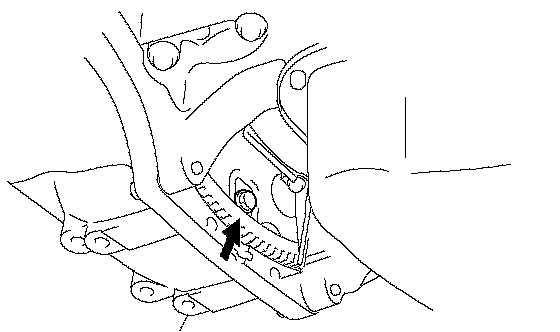
32. REMOVE FLYWHEEL HOUSING UNDER COVER
a. Remove the bolt and under cover.
33. REMOVE AUTOMATIC TRANSMISSION ASSEMBLY
a. Turn the crankshaft to gain access to each bolt.
b. Hold the crankshaft pulley nut with a wrench and remove the 6 bolts.
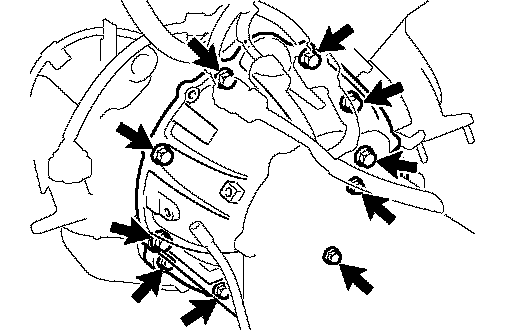
c. Remove the 10 bolts.
d. Remove the transmission together with the torque converter clutch from the engine.
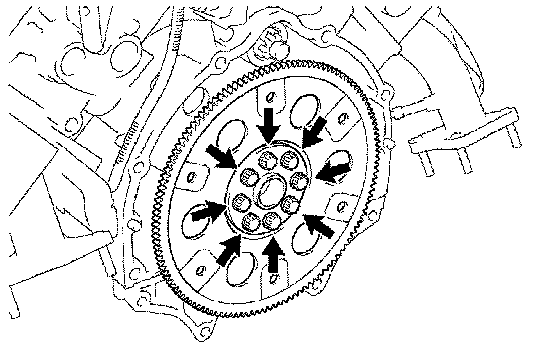
34. REMOVE DRIVE PLATE SUB-ASSEMBLY
a. Hold the crankshaft pulley bolt with a wrench, and remove the 8 bolts, front spacer, drive plate and rear spacer.
35. INSTALL ENGINE TO ENGINE STAND
a. Place the engine assembly onto the stand.
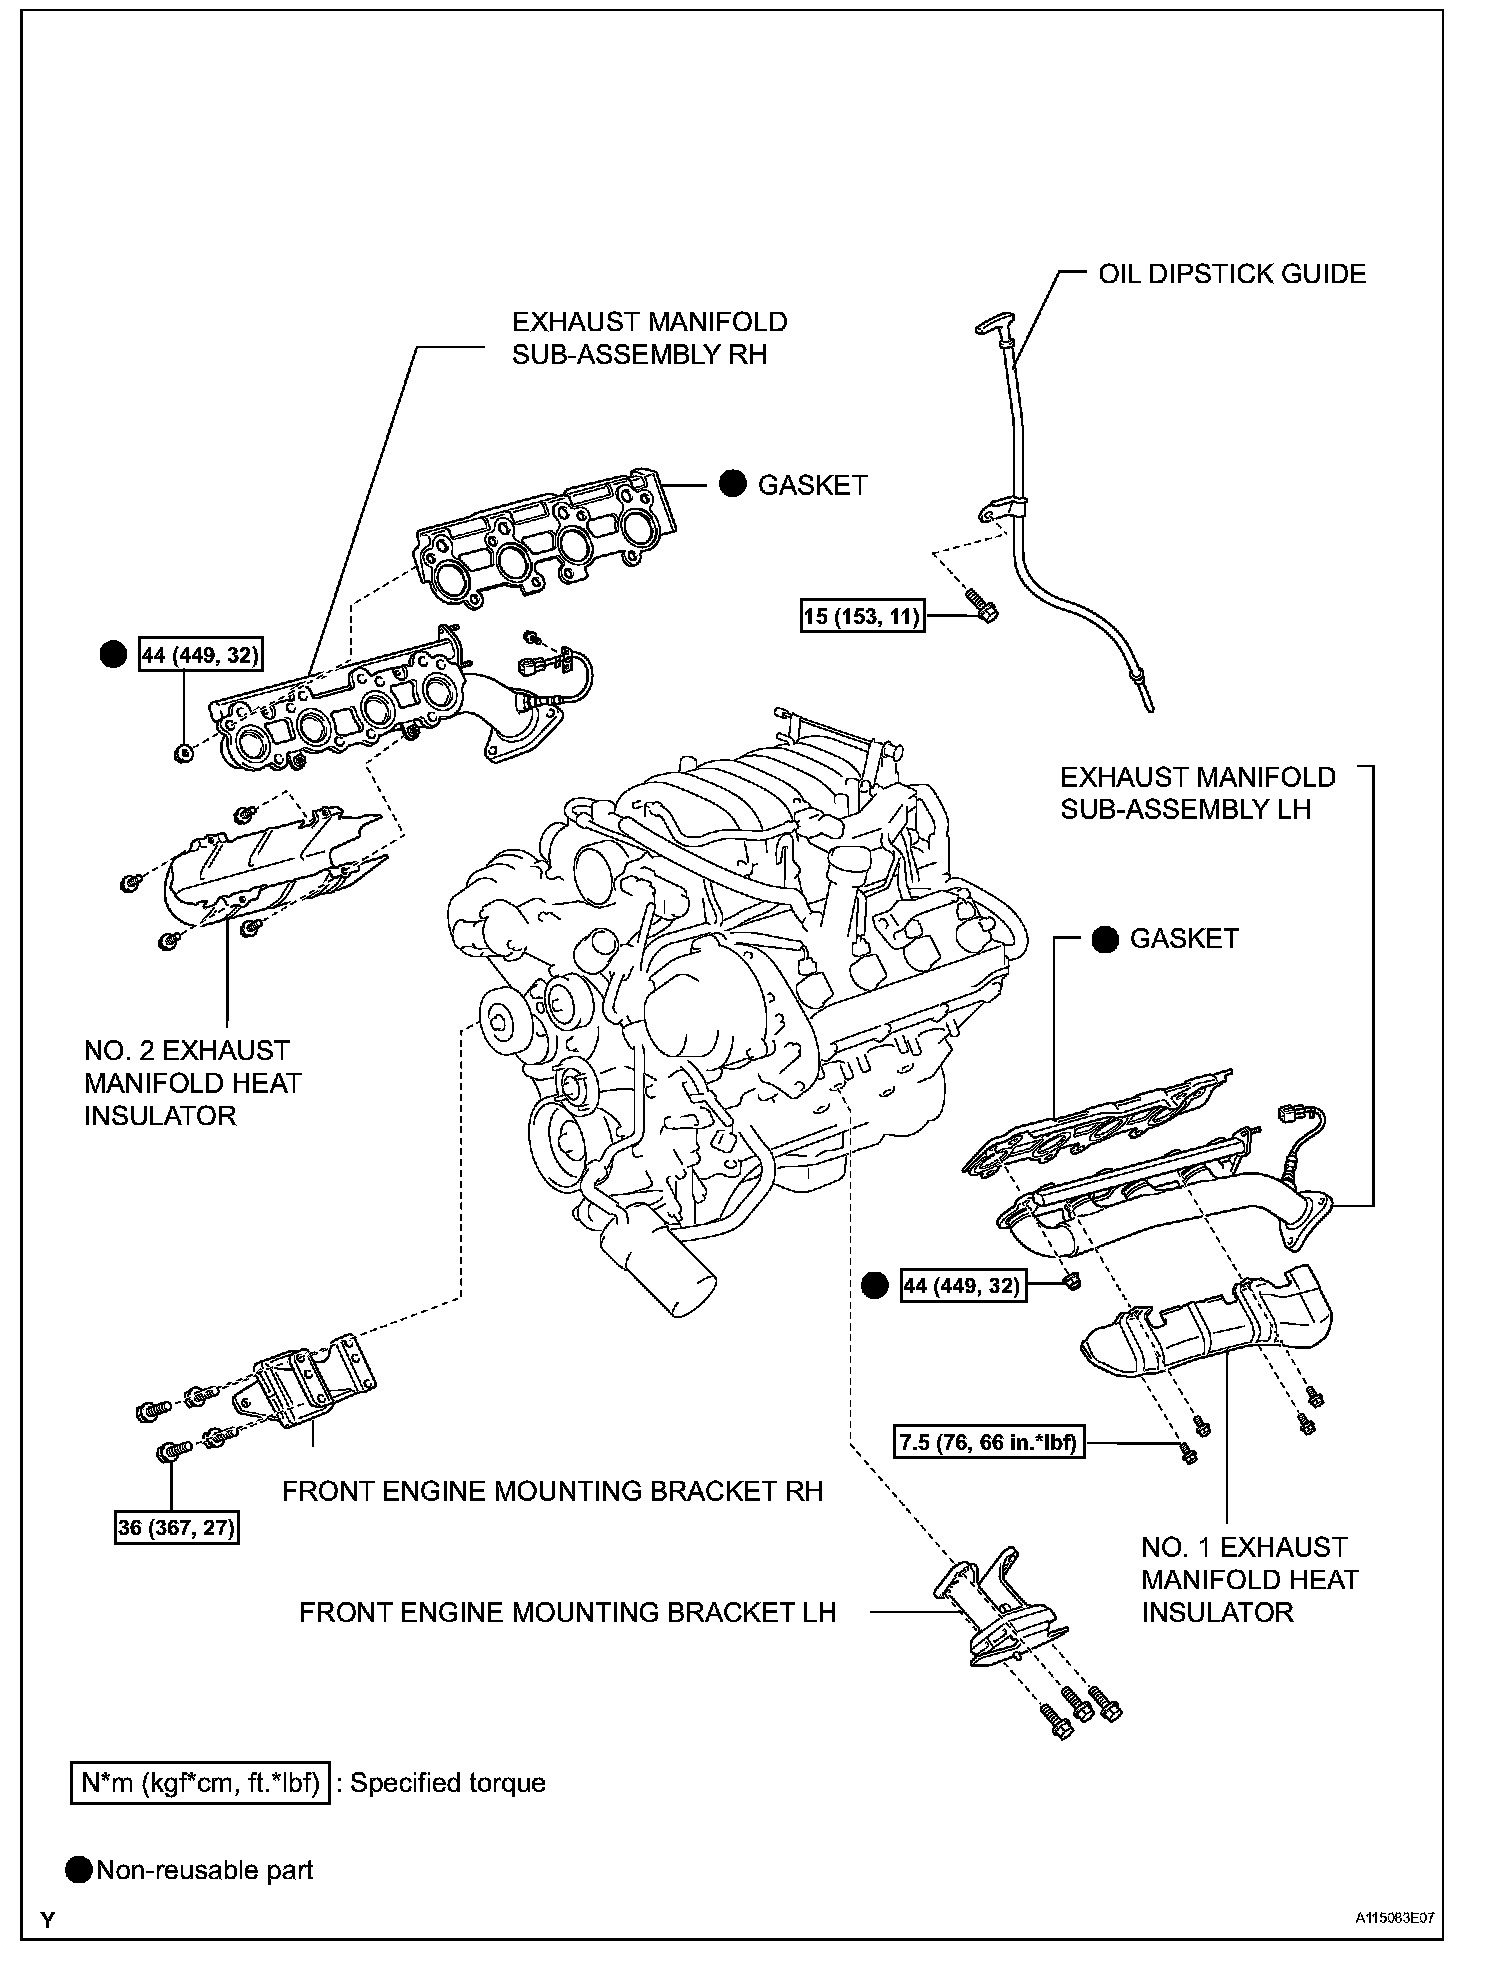
36. REMOVE OIL DIPSTICK GUIDE
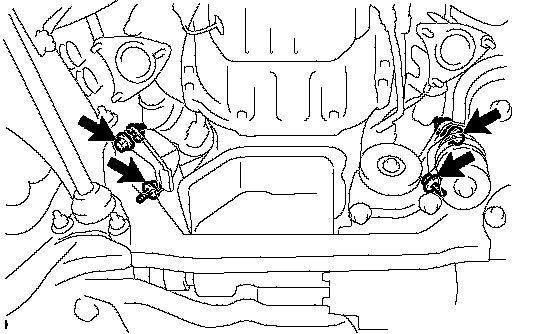
37. REMOVE FRONT ENGINE MOUNTING BRACKET RH
a. Remove the 4 bolts and mounting bracket together with the mounting insulator.
38. REMOVE FRONT ENGINE MOUNTING BRACKET LH
a. Remove the 4 bolts and mounting bracket together with the mounting insulator.
39. REMOVE GENERATOR ASSEMBLY
40. REMOVE AIR SWITCHING VALVE ASSEMBLY
41. REMOVE NO. 1 EXHAUST MANIFOLD HEAT INSULATOR
42. REMOVE EXHAUST MANIFOLD SUB-ASSEMBLY RH
43. REMOVE NO. 2 EXHAUST MANIFOLD HEAT INSULATOR
44. REMOVE EXHAUST MANIFOLD SUB-ASSEMBLY LH
45. REMOVE INTAKE MANIFOLD ASSEMBLY
46. REMOVE AIR PUMP ASSEMBLY
47. REMOVE NO. 1 ENGINE HANGER
48. REMOVE NO. 2 ENGINE HANGER
49. REMOVE OIL COOLER PIPE
50. REMOVE WATER INLET HOUSING
51. REMOVE FRONT WATER BY-PASS JOINT
52. REMOVE REAR WATER BY-PASS JOINT
53. REMOVE WATER BY-PASS PIPE SUB-ASSEMBLY
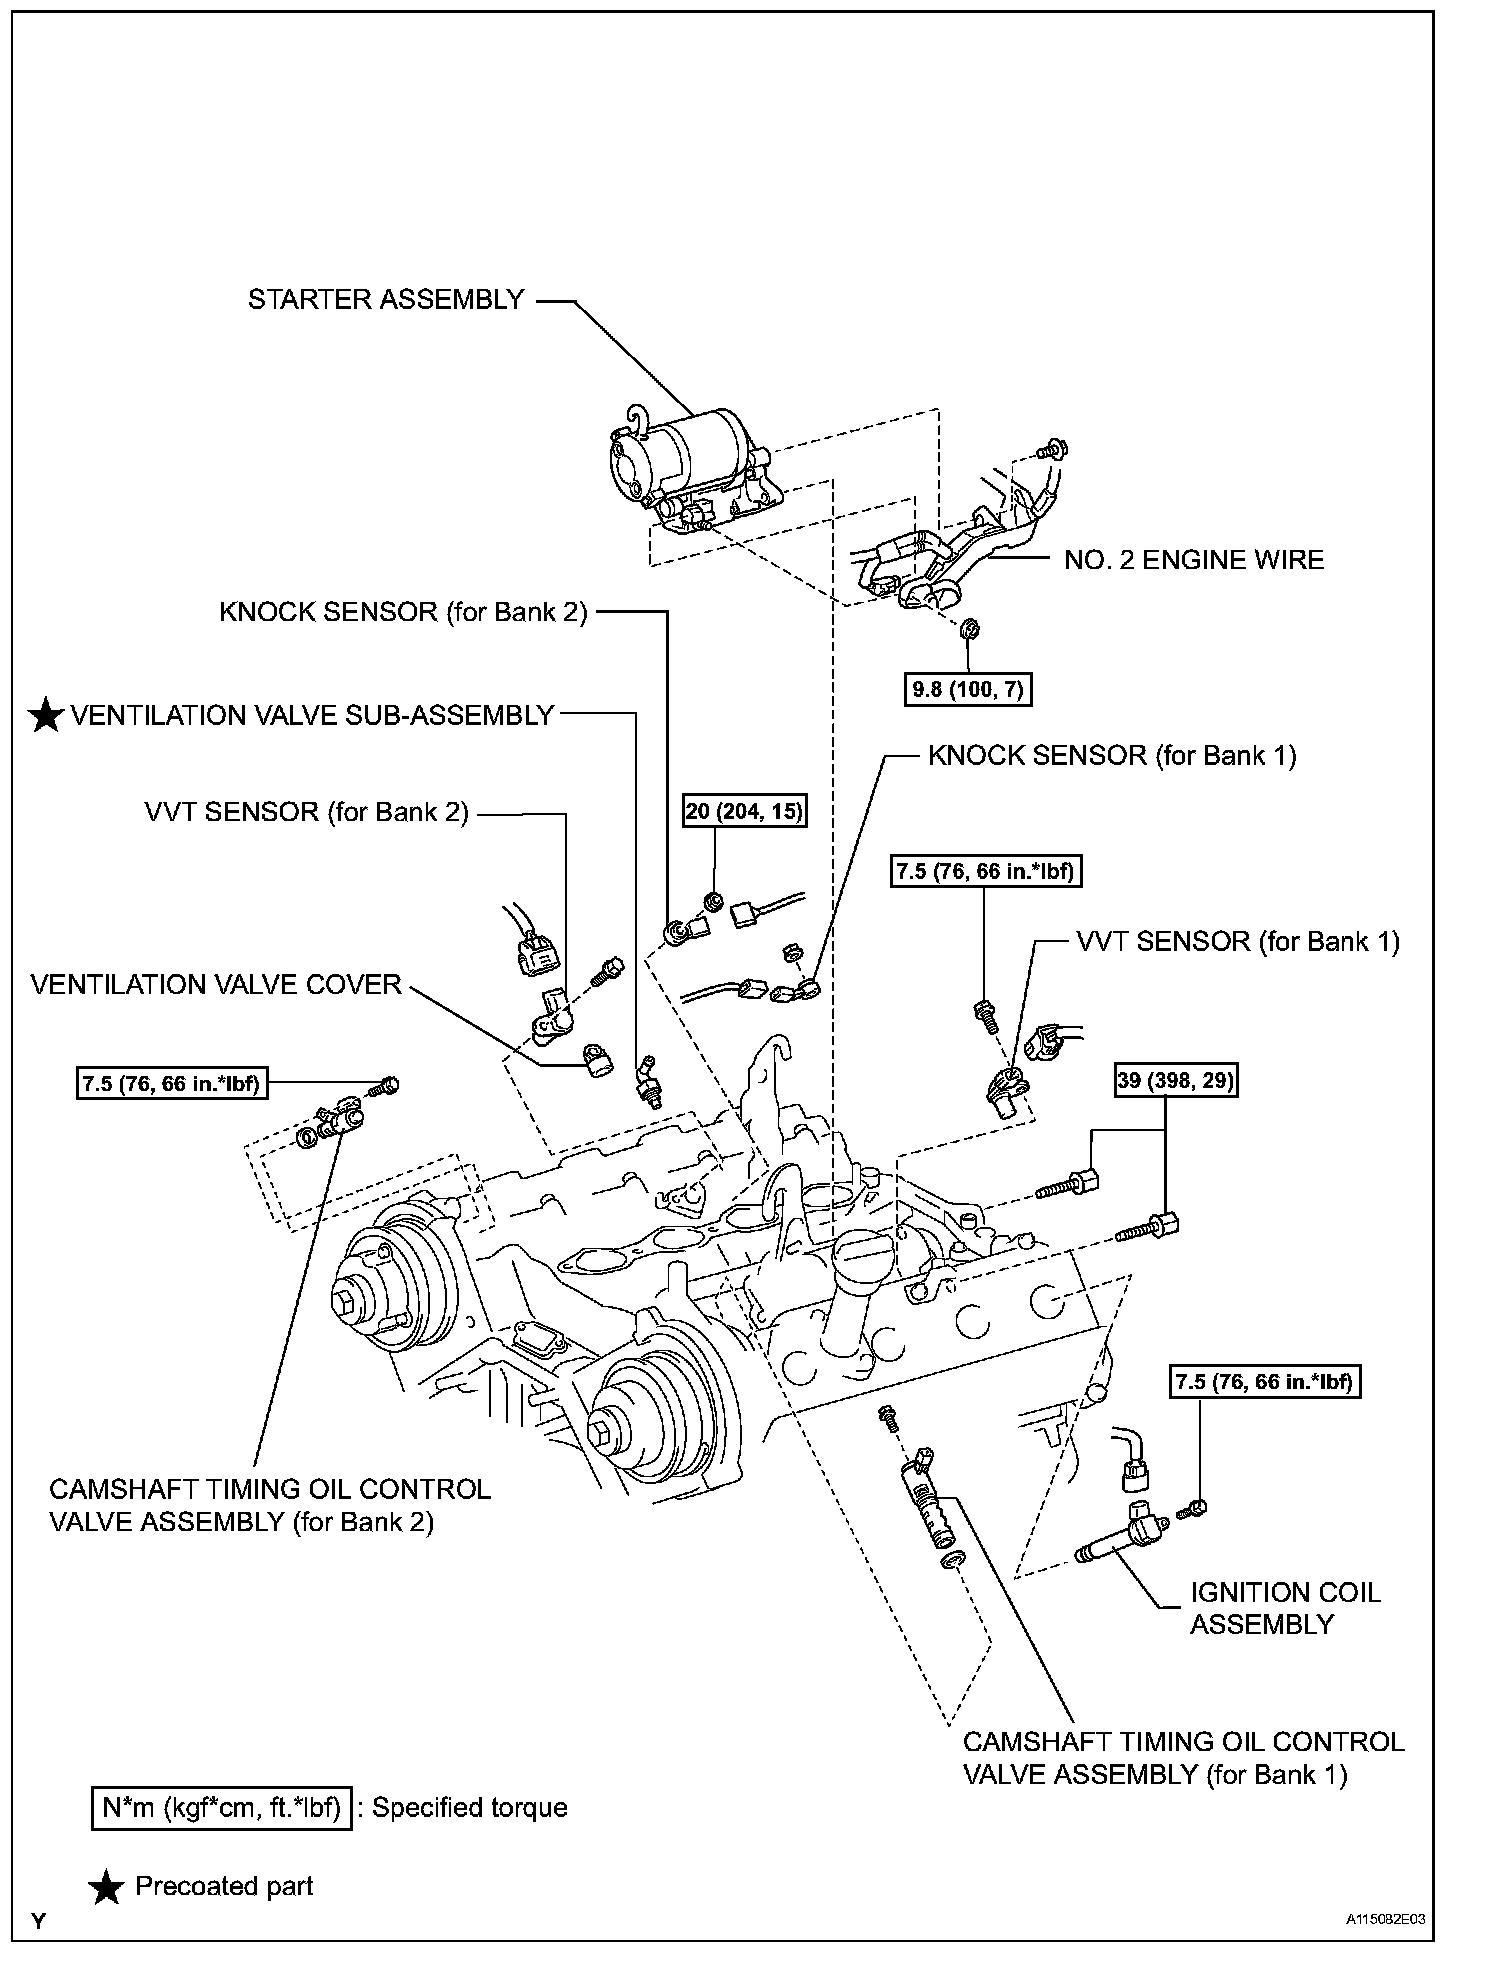
54. REMOVE STARTER ASSEMBLY
55. REMOVE CAMSHAFT TIMING OIL CONTROL VALVE ASSEMBLY (for Bank 1)
56. REMOVE CAMSHAFT TIMING OIL CONTROL VALVE ASSEMBLY (for Bank 2)
57. REMOVE VVT SENSOR (for Bank 1)
58. REMOVE VVT SENSOR (for Bank 2)
59. REMOVE CRANKSHAFT POSITION SENSOR
60. REMOVE KNOCK SENSOR
61. REMOVE IGNITION COIL
62. REMOVE OIL PRESSURE SWITCH
63. REMOVE OIL FILTER BRACKET SUB-ASSEMBLY