PROPELLER SHAFT ON-VEHICLE INSPECTION
id031500800200
Propeller Shaft Visual Inspection
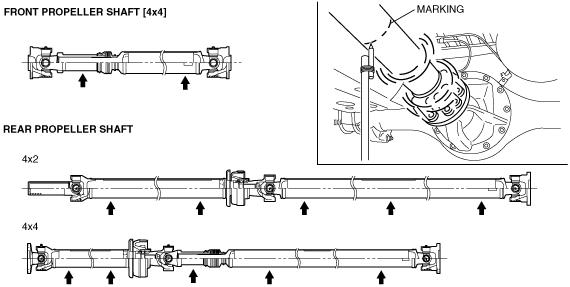
Propeller shaft universal joint
1. Lift the vehicle, rotate the propeller shaft by hand and inspect the following points:
-
• Operation stick
• Burning or seizure of the universal joint
• Universal joint movement (is it smooth?)
• Universal joint sticking
-
Propeller Shaft and Bearings
1. Rotate the propeller shaft by hand.
-
Propeller Shaft Vibration and Balance Inspection
-
Warning
-
• Always wear a helmet and protective glasses while performing the inspection.
• Be careful not to touch the propeller shaft while it is rotating and only come near it if necessary. Otherwise, it could result in injury.
• Be careful not to touch or come near a brake disc or brake drum while it is rotating. Otherwise it could result in injury.
• When applying marks, be careful not to touch the propeller shaft with your hands. Use an appropriate rod with the marker to establish a distance between your hands and the propeller shaft.
-
Caution
-
• To prevent overheating, do not run the vehicle engine for long periods while the vehicle is on the lift.
• When inspecting the locations of installed hose clamps, inspect by placing marks that are offset from the hose clamp installation positions, not at the hose clamp positions.
• When inspecting vehicles with ABS, rotating only the rear wheels will cause the ABS HU/CM to determine an ABS malfunction and illuminate the warning light. Therefore, after completing the inspection perform the following procedure.
-
― Lower the vehicle to the ground and drive the vehicle at 10 km/h {6.2 mph} or more to verify that the warning light turns off. In addition, because a DTC will have been recorded in the memory, erase it by following the DTC erasing procedure. (See:
ON-BOARD DIAGNOSIS.)
1. Lift up the vehicle.
2. Remove the front tires. (4x4) (See GENERAL PROCEDURES (FRONT AND REAR AXLES).)
3. Install the wheel nuts and appropriate washers to hold the disc plate securely.(4x4)
4. Remove the rear tires. (See GENERAL PROCEDURES (FRONT AND REAR AXLES).)
5. Install the wheel nuts and appropriate washers to hold the brake drum securely.
6. Put the vehicle in gear and run the engine at idle.
7. Lightly touch the locations shown in the figure with a marker to mark the propeller shaft.
-
-
Note
-
• Gaps in the marked areas can be considered locations were vibration or shaking is occurring.
-
Caution
-
• If abnormal vibration occurs during acceleration, remove your foot from the accelerator pedal immediately. Also, until the propeller shaft is balanced, do not drive at a speed higher than the speed in which the abnormal vibration occurs.
8. Put the vehicle in gear, gradually accelerate from idling, and accelerate to 140 km/h {87.0 mph}.
9. Record the speed at which vibration or shaking occurs.
10. Drive at the recorded speed in which the vibration occurred.
11. Mark the propeller shaft lightly in the same way as Step 7.
-
Note
-
• Gaps in the marked areas can be considered locations were vibration or shaking is occurring.
12. Perform balance adjusting in the locations where vibration or shaking occurs. (See Propeller Shaft Balance Adjustment.)
Propeller Shaft Balance Adjustment
-
Warning
-
• Always wear a helmet and protective glasses while performing the inspection.
• Be careful not to touch the propeller shaft while it is rotating and only come near it if necessary. Otherwise, it could result in injury.
• Be careful not to touch or come near a brake disc or brake drum while it is rotating. Otherwise it could result in injury.
• When applying marks, be careful not to touch the propeller shaft with your hands. Use an appropriate rod with the marker to establish a distance between your hands and the propeller shaft.
-
Caution
-
• To prevent overheating, do not run the vehicle engine for long periods while the vehicle is on the lift.
• When inspecting the locations of installed hose clamps, inspect by placing marks that are offset from the hose clamp installation positions, not at the hose clamp positions.
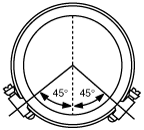
1. To balance a propeller shaft, install 2 screw-type hose clamps opposed 90 degrees to each other at the locations where gaps appears in the markings.
2. Put the vehicle in gear and drive the vehicle while not depressing the accelerator (engine idling).
-
• If there is vibration or shaking, rotate the clamps together with each other until the propeller shaft is balanced.
3. Drive at the recorded vehicle speed in which the vibration occurred.
-
• If there is vibration or shaking, rotate the clamps together with each other until the propeller shaft is balanced.
4. Inspect the propeller shaft for any vibration, and whether it is balanced. (See Propeller Shaft Vibration and Balance Inspection)