|
absggw00002368
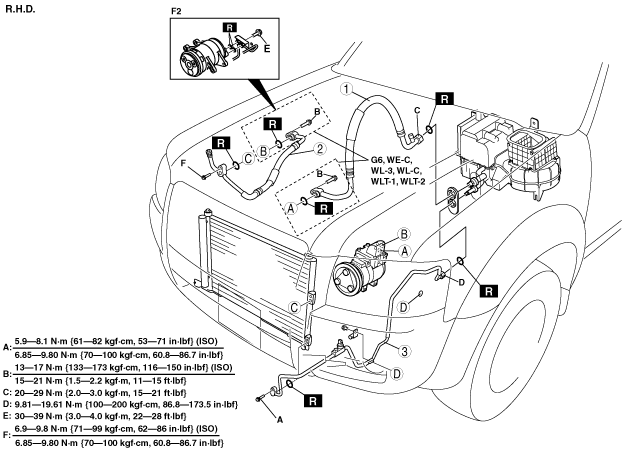
REFRIGERANT LINE REMOVAL/INSTALLATION
id071100801100
1. Disconnect the negative battery cable.
2. Discharge the refrigerant from the system. (See REFRIGERANT RECOVERY.) (See REFRIGERANT CHARGING.)
3. Remove the radiator grille. (See RADIATOR GRILLE REMOVAL/INSTALLATION.)
4. Remove the front bumper. (See FRONT BUMPER REMOVAL/INSTALLATION.)
5. Remove the radiator. (WLT-1, WLT-2 only)
6. Remove in the order indicated in the table. Do not allow compressor oil to spill.
absggw00002368
|
|
1
|
Cooler pipe (LO)
|
|
2
|
Cooler hose (LO)
(See Cooler Hose Removal Note.)
|
|
3
|
Cooler pipe (HI)
|
|
4
|
Cooler hose (HI)
(See Cooler Hose Removal Note.)
|
absggw00002369
|
|
1
|
Cooler hose (LO)
(See Cooler Hose Removal Note.)
|
|
2
|
Cooler hose (HI)
(See Cooler Hose Removal Note.)
|
|
3
|
Cooler pipe
|
7. Install in the reverse order of removal.
8. Perform the refrigerant system performance test. (See REFRIGERANT SYSTEM PERFORMANCE TEST.)
Cooler Hose Removal Note
WLT-1, WLT-2 only
Refrigerant Line Removal Note
Refrigerant Line Installation Note
1. When installing a new cooler pipe or hose, add FD46XG (G6, WE-C, WL-C, WLT-1, WLT-2) or ZXL 100PG (F2) compressor oil into the refrigeration cycle.
2. Apply compressor oil to the O-rings and connect the joints.
3. Tighten the joints.