 |
absggw00002370
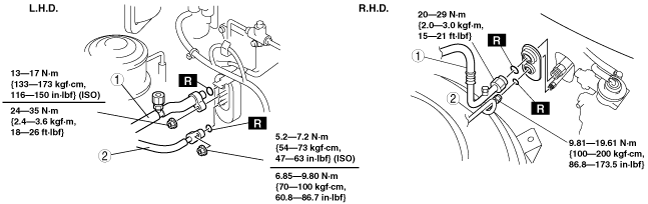
COOLING UNIT REMOVAL/INSTALLATION
id071100803800
1. Disconnect the negative battery cable.
2. Discharge the refrigerant from the system. (See REFRIGERANT CHARGING.)
3. Remove the glove compartment. (See GLOVE COMPARTMENT REMOVAL/INSTALLATION.)
4. Disconnect the air intake wire from the blower unit. (See CLIMATE CONTROL UNIT WIRE ADJUSTMENT.)
5. Remove in the order indicated in the table. Do not allow compressor oil to spill.
absggw00002370
|
absggw00001148
|
|
1
|
Cooler hose (LO)
|
|
2
|
Cooler pipe
|
|
3
|
Cooling unit
|
6. Install in the reverse order of removal.
7. Perform the refrigerant system performance test. (See REFRIGERANT SYSTEM PERFORMANCE TEST.)
Cooling Unit Installation Note
1. When installing a new cooling unit (evaporator), add FD46XG (G6, WE-C, WL-C, WLT-1, WLT-2) or ZXL 100PG (F2) compressor oil into the refrigerant cycle.
